This post may contain affiliate links, which means I get a little off the top to help me keep this website running. It doesn't cost you extra or affect my opinion.
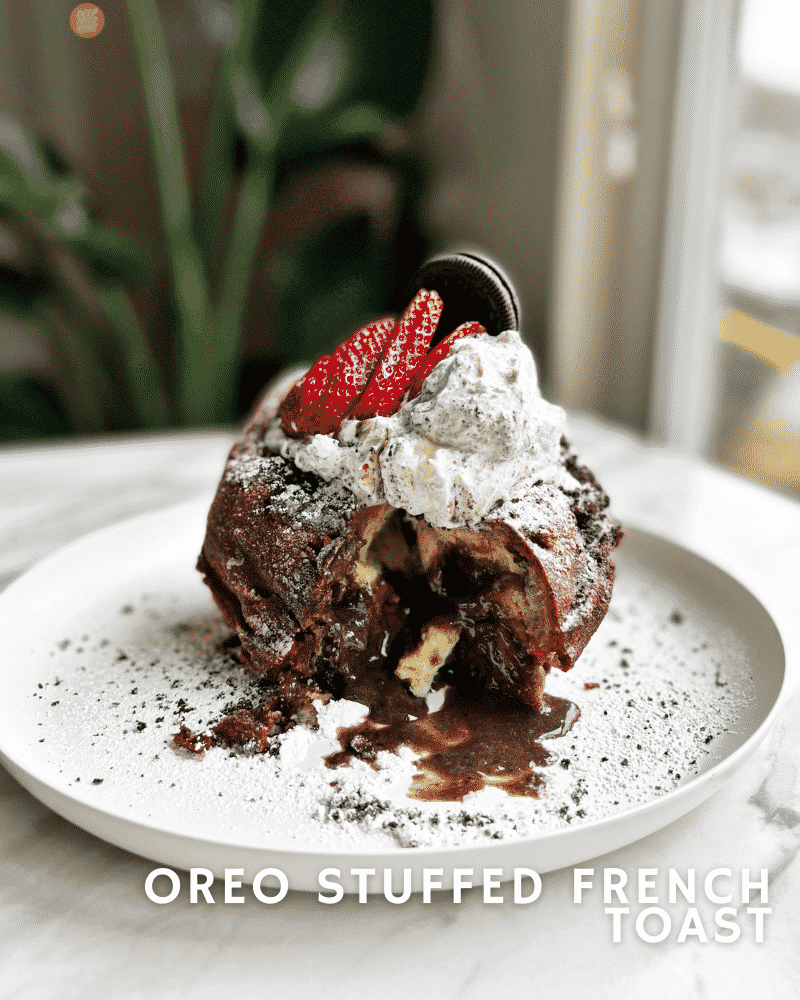
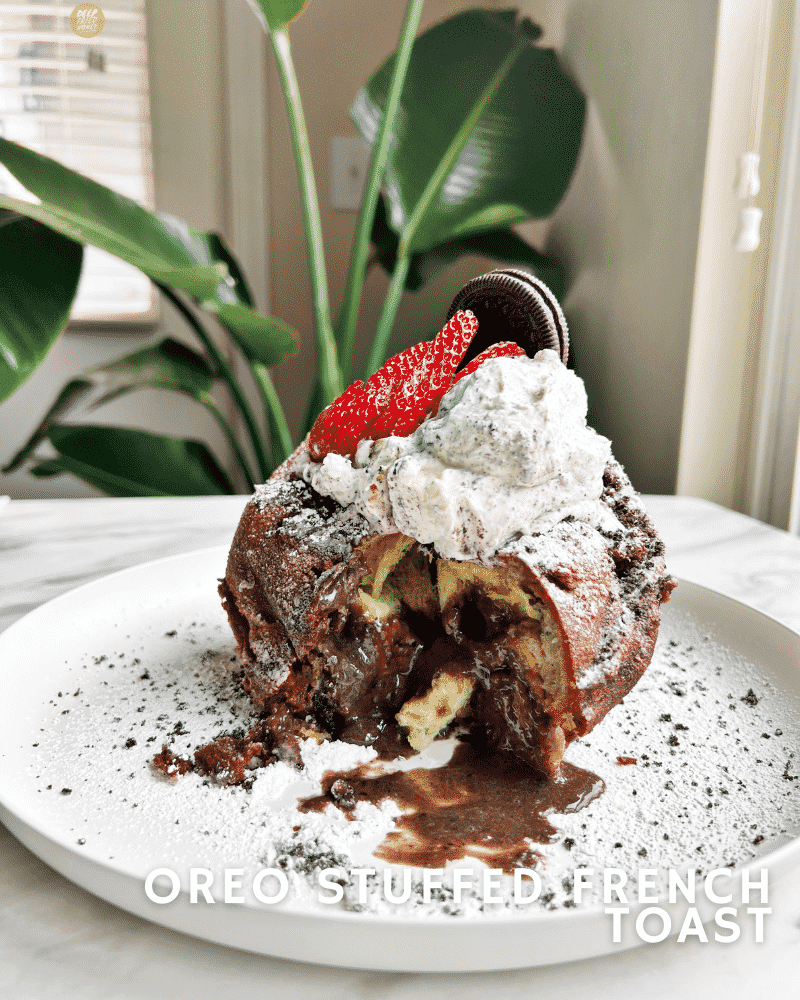
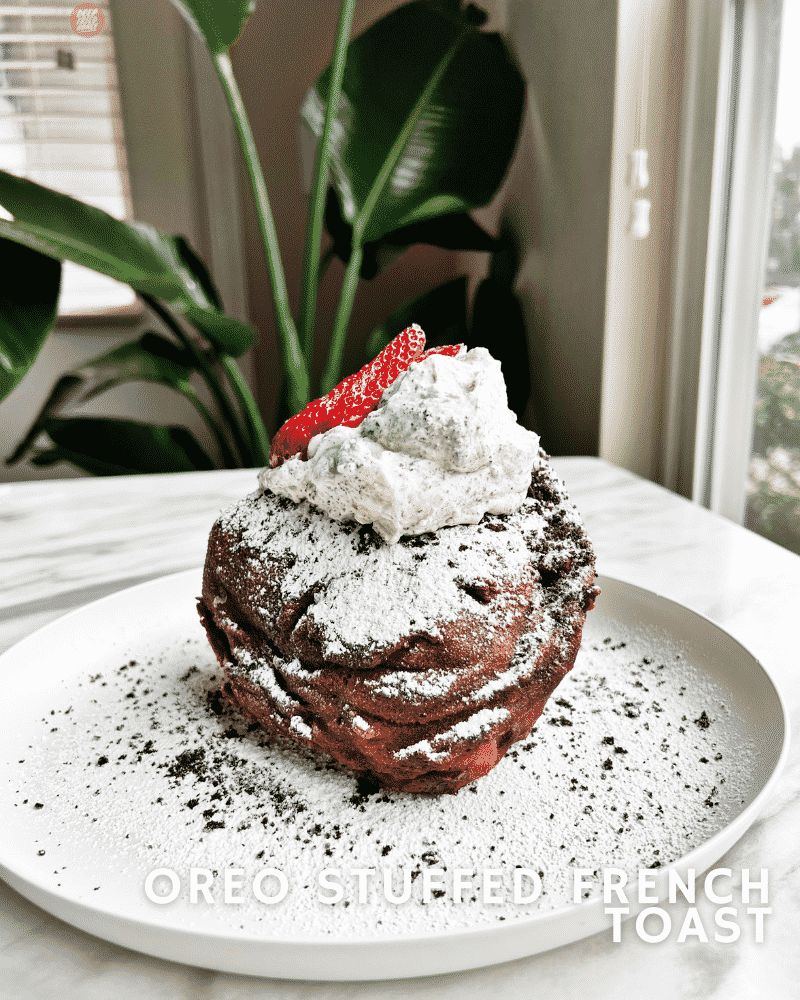
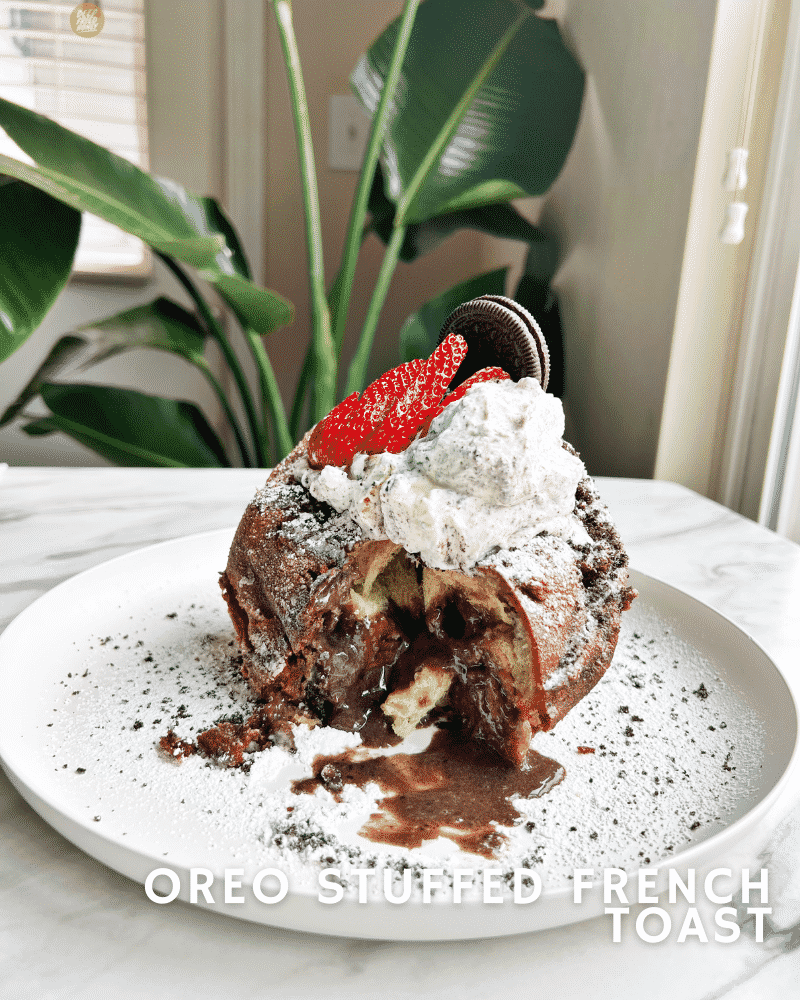
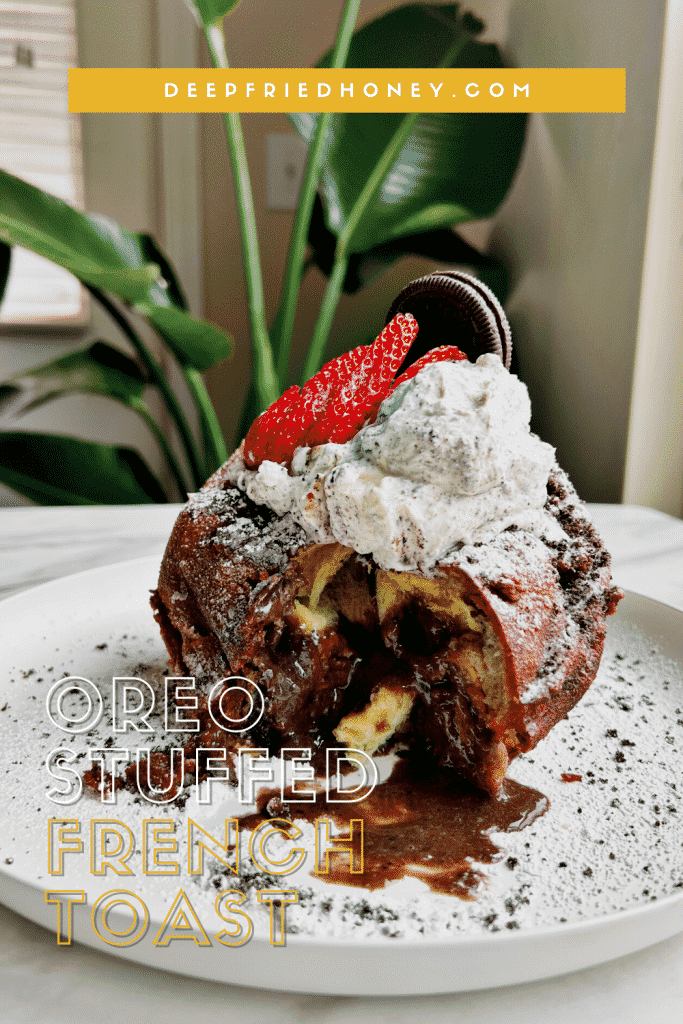
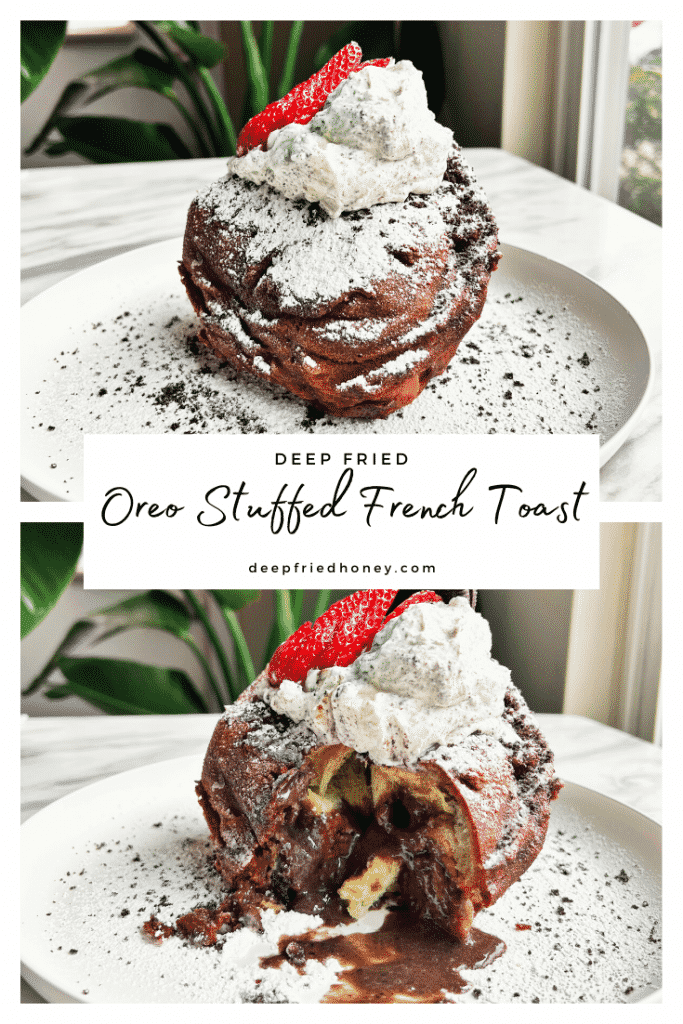
I’m back with yet another French Toast recipe. This Oreo Stuffed French Toast is comprised of thick slices of brioche that are stuffed with Oreo mascarpone cream, coated in an Oreo batter, and fried, then served with a generous helping of Oreo whipped cream.
It’s kind of a mashup of my Fried French Toast, Oreo Overload Cheesecake, and Strawberry Cheesecake Crunch French Toast recipes, and I have to credit my husband with the overall idea. Partially at least: I asked him what he’d like for breakfast and he said French Toast, and he’d like it stuffed, and that Oreos sounded yummy, and I took it from there.
Oreo Stuffed French Toast Ingredients
Feel free to jump to the full recipe, but here are useful notes about the ingredients you will need to make this Oreo Stuffed French Toast recipe:
Oreos: Key, obviously. Blitz them in the food processor or blender until they’re fine, even crumbs.You don’t need to remove the creme centers, just toss them in whole. You can reserve some for serving, if you like.
Heavy whipping cream: For the whipped cream, and the mascarpone filling.
Powdered sugar, granulated sugar: Powdered sugar to sweeten everything, and for serving. We add the granulated sugar to the batter to meld with and further break down the egg yolk.
Cornstarch: To stabilize the whipped cream, so it holds up better against the hot toast.
Vanilla extract: I don’t know about you but it’s not french toast without the warm, round notes of vanilla. It also highlights the cream filling’s flavor, which can tend to get overpowered by the cookie.
Mascarpone: Cream cheese will work, too. Flavor will be slightly different.
Brioche bread: You can really use any full loaf of bread you like, as long as it’s unsliced. You want to be able to slice it into thick – about 3″ or so – slices.
Self-rising flour: We use self rising to add lift to the batter, making it nice and light. It’ll be almost like a tempura coating.
Large egg yolks: Yolks only, so the French Toast doesn’t taste ‘eggy’ which is a common complaint. If you like your French Toast that way just keep the whites and use only two eggs.
Vegetable oil: For frying! Any frying oil will work.
How to Make Oreo Stuffed French Toast
Full instructions are included in the recipe below, but here is a basic overview of what you’ll need to do, along with some important tidbits to help you make the most of this Oreo Stuffed French Toast recipe:
Whip it up! Grab four mixing bowls – at least one of them should have tall sides. To the first bowl add all of the ingredients for the mascarpone filling. Use a hand mixer – or a whisk and elbow strength if you’ve got it like that – to beat the ingredients together, into a fluffy frosting-like consistency. Use a spatula to scrape the sides of the bowl and fold any excess ingredients into the filling. Set aside. In another mixing bowl add all of the ingredients for the whipped cream. Use an immersion blender – you can swap or clean the beaters for your hand mixer instead – to beat everything together until the cream is whipped and the Oreo crumbs are evenly dispersed. The cream should form stiff peaks that do not lean or sink when it’s ready. Cover and place the whipped cream in the refrigerator until ready to use.
Make the batter. In a third mixing bowl whisk together the flour and powdered sugar for the french toast batter, and in the final mixing bowl whisk together all of the wet ingredients: the milk, egg yolks, and vanilla extract. Make a well in the center of the dry ingredients and pour in the wet. Whisk together into a batter, somewhere between pancake and cake batter. Loosen with more milk if needed. Whisk the Oreo crumbs into the batter, and set it aside. Yes, we’re putting Oreo in every bit of this Oreo Stuffed French Toast.
Prepare the bread. Now, grab a paring knife. Use it to cut a slit into the top of each slice of brioche, right into the center. Wiggle the knife around to widen the slit into a full-on gap, being careful not the pierce through the sides or bottom. Do this to all the slices. Use a small spoon to carefully stuff the mascarpone filling into the opening you’ve made in the slices of bread. Press it down in there as you go, making sure the gap is full. Scrape the excess off the top. Repeat this with each piece of bread.
Heat the oil. Add about two inches of oil to a saute pan or saucepan and let it heat up over medium-high heat. Bring the oil to about 350°F – you can test it by dropping a small crumb or drop of custard into the center. If it sinks to the bottom then floats back up immediately, bubbling gently, it’s ready. If it sinks, it’s not. If it floats back up immediately and starts turning colors it’s too hot. We don’t want to burn the Oreo Stuffed French Toast.
Fry the toast. When the oil is ready, drop a slice of bread into the batter and turn it, coating it completely. Let excess liquid drip off into the bowl, then transfer it carefully to the oil. I recommend cooking only one or two pieces at a time so they don’t stick together. Cook on the first side for about 2 minutes, ’til golden brown, then flip and continue frying for another couple of minutes. Depending on how large or square the pieces are, you might need to turn them on the two other sides as well. Once it’s nicely and evenly brown all over remove it from the oil and let it drain on a wire rack.
Enjoy. Serve with a heaping dollop of the Oreo whipped cream, powdered sugar, and any leftover Oreo crumbs on top. You can add a compote or syrup if you like, just keep in mind that it’s very sweet all on its own.
“Traditional” Style Oreo Stuffed French Toast
When I was first brainstorming this recipe I didn’t intend to fry it, but to griddle it in butter like your regular french toast. I’m sure it would be just as delicious, only differently. Here’s how to adapt this recipe in that way:
Ingredients: Reduce the self-rising flour to one tablespoon. That’ll turn the batter into a regular custard with a much looser consistency. You can also use all-purpose flour, since you don’t need the lift if you’re not frying it. You will need to grab some butter for griddling the French Toast, and you’ll be using much less oil, obviously.
The method: Follow the recipe as written until step 8. At step 8, place a frying pan over medium heat and add about a teaspoon of oil and a tablespoon of butter. Swirl it around to coat the surface of the pan. Dip the slices of brioche in the custard. If you like your French Toast very soft and moist inside let the slices soak in the custard for about 30 seconds. Let the excess liquid drip back into the bowl and transfer the slices to the pan. Let cook for 2 minutes, then flip and continue cooking for another 2 minutes. Flip again, and reduce the heat to medium-low. Continue cooking the Oreo Stuffed French Toast, flipping occasionally until the surface of the toast is a bit firm if you press it with your finger, and is well browned on both sides. Pick back up with the recipe in step 10.
Grab four mixing bowls – at least one of them should have tall sides. To the first bowl add all of the ingredients for the mascarpone filling. Use a hand mixer – or a whisk and elbow strength if you’ve got it like that – to beat the ingredients together, into a fluffy frosting-like consistency. Use a spatula to scrape the sides of the bowl and fold any excess ingredients into the filling. Set aside.
In another mixing bowl add all of the ingredients for the whipped cream. Use an immersion blender – you can swap or clean the beaters for your hand mixer instead – to beat everything together until the cream is whipped and the Oreo crumbs are evenly dispersed. The cream should form stiff peaks that do not lean or sink when it’s ready. Cover and place the whipped cream in the refrigerator until ready to use.
In a third mixing bowlwhisk together the flour and powdered sugar for the french toast batter, and in the final mixing bowlwhisk together all of the wet ingredients: the milk, egg yolks, and vanilla extract.
Make a well in the center of the dry ingredients and pour in the wet. Whisk together into a batter, somewhere between pancake and cake batter. Loosen with more milk if needed.
Whisk the Oreo crumbs into the batter, and set it aside.
Now, grab a paring knife. Use it to cut a slit into the top of each slice of brioche, right into the center. Wiggle the knife around to widen the slit into a full-on gap, being careful not the pierce through the sides or bottom. Do this to all the slices.
Use a small spoon to carefully stuff the mascarpone filling into the opening you’ve made in the slices of bread. Press it down in there as you go, making sure the gap is full. Scrape the excess off the top. Repeat this with each piece of bread.
Add about two inches of oil to a saute pan or saucepan and let it heat up over medium-high heat. Bring the oil to about 350°F – you can test it by dropping a small crumb or drop of custard into the center. If it sinks to the bottom then floats back up immediately, bubbling gently, it’s ready. If it sinks, it’s not. If it floats back up immediately and starts turning colors it’s too hot.
When the oil is ready, drop a slice of bread into the batter and turn it, coating it completely. Let excess liquid drip off into the bowl, then transfer it carefully to the oil. I recommend cooking only one or two pieces at a time so they don’t stick together. Cook on the first side for about 2 minutes, ’til golden brown, then flip and continue frying for another couple of minutes. Depending on how large or square the pieces are, you might need to turn them on the two other sides as well. Once it’s nicely and evenly brown all over remove it from the oil and let it drain on a wire rack.
Serve with a heaping dollop of the Oreo whipped cream, powdered sugar, and any leftover Oreo crumbs on top. You can add a compote or syrup if you like, just keep in mind that it’s very sweet all on its own.
Notes
Don’t want to fry it? Check out the griddle instructions above the recipe.
This post may contain affiliate links, which means I get a little off the top to help me keep this website running. It doesn't cost you extra or affect my opinion.
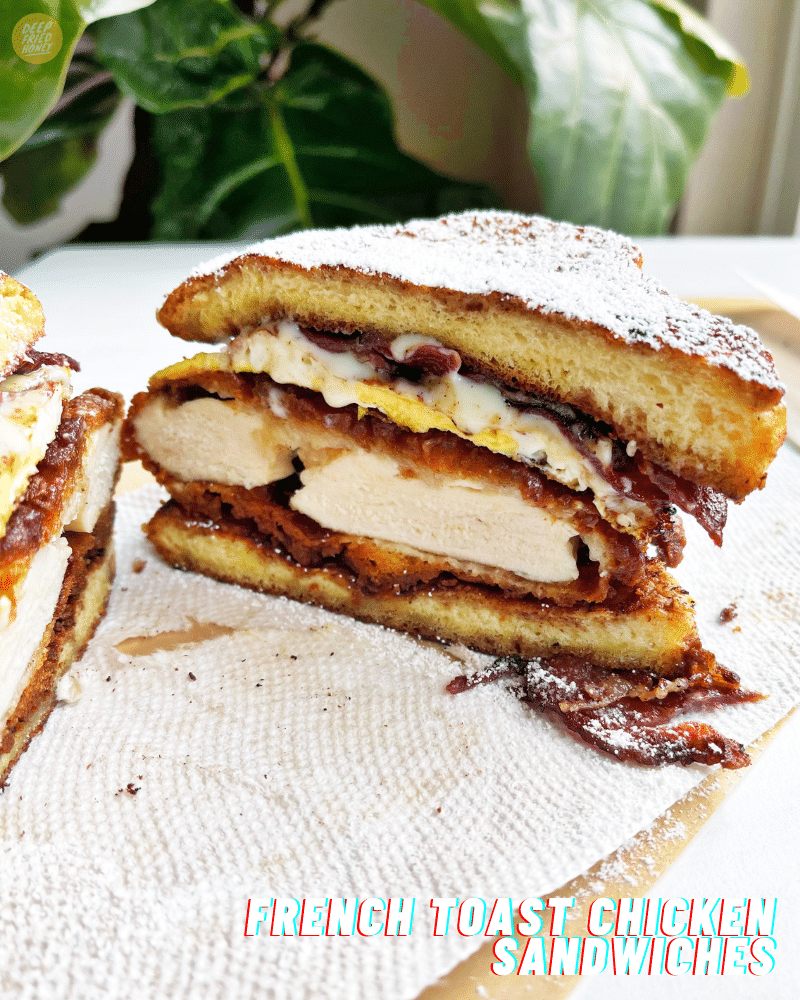
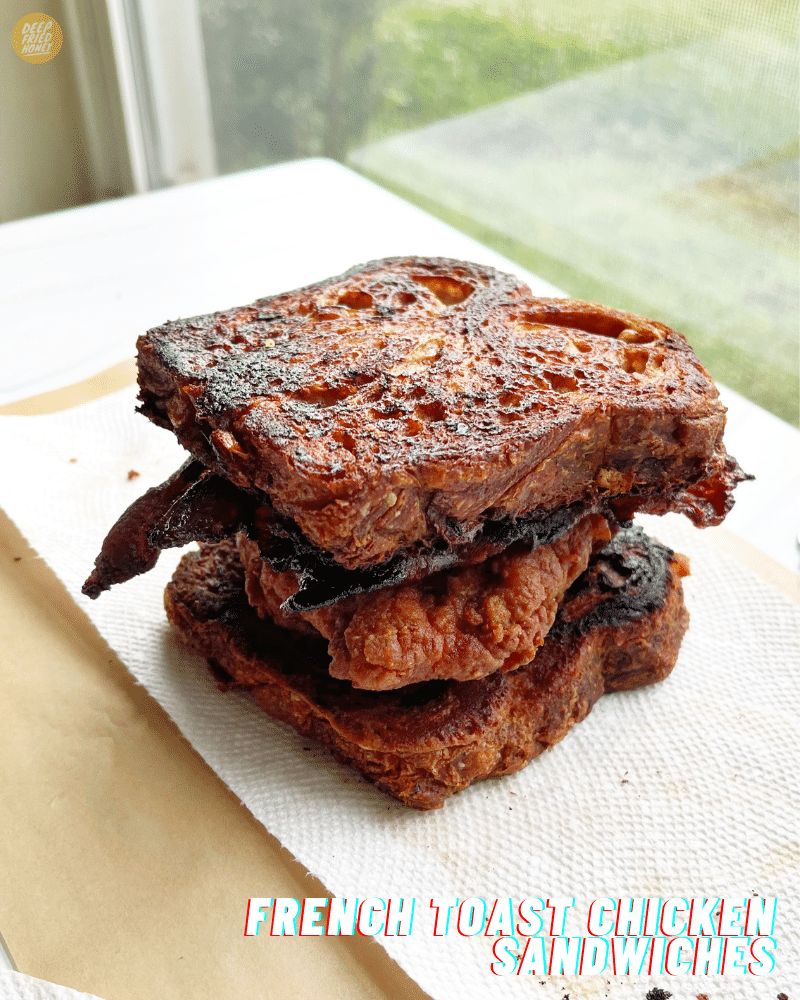
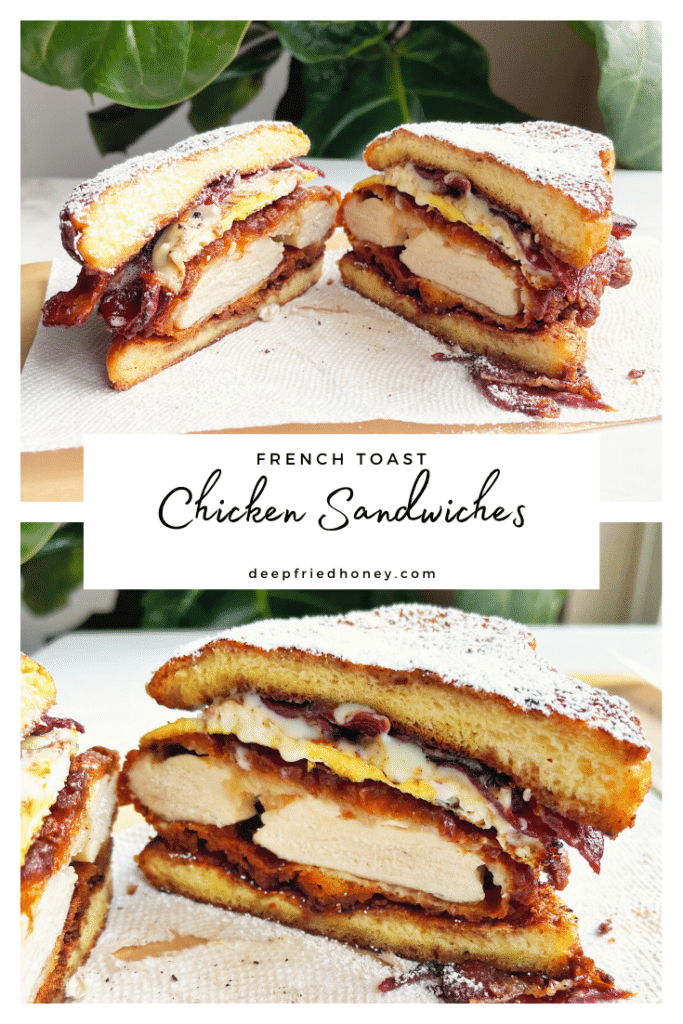
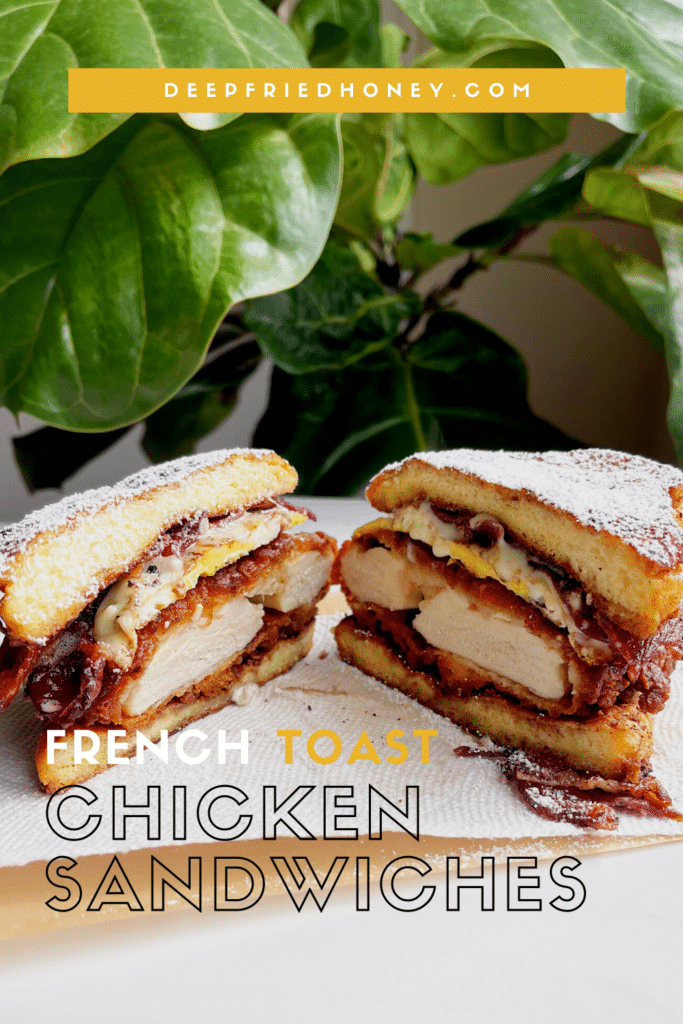
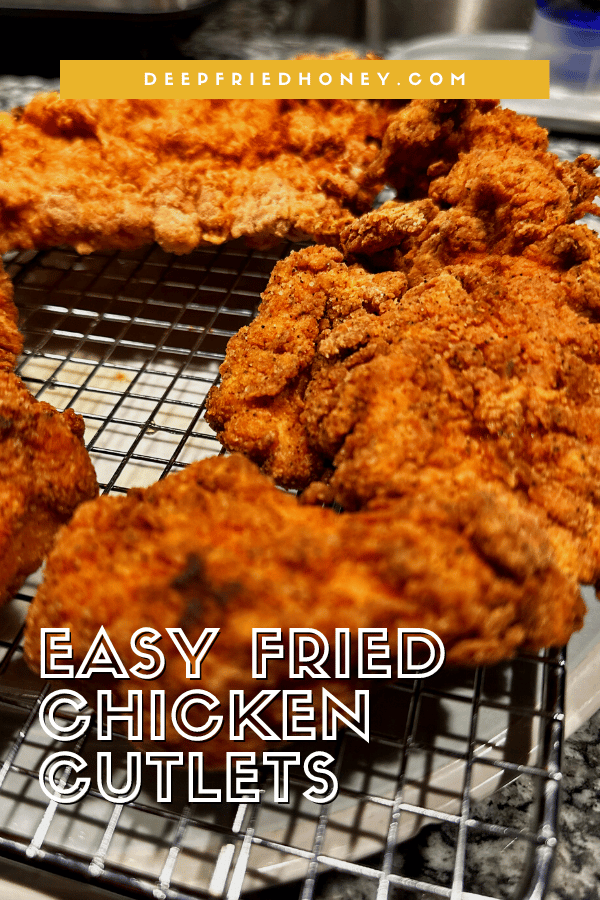
Yes, another French Toast recipe. Blame my husband because his sweet tooth and love for breakfast are why I’m always making it! Today I’m bringing you a hybrid of sorts, combining my standard French Toast recipe with one for a well seasoned fried chicken cutlet, forming one of the most delicious sweet and savory breakfasts on the go you could ever imagine: French Toast Chicken Sandwiches!
I’m not sure about other regions but down here in the south chicken biscuits are very standard breakfast fare. Sometimes you’ll find them topped with egg and cheese too, or smothered with gravy. I decided to kick that up a notch and send my husband off to work with the portable breakfast of his dreams – but I didn’t have or feel like making biscuits, so a French Toast Biscuit Sandwich was out. In comes a loaf of brioche for him, and Croissant Toast for me!
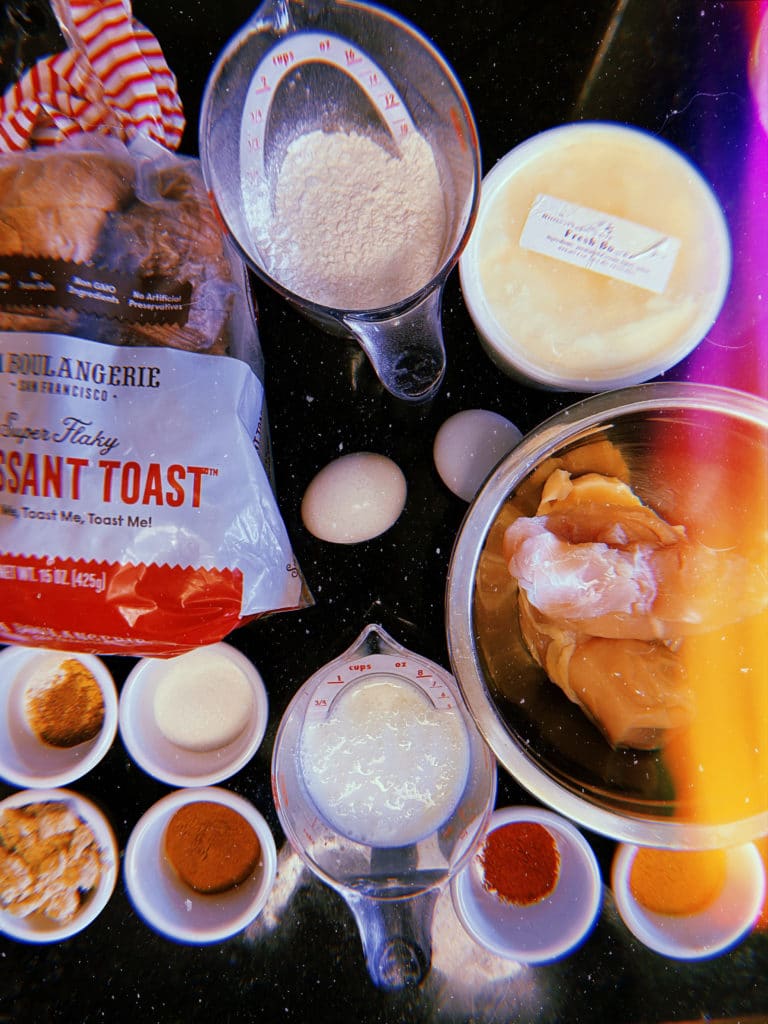
French Toast Chicken Sandwiches Ingredients
Feel free to jump to the full recipe, but here are useful notes about the ingredients you will need to make this French Toast Chicken Sandwiches recipe:
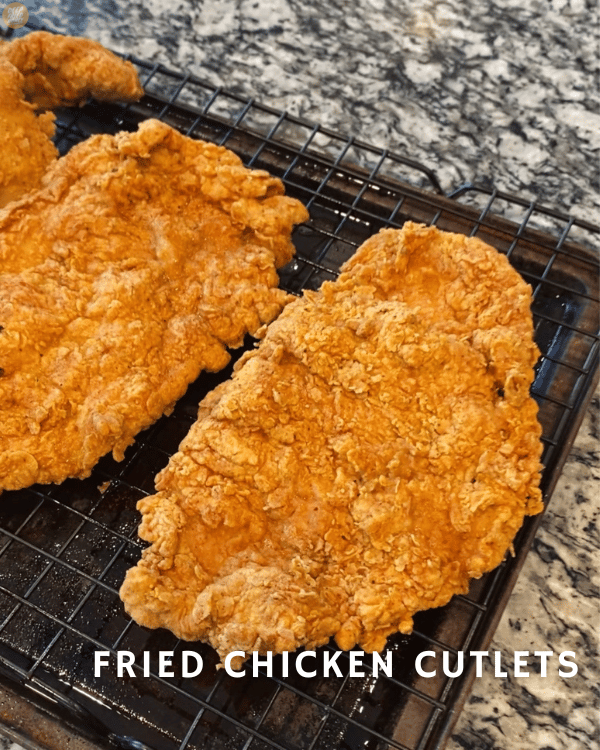
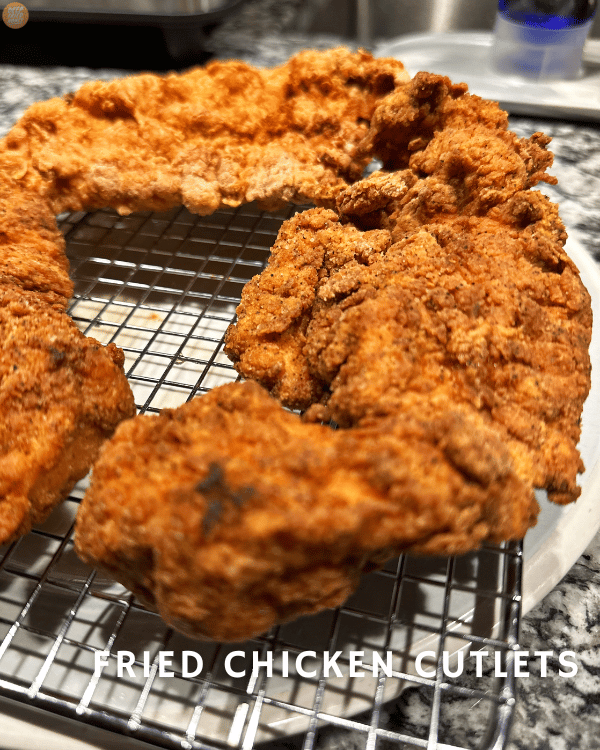
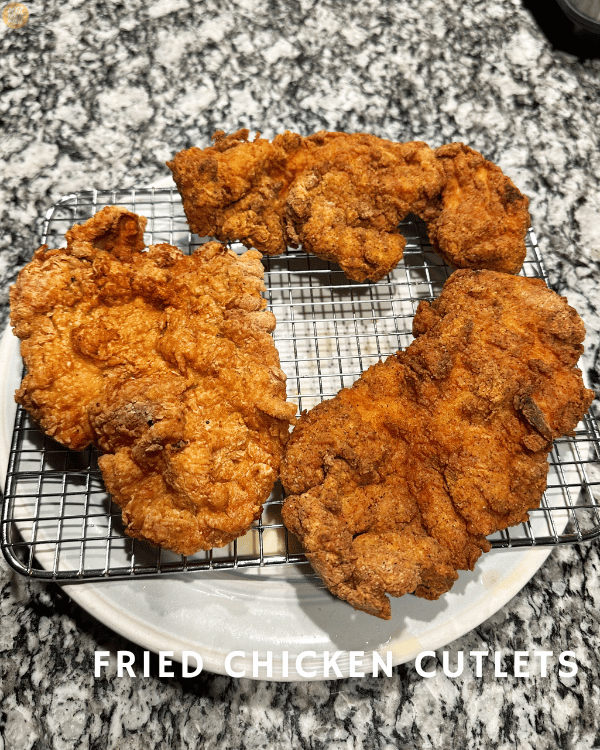
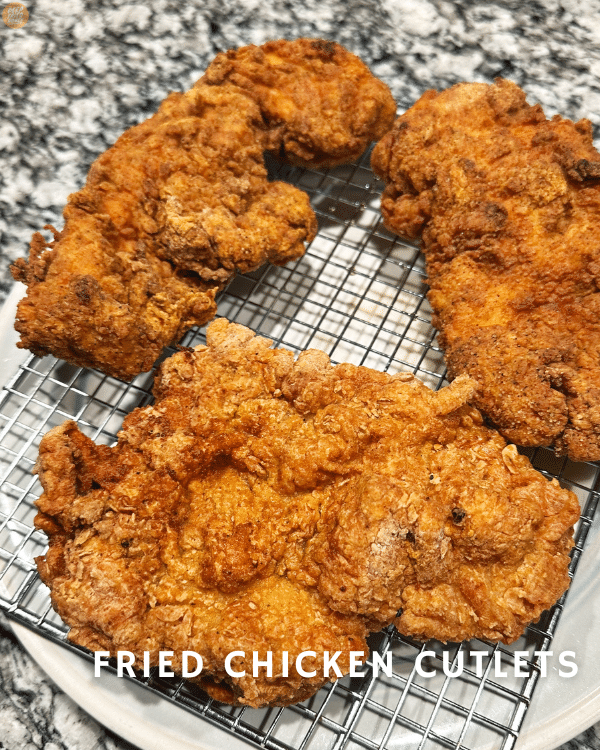
Boneless skinless chicken breasts: You can use thighs if you’re into that. Just use a mallet to pound them out into an even 1/2″ thickness, and cut them in half. Now you’ve got cutlets that will cook evenly and should remain nicely sized even after frying, making for good sandwiches.
Good bread: I used Trader Joe’s Sliced French Brioche and La Boulangerie’s Croissant Toast for the French Toast Chicken Sandwiches you see pictured but any bread will do. No matter what you decide to use you’ll want to avoid soaking it for long; the bread can’t be too custardy in the center because it has to be strudy enough to support the chicken.
Salted butter: Salted butter is important because it’ll help balance the sweetness from the custard.
Buttermilk: My preffered tenderizing marinade and wet dredge for fried chicken. Whole milk whisked together with an egg will suffice (add a capful of vinegar too, if you have it and you’ve got homemade buttermilk).
Whole milk: Normally I would use heavy cream but I didn’t have any! I increased the amount of flour and that thickened the custard up nicely. Heavy cream, half-and-half, oat milk – any of these would work.
Egg yolks: As I mention in all of my french toast recipes, we use just the yolks so it doesn’t taste eggy.
Granulated sugar, light brown sugar, powdered sugar: The sugars are for sweetness, of course, and the powdered sugar along with a lil’ flour acts as a thickener for the custard, so it coats the bread instead of just soaking right in. We need the French Toast for these Chicken Sandwiches to be sturdy. Since we’re not adding syrup or anything, the sugar has been increased from what I’d normally use to compensate.
All-purpose flour, cornstarch: For dregding the chicken, and for battering the french toast.
Ground cinnamon: It’s not french toast without cinnamon! Adjust the amount to your taste, but I use quite a bit so the French Toast flavor is rampant.
Vanilla extract: Warm, soft, gentle, and necessary.
Seasoned salt, paprika, ground black pepper: We’ll use these to season the chicken directly and the flour dredge. Black pepper only goes in the flour.
Peanut oil: for frying the bread and the meat. Any oil or fat with a high smoke point will do fine.
Equipment: Here’s all of the equipment I use to make these:
How to Make French Toast Chicken Sandwiches
Full instructions are included in the recipe below, but here is a basic overview of what you’ll need to do, along with some important tidbits to help you make the most of this French Toast Chicken Sandwiches recipe:
Marinate the chicken. The night before you’re gonna make the French Toast Chicken Sandwiches – unless you’re a super early riser or something – add the chicken to a bowl and season with 1 tsp of seasoned salt. Pour in the buttermilk and stir to coat the chicken thorouhgly. Cover tightly and refrigerate for at least an hour, up to overnight. Remove and let rest at room temperature about 30 minutes before you’re ready to fry so it cooks more evenly.
Make the dredge and the custard. Grab two more bowls, about medium in size. To the first add the self-rising flour, cornstarch, remaining seasoned salt, paprika, and black pepper. Whisk together and set aside. This is your dry dredge for the fried chicken. In the other bowl add your egg yolks, cinnamon, sugars, vanillas, and flour. Whisk together into a thick paste, then slowly whisk in the milk until everything’s well combined. There might be lumps of flour but that’s OK. This is your custard for the French toast.
Dredge the chicken. Remove a piece of chicken from the buttermilk and allow any excess to drip off. Drop it in the flour and cover the top with more flour. Then, use the back of your hand to press the chicken down into the bowl, and the flour into the chicken. Flip the cutlet over and repeat, spooning flour onto the top and pressing it into the chicken. Once the cutlet is nicely, thourougly coated, shake of the excess flour and place on a plate to rest. Double-dredging is allowed here, but not necessary. Repeat with all of the cutlets and set aside.
Prepare to fry! Turn your oven on to warm – or whatever the lowest temerature is – and place a wire rack over a baking sheet in the center of the oven. This is your warming station: you’ll keep the separate components of these French Toast Chicken Sandwiches hot until it’s time to assemble! Next, figure out what you’re frying in (check out the equipment widget above to see my choices) and fill it up about 1/2″ with oil. Cover with a lid and preheat the oil over medium-high heat until the oil bubbles gently (about 360°F).
Fry the chicken. Gently add the chicken to the hot oil, making sure not to crowd the pan – let them dance freely! Cook for 7 minutes, then turn and cook for another 5-7 minutes, until cooked through and golden brown. It’ll vary but remember that chicken is safe at 165°F internally. Transfer the chicken to the warming rack in the oven and continue with the recipe.
Prepare to pan-fry. Reduce the heat to medium low and place a large skillet where the frying pot just was. Or use another one. If you’re good at multitasking you can combine these steps for the French Toast Chicken Sandwiches into one! Anyway, add a drizzle of oil and a small pat of butter in the center. Once it’s melted, swirl them around to coat the surface of the pan.
Dip, drip, push. I sing this phrase – to the tune of Kick, Kick, Push by Lupe Fiasco – every time I make french toast using the Croissant Toast especially. I submerge each piece of bread in the custard quickly and remove it just as quickly, let the excess drip off, and then place the bread in the skillet, and push it down with either a spatula or my fingers to make sure the center makes contact with the skillet.
Cook it kinda low, and kinda slow. We want things crisp on the outside, soft in the middle. If we have the heat too high, it’ll brown too quickly. If we have the heat too low, it’ll dry out. Keep it medium, and keep adjusting, if needed. The time will vary, but generally, it takes about 7 or 8 minutes per side.
Keep warm and carry on. If your oven is clean just transfer the french toast directly to the rack to rest while you prepare the other batches. Alternatively, place it on the rack with the fried chicken cutlets.
Finish and serve. If you wanted bacon and eggs on your French Toast Chicken Sandwiches you shoud have been cooking that while you were making the french toast. If you didn’t, assemble the sandwiches by placing a cutlet on one slice of french toast, topping it with another side, and dusting the top lightly with powdered sugar. Cut it down the middle to make it easier to eat and have at it! Dassit!
Amp Up These French Toast Chicken Sandwiches
I wrote the recipe before I made these French Toast Chicken Sandwiches, and while running it past the family the addition of bacon was brought up. I personally feel like with just a dusting of powdered sugar these French Toast Chicken Sandwiches are pretty damn indulgent, but I’m never gonna say no to beef bacon, so I added it to mine and loved it!
For the man, I took it up a notch further and that explains all the French Toast Bacon Egg and Cheese Chicken Sandwiches you see pictured in this post. The second time I made these I didn’t add bacon or anything else and they were still amazing. Decide for yourself!
At least an hour before you plan to make breakfast add the chicken to a bowl and season with 1 tsp of seasoned salt. Pour in the buttermilk and stir to coat the chicken thoroughly. Cover tightly and refrigerate for at least an hour, up to overnight. If you have time you’ll want to pull it from the fridge to rest at room temperature before you’re ready to fry so it cooks more evenly. About 15-30 minutes should do!
In another mixing bowl add the self-rising flour, cornstarch, remaining seasoned salt, paprika, and black pepper. Whisk together and set aside until it’s time to dredge the chicken.
In yet another bowl add your egg yolks, cinnamon, sugars, vanillas, and flour. Whisk together into a thick paste, then slowly whisk in the milk until everything’s well combined. Lumps are fine.
Remove a piece of chicken from the buttermilk and allow any excess to drip off. Drop it in the flour and cover the top with more flour. Then, use the back of your hand to press the chicken down into the bowl, and the flour into the chicken. Flip the cutlet over and repeat, spooning flour onto the top and pressing it into the chicken. Once the cutlet is nicely, thoroughly coated, shake of the excess flour and place on a plate to rest. Double-dredging is allowed here, but not necessary. Repeat with all of the cutlets and set aside.
Turn your oven on to warm and place a wire rack over a baking sheet in the center of the oven. Next, heat your oil in a heavy-bottomed pot – it should only come about 1/2 way up the sides. Preheat the oil over medium-high heat until it reaches about 360°F.
Once the oil is heated go ahead and add the chicken to the hot oil, making sure not to crowd the pan – go in two batches if necessary. Cook the chicken for 7 minutes, then turn and cook for another 5-7 minutes, until cooked through (around 160°F internally) and golden brown. Transfer the chicken to the warming rack in the oven.
Preheat a large skillet over medium-low heat and add a drizzle of oil and a small pat of butter in the center. Once it’s melted, swirl them around to coat the surface of the pan.
Submerge each piece of bread in the custard quickly and remove it just as quickly, let the excess drip off, and then place the bread in the skillet, and push it down slightly in the center to make sure it’s making contact with the surface of the pan.
Cook the french toast for about 4 minutes, then flip. Cook until browned, then flip again. Continue cooking and flipping until the bread is a touch crisp on the outside and feels firm. The time will vary, but generally, it takes about 7 or 8 minutes per side.
Transfer the French toast to the rack with the fried chicken cutlets and continue until it’s all cooked.
Assemble the sandwiches and dust the tops lightly with powdered sugar. Cut ’em down the middle to make it easier to eat and have at it! Dassit!
This post may contain affiliate links, which means I get a little off the top to help me keep this website running. It doesn't cost you extra or affect my opinion.
I brainstormed it on Twitter the day before yesterday and took votes on the idea: the results were overwhelming “DO IT!”
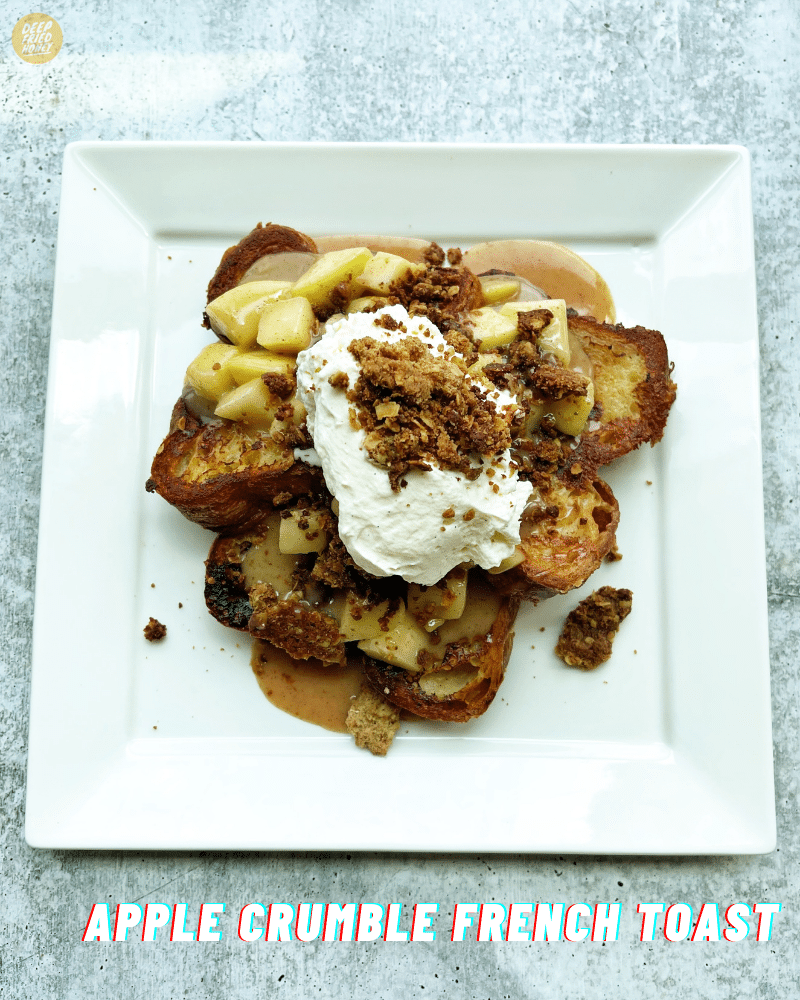
Apple Crumble French Toast Ingredients
Feel free to jump to the full recipe, but here are useful notes about the ingredients you will need to make this Apple Crumble French Toast recipe:
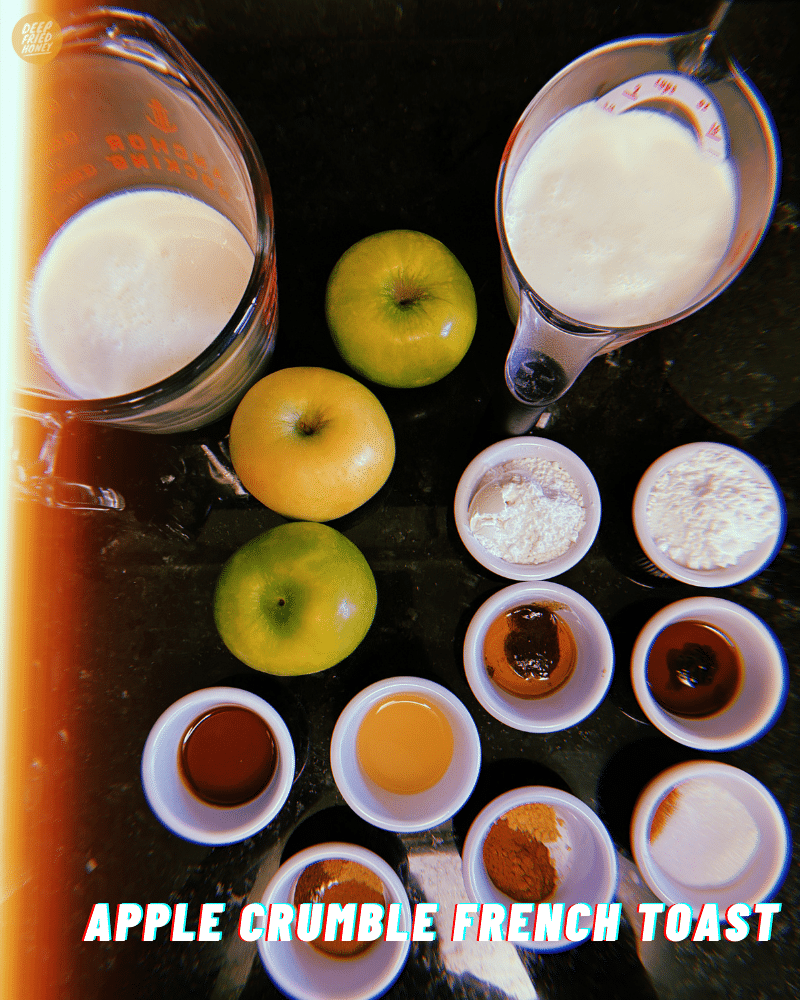
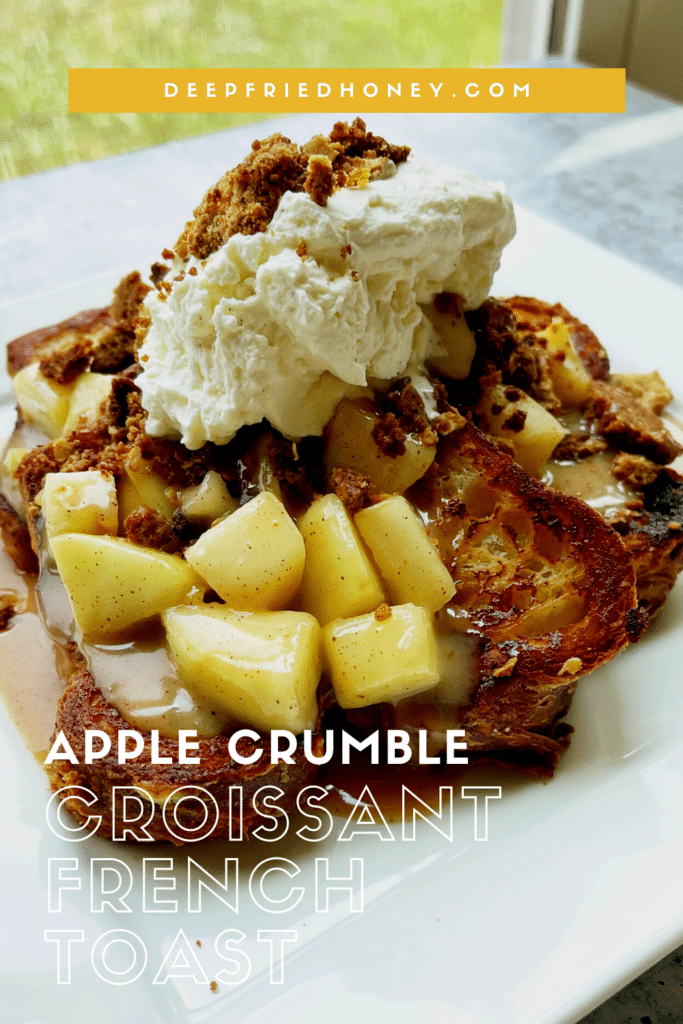
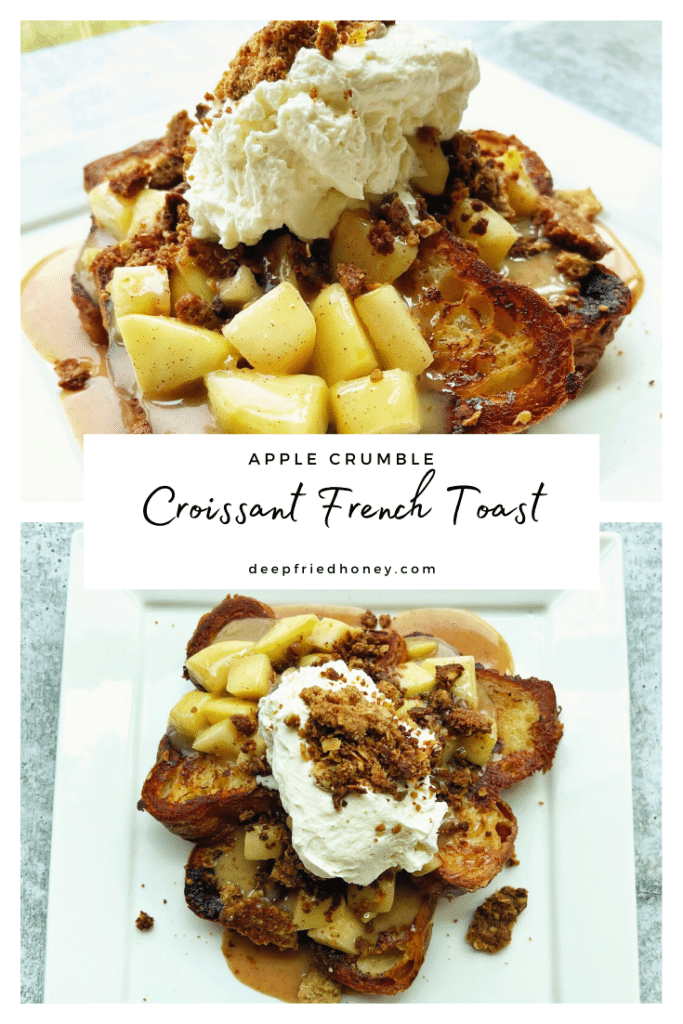
Green apples: Granny Smith if you’re nasty. I just wanted to channel Janet for a moment, use Granny Smith apples period. They have the perfect texture and amount of tart for this.
Croissant toast: My favorite! Brioche, challah, or King’s Hawaiian sweet bread are great substitutes.
All-purpose flour, self-rising flour, cornstarch: We use self-rising flour to make the crumble topping, all-purpose to thicken the sauce that coats the apples, and cornstarch to stablize the chantilly cream.
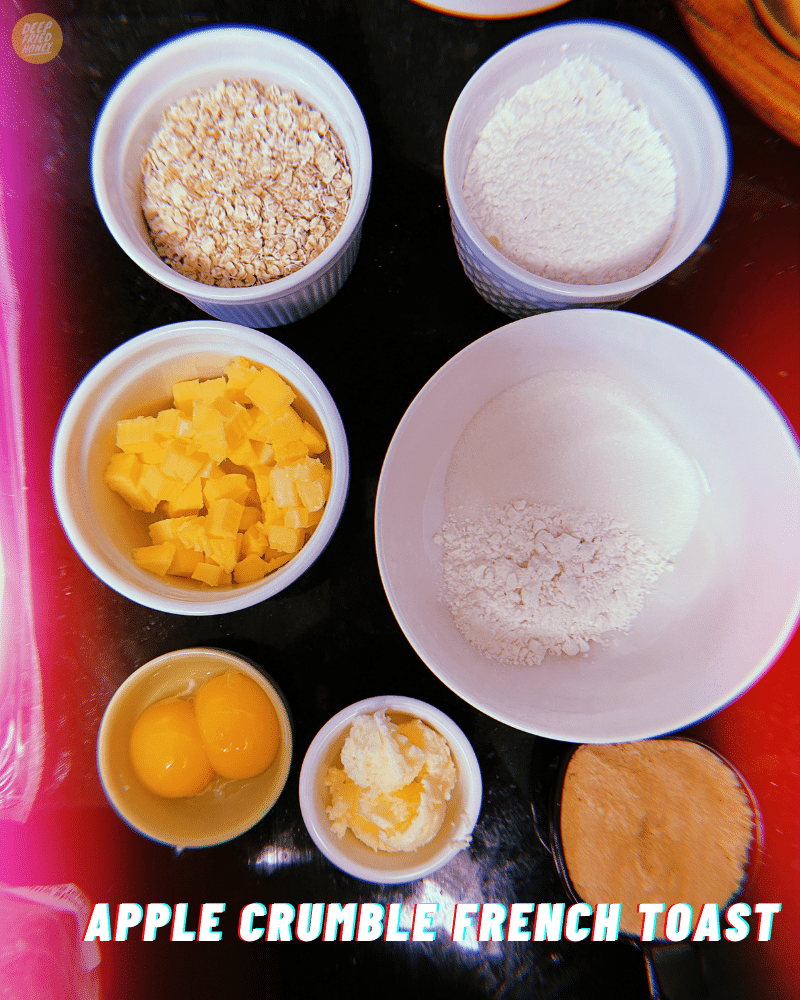
Quick-cooking oats: For the crumble topping! I love the warm sweetness that oats add.
Granulated sugar, light brown sugar, powdered sugar: Granulated sugar for the custard, apples, and whipped cream; brown sugar for the crumble; powdered sugar for the whipped cream.
Salted butter, vegetable oil: Salted butter for everything! If you use unsalted butter you’ll need to add a pinch of salt to everything.
Ground cinnamon, ground nutmeg, ground ginger: Our spices. It’s not french toast without cinnamon, and it’s not Apple Crumble without all three, for me!
Lemon juice: The main reason is to keep the apples from turningbrown, but it also brightens the apples. They’ll lose most of their tartness during cooking.
Vanilla extract, vanilla bean paste: If you can’t find the paste it’s OK, just use all vanilla extract. You’ll be missing the little vanila bean caviar specks in your whipped cream, but that’s OK.
Heavy whipping cream, whole milk: For a slightly thicker custard use all heavy cream. I didn’t have enough to make both the chantilly cream and custard so I used half whole milk.
Egg yolks: Yolks only means no “eggy” taste.
Water: Just a tad, to loosen the caramel that forms around the apples into a nice sauce.
How to Make Apple Crumble French Toast
Full instructions are included in the recipe below, but here is a basic overview of what you’ll need to do, along with some important tidbits to help you make the most of this Apple Crumble French Toast recipe:
Let’s get ready to crumble! Preheat your oven to 350°F and line a baking sheet with parchment paper then set it aside. Make the crumble: In a small mixing bowl stir together the flour, oats, sugar, cinnamon, and ginger. Sprinkle the cubes of butter over the top and then use a fork or pastry cutter to work the butter into the flour and oats – the same way you’d make pie dough or biscuits – until it’s well combined.
Bake the crumble. Pour the crumble mixture onto the prepared baking sheet and spread it out in an even layer. Place in the oven for 5-7 minutes, until nicely browned and it smells like oatmeal cookies when you open the oven. Remove and set aside to cool completely before disturbing, then you’ll use a spoon to break it up into bite-sized pieces to top the Apple Crumble French Toast.
Cook the apples. Place a medium saucepan over medium heat and add two tablespoons of butter. Once it has melted add the flour, then the apples, lemon juice, vanilla, cinnamon, nutmeg, and sugar. Stir together, until a sauce forms – you shouldn’t see any large swathes of flour or cinnamon. Cover with a lid and let cook for 5 minutes.
Adjust the sauce. After 5 minutes the sauce should have thickened into caramel. If it hasn’t, allow it to cook 2-3 minutes more, then add the water. Stir together until the water has been fully incorporated into the sauce, then cover and reduce the heat to medium-low. Let the apples simmer just until they’re fork-tender, stirring occasionally. When they have, remove the pan from heat but keep it covered.
Whip up the custard. Grab a medium-sized mixing bowl and whisk together the egg yolks, sugars, vanillas, cinnamon, and flour. After it’s well combined with no lumps, whisk in the heavy cream as well. This is the custard for the Apple Crumble French Toast! Set it aside and prepare your skillet. Place a wide – at least 10″ – skillet over medium heat and let it warm up for a few minutes. Add about a teaspoon of oil and a teaspoon of butter to the pan, and swirl it around so it coats the surface.
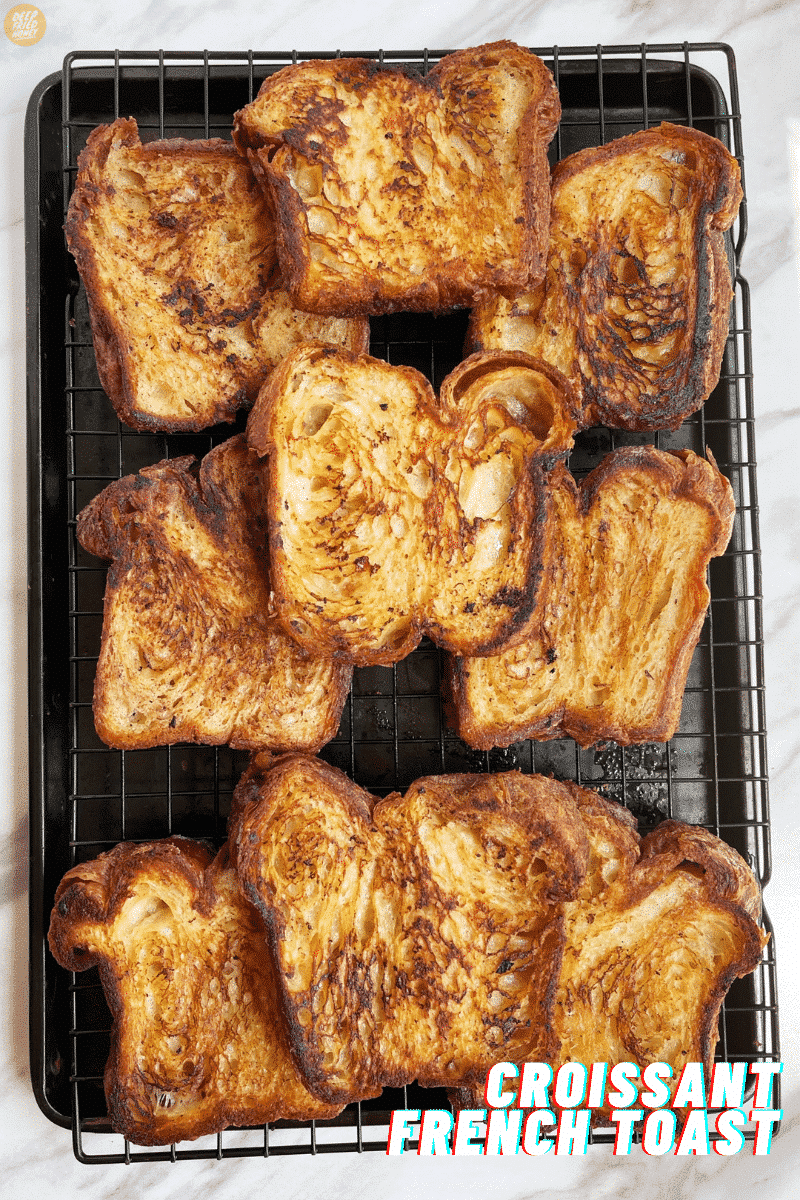
French the toast. Dip a single slice of croissant toast into the custard. Submerge it completely, and pull it out immediately. Let the excess drip back into the bowl, and add the toast to the pan. Press down on it – especially the center – to make sure it all comes into direct contact with the pan. Repeat until the surface of the pan is covered, but don’t crowd it. Cook the toast for about 7 minutes on each side, until it’s golden brown in color and a bit crisp along the edges. Add a bit more butter after the first flip. When the toast is done to your liking remove it from the pan and transfer it to your oven (preheated to its lowest setting) to keep warm while you finish cooking the rest of the toast. Add more oil and butter between each batch, as needed, and keep adjusting the heat, as needed so things don’t burn.
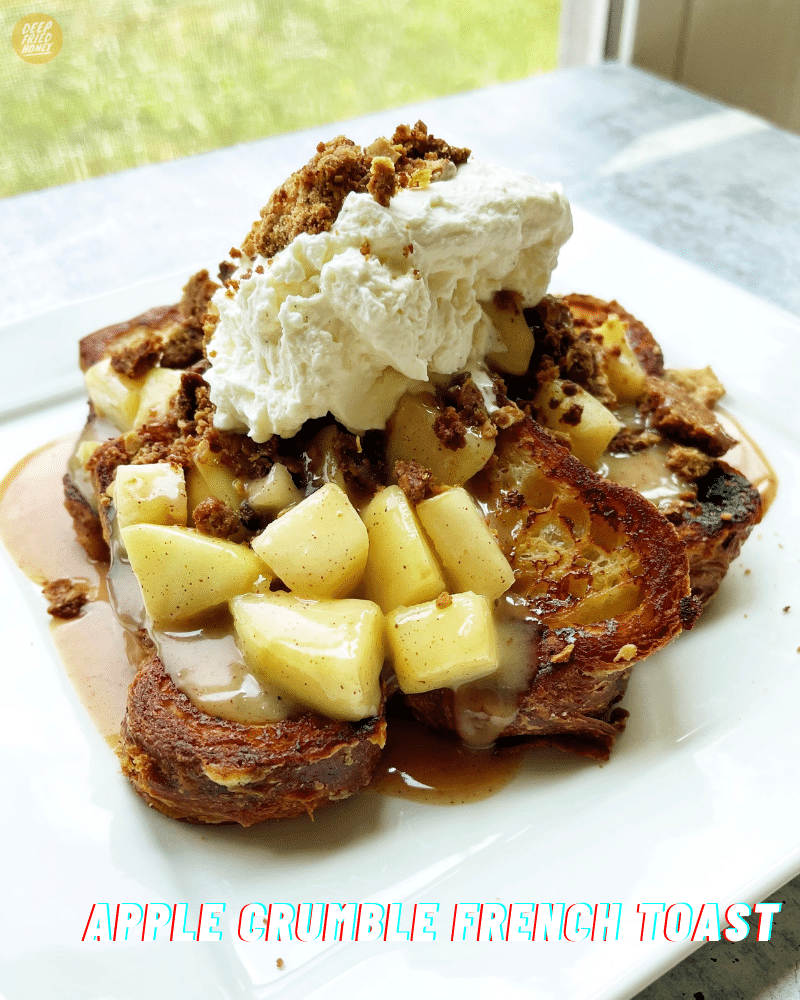
Serve up the Apple Crumble French Toast! I served it by arranging a few slices of french toast on a plate, then spooning on a generous amount of apples and caramel sauce, followed by a heaping portion of the crumble topping and a dollop of whipped cream. No syrup or powdered sugar is needed, but if you want to go right ahead! Dassit.
Try My Other French Toast Recipes
French Toast is my husband’s favorite breakfast, so I’ve developed plenty of options over the years…
Make the crumble: In a small mixing bowl stir together the flour, oats, sugar, cinnamon, and ginger. Sprinkle the cubes of butter over the top and then use a fork or pastry cutter to work the butter into the flour and oats – the same way you’d make pie dough or biscuits – until it’s well combined.
Pour the crumble mixture onto the prepared baking sheet and spread it out in an even layer. Place in the oven for 5-7 minutes, until nicely browned and it smells like oatmeal cookies when you open the oven. Remove and set aside to cool completely before disturbing, then you’ll use a spoon to break it up into bite-sized pieces.
Place a medium saucepan over medium heat and add two tablespoons of butter. Once it has melted add the flour, then the apples, lemon juice, vanilla, cinnamon, nutmeg, and sugar. Stir together, until a sauce forms – you shouldn’t see any large swathes of flour or cinnamon. Cover with a lid and let cook for 5 minutes.
After 5 minutes the sauce should have thickened into caramel. If it hasn’t, allow it to cook 2-3 minutes more, then add the water. Stir together until the water has been fully incorporated into the sauce, then cover and reduce the heat to medium-low. Let the apples simmer just until they’re fork-tender, stirring occasionally. When they have, remove the pan from heat but keep it covered.
Now it’s time for the french toast: Grab a medium-sized mixing bowl and whisk together the egg yolks, sugars, vanillas, cinnamon, and flour. After it’s well combined with no lumps, whisk in the heavy cream as well. This is your custard! Set it aside and prepare your skillet.
Place a wide – at least 10″ – skillet over medium heat and let it warm up for a few minutes. Add about a teaspoon of oil and a teaspoon of butter to the pan, and swirl it around so it coats the surface.
Dip a single slice of croissant toast into the custard. Submerge it completely, and pull it out immediately. Let the excess drip back into the bowl, and add the toast to the pan. Press down on it – especially the center – to make sure it all comes into direct contact with the pan. Repeat until the surface of the pan is covered, but don’t crowd it.
Cook the toast for about 7 minutes on each side, until it’s golden brown in color and a bit crisp along the edges. Add a bit more butter after the first flip. When the toast is done to your liking remove it from the pan and transfer it to your oven (preheated to its lowest setting) to keep warm while you finish cooking the rest of the toast. Add more oil and butter between each batch, as needed, and keep adjusting the heat, as needed so things don’t burn.
I served it by arranging a few slices of french toast on a plate, then spooning on a generous amount of apples and caramel sauce, followed by a heaping portion of the crumble topping and a dollop of whipped cream. No syrup or powdered sugar is needed, but if you want to go right ahead! Dassit.
Notes
The post above the recipe is not a story about picking apples: it’s full of advice and information about this recipe. Read it to ensure you make the most of it!
This post may contain affiliate links, which means I get a little off the top to help me keep this website running. It doesn't cost you extra or affect my opinion.
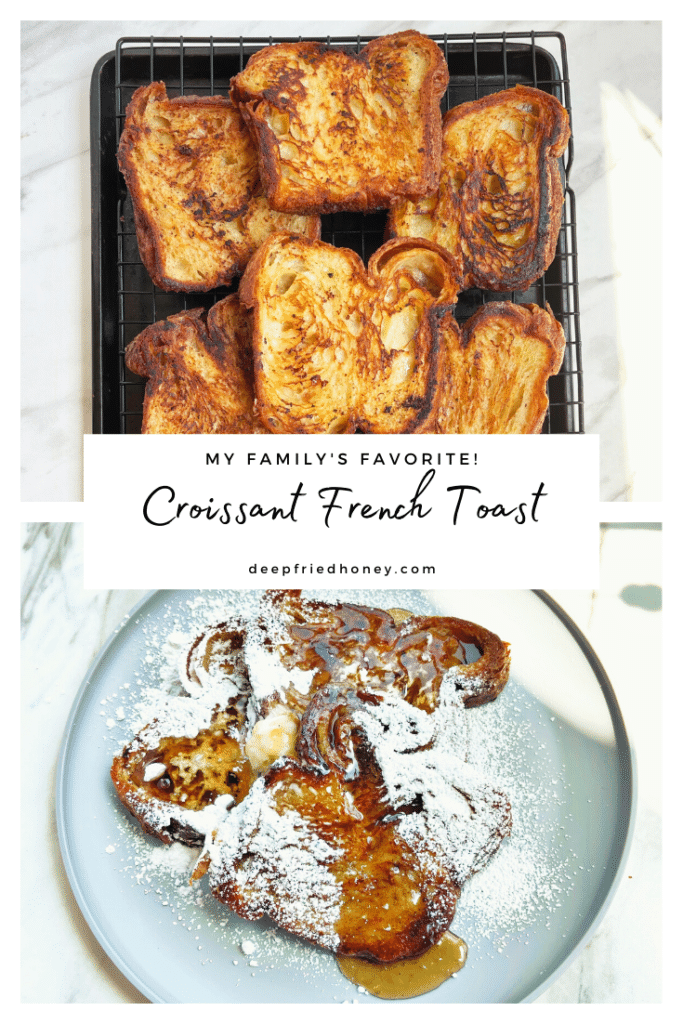
Croissant French Toast made with La Boulangerie’s Croissant Toast Bread is the stuff dreams are made of, truly. The bread is what makes this recipe (and a few others already posted here on deepfriedhoney.com) and it’s sold nationwide at Whole Foods. I’ve been told that other stores are starting to carry alternatives, but I’m good with the original – if it ain’t broke, don’t fix it! – and I usually purchase it directly from the bakery’s website to get the bulk discount.
Croissant French Toast Ingredients
Feel free to jump to the full recipe, but here are useful notes about the ingredients you will need to make this Croissant French Toast recipe:
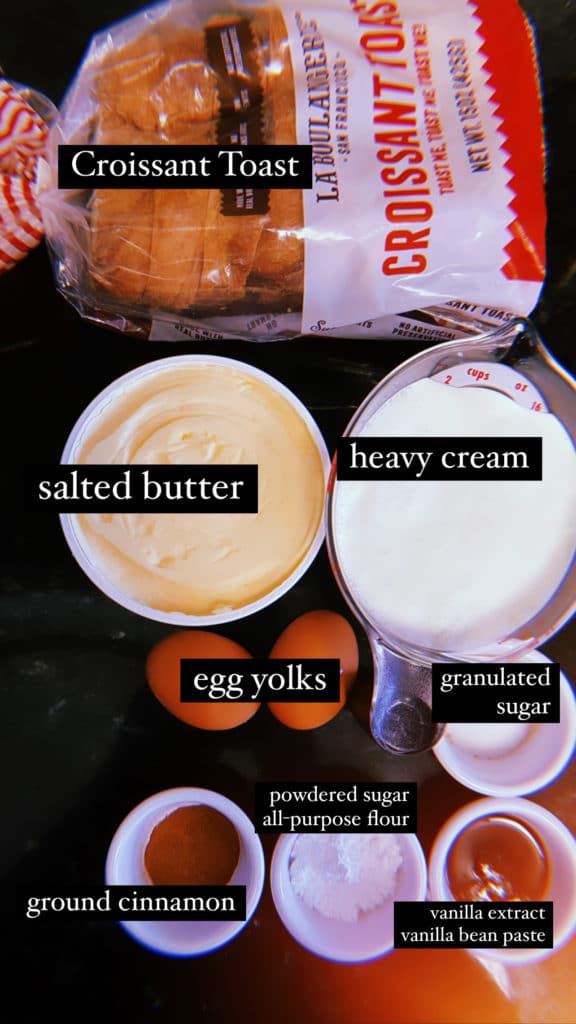
Croissant Toast: I recommend using La Boulangerie’s Croissant Toast Bread for this recipe – but you can also regular croissants from the bakery. Just split them down the middle like you were going to fill them and carry on with the recipe as written. Make sure they’re as large as your hand, or bigger.
Salted butter: Salted butter is important because it’ll help balance the sweetness from the custard.
Heavy cream: Along with the thickeners listed below, this will make sure we have a custard with enough heft to coat the bread without soaking through it – without becoming a batter as you’d make for my Fried French Toast. I’ve used a mix of heavy cream and whole milk before. I’ve also used almond milk to make a Vegan version of this with their Vegan Croissant Toast Bread. The custard wasn’t as rich either way and the inside of the Croissant French Toast was softer.
Egg yolks: As I mention in all of my french toast recipes, we use just the yolks so it doesn’t taste eggy.
Granulated sugar, powdered sugar, all-purpose flour: The sugars are for sweetness, of course, and the flour and powdered sugar act as a thickener for the custard, so it coats the bread instead of just soaking right in.
Ground cinnamon: It’s not french toast without cinnamon! Adjust the amount to your taste.
Vanilla extract, vanilla bean paste: Y’all know I love my vanilla bean caviar, so of course I’m using both. You can use just extract.
How to Make Croissant French Toast
Full instructions are included in the recipe below, but here is a basic overview of what you’ll need to do, along with some important tidbits to help you make the most of this Croissant French Toast recipe:
Make the custard. In a medium mixing bowl add your egg yolks, cinnamon, sugars, vanillas, and flour. Whisk together into a thick paste until no lumps remain, then slowly whisk in the heavy cream until everything’s well combined.
Prep the pan. Place a large skillet over medium-low heat and add a drizzle of oil and a small pat of butter in the center. Once it’s melted, swirl them around to coat the surface of the pan.
Dip, drip, push. I sing this phrase – to the tune of Kick, Kick, Push by Lupe Fiasco – every time I make this. Now it’s up to you, but I don’t soak this Croissant Toast at all. I want to preserve the delicate texture and those flaky layers. Adding liquid is not going to help that. I submerge each piece of bread in the custard quickly and remove it just as quickly, let the excess drip off, and then place the croissant toast in the skillet, and push it down with either a spatula or my fingers to make sure the center makes contact with the skillet.
Cook kinda low, and kinda slow. We want things crisp on the outside, soft and flaky in the middle. If we have the heat too high, it’ll brown too quickly. If we have the heat too low, it’ll dry out. Keep it medium, and keep adjusting, if needed. The time will vary, but generally, it takes about 7 or 8 minutes per side.
Keep warm and serve. Set your oven to its lowest setting, or warm if it has it. If your oven is clean just transfer the french toast directly to the rack to rest while you prepare the other batches. Alternatively, you can place a wire rack over a baking sheet in the oven and place the Croissant French Toast on that.
How To Serve the Croissant French Toast
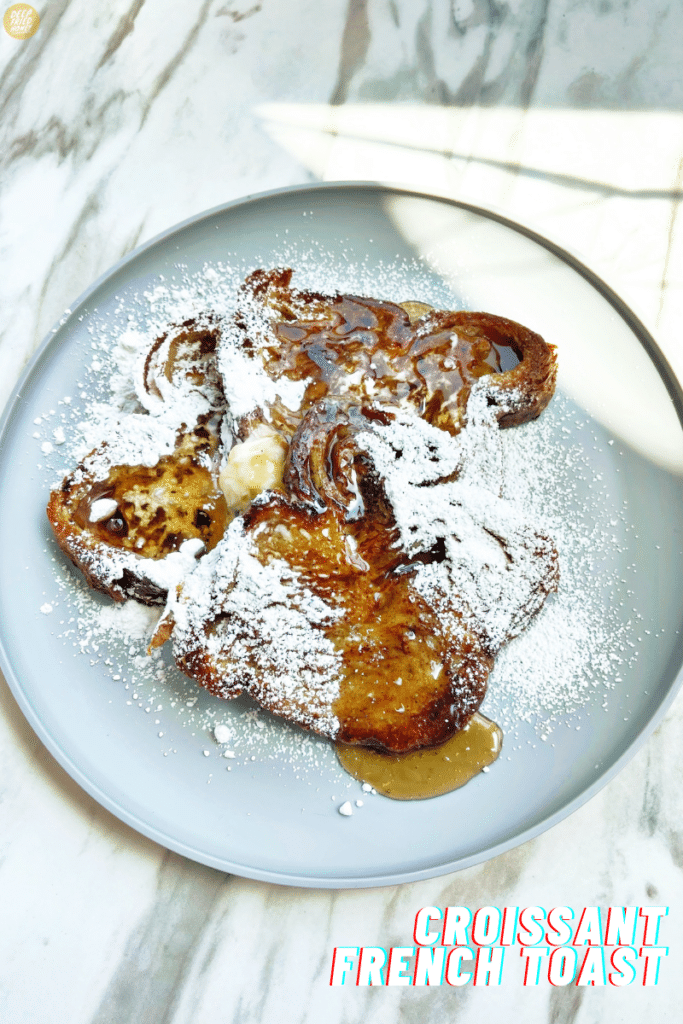
I really can’t tell you how many times I’ve made this Croissant French Toast recipe, and while the classic way pictured above with syrup, butter, and powdered sugar is nice for most of my family, it’s much too sweet for my taste, so I’ve come up with a few ways to serve it.
French Toast Sandwich – Similar to this bad boy I make with my French Toast Biscuits, I sandwich beef bacon and a fried egg between two slices of Croissant French Toast. Sometimes I’ll dust the whole shebang with powdered sugar, sometimes I don’t.
French Toast Sticks – Slice the croissant toast into sticks *after* cooking. I’ve tried doing it beforehand and it made them too soft for my liking. Maybe play with it and see what you like for yourself.
And finally, my favorite: with fruit! Chop up your favorite and have a blast. I like strawberries best, but my family has done bananas, kiwi, Apple butter (does that count?), and more. A dusting of powdered sugar again, is optional.
Grab a medium-sized mixing bowl and whisk together the egg yolks, sugars, vanillas, cinnamon, and flour. After it’s well combined with no lumps, whisk in the heavy cream as well. This is your custard! Set it aside and prepare your skillet.
Place a wide – at least 10″ – skillet over medium heat and let it warm up for a few minutes. Add about a teaspoon of oil and a teaspoon of butter to the pan, and swirl it around so it coats the surface.
Dip a single slice of croissant toast into the custard. Submerge it completely, and pull it out immediately. Let the excess drip back into the bowl, and add the toast to the pan. Press down on it – especially the center – to make sure it all comes into direct contact with the pan. Repeat until the surface of the pan is covered, but don’t crowd it.
Cook the toast for about 7 minutes on each side, until it’s golden brown in color and a bit crisp along the edges. Add a bit more butter after the first flip. When the toast is done to your liking remove it from the pan and transfer it to your oven (preheated to its lowest setting) to keep warm while you finish cooking the rest of the toast. Add more oil and butter between each batch, as needed, and keep adjusting the heat, as needed so things don’t burn.
Dust with powdered sugar and enjoy. Serve hot. Dassit!
Notes
Read the post above the recipe for all my tips for success!
This post may contain affiliate links, which means I get a little off the top to help me keep this website running. It doesn't cost you extra or affect my opinion.
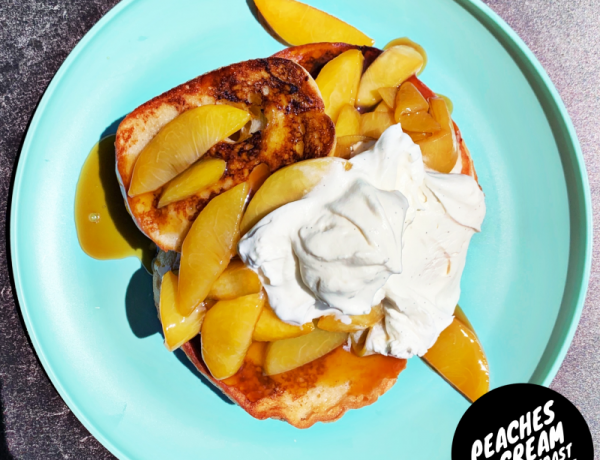
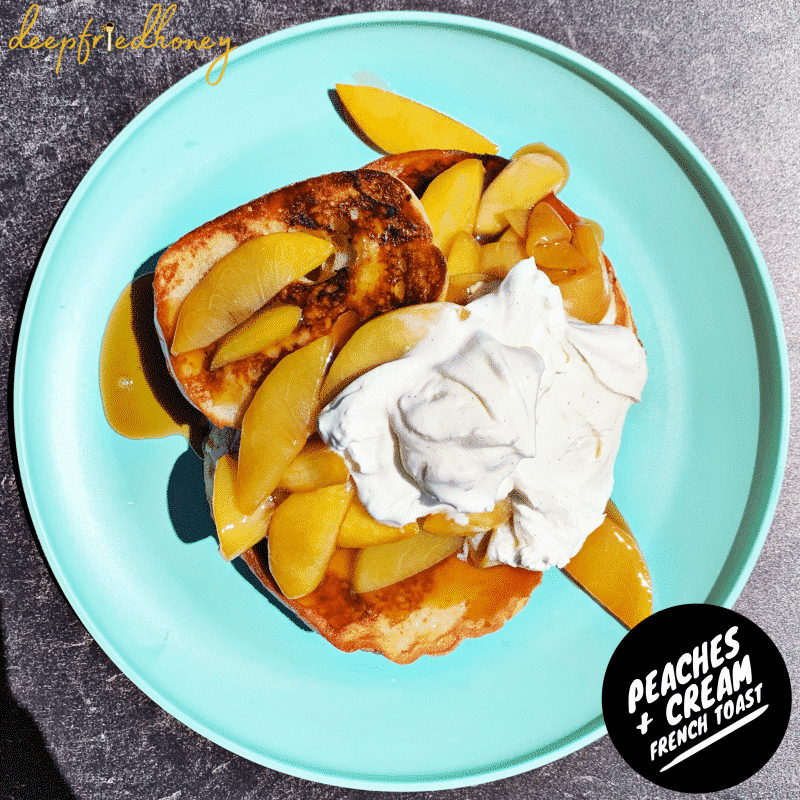
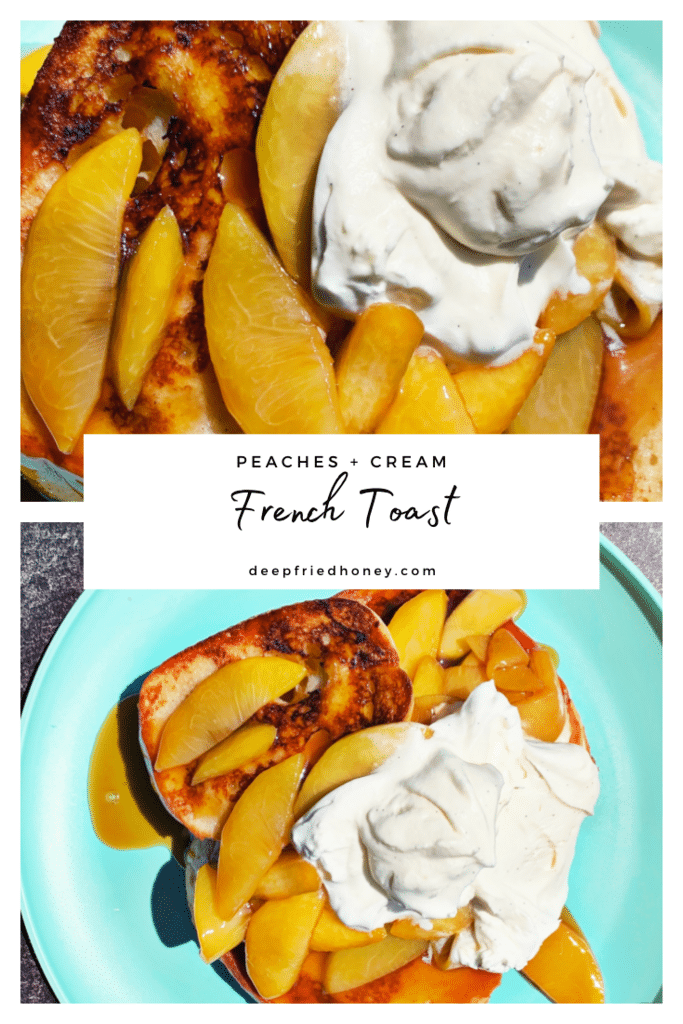
Peaches and Cream French Toast is comprised of three parts: homemade vanilla bean whipped cream, sauteed peaches, and regular ol’ French Toast. It makes an incredible combination.
Yes, another french toast recipe! Blame my husband, who loves everything sweet and all things breakfast. Pancakes, french toast, waffles – all of those are right up his alley and I don’t mind because while they’re all some of the quickest and easiest things to make, they almost always impress, giving off that “a lot of effort was put into breakfast or brunch today” vibe.
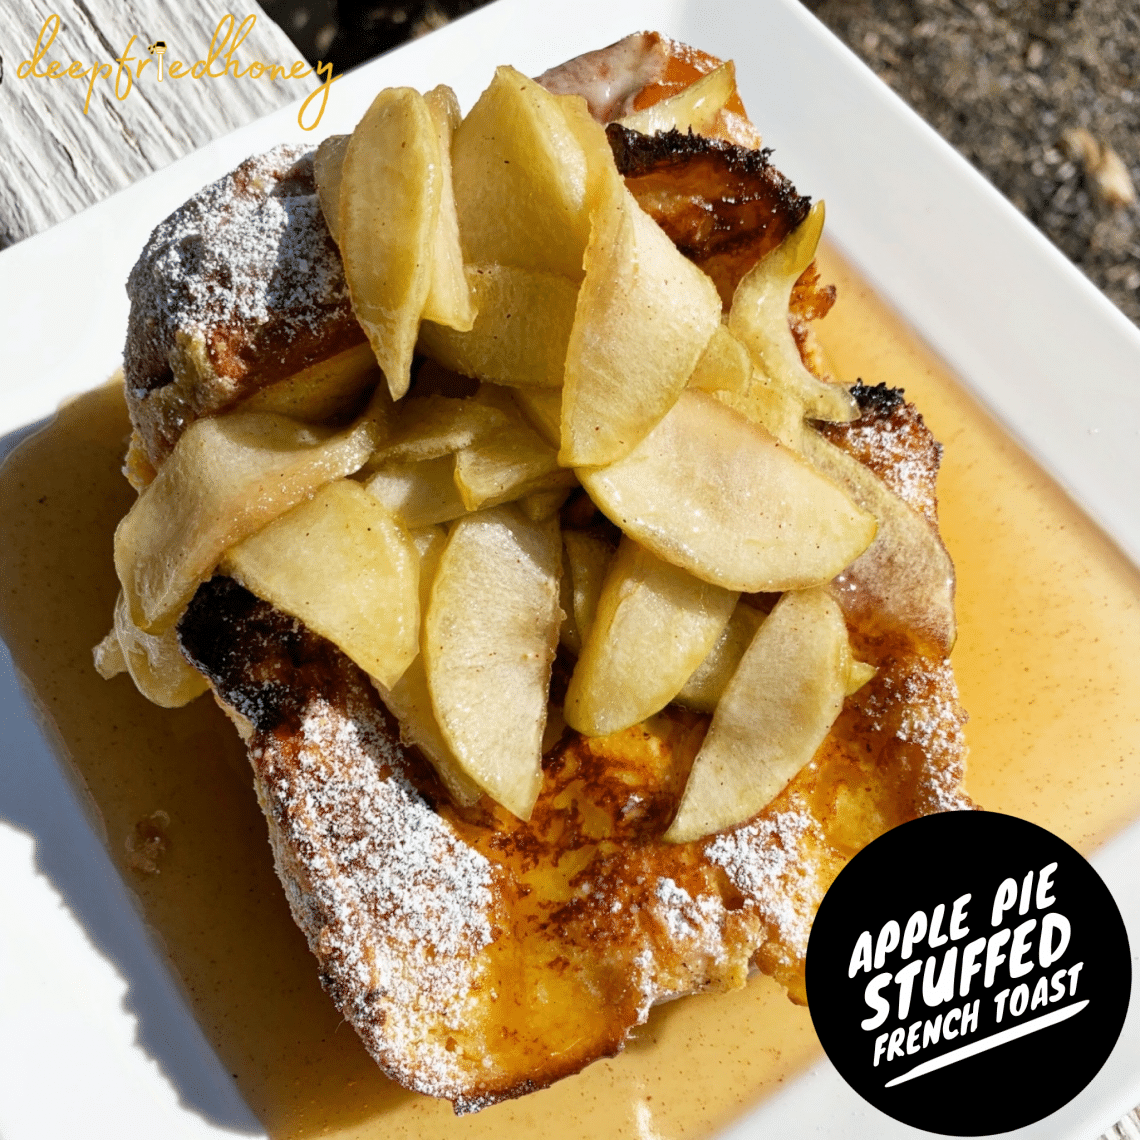
This recipe might remind you of my Apple Pie Stuffed French Toast, but I think they’re pretty different. Different enough to warrant a new recipe post, at least! No stuffing and we let the fruit kinda build its own syrup instead of making one.
Switch it Up:
Want caramelized peaches instead of sauteed? Melt the butter and sugar together in the pan, then add the peaches and let cook until your desired consistency. Simple!
Don’t like peaches? Swap it out! Apples, apricots, pears, nectarines: use what you want.
Don’t have vanilla bean paste? If you have vanilla beans just scrape out a short pod and add the caviar along with a teaspoon of vanilla extract. Or use all vanilla extract.
Leave out the vanilla all together for regular whipped cream.
If you’re feeling extra decadent, try the toppings on my Fried French Toast.
Come back and let me know what you thought of this recipe: rate it and leave a comment! You can also follow me on Twitter and Instagram if you don’t already and keep an eye on what I’m up to in the kitchen between recipe posts here on deepfriedhoney. I’m also on Facebook and TikTok but I hate them both and barely use them. ?
Place a medium saucepan over medium-high heat and add the salted butter. When the butter has melted add the sliced peaches, sugar, lemon juice, and water. Stir to combine well.
Bring to a boil then reduce to a simmer, with your burner somewhere in the low region. Cover and allow to cook for 5-6 minutes, until the peaches have softened.
Once the peaches are tender whisk together the cornstarch and water in a small bowl, then stir that into the peaches. Cook for another 2-3 minutes, then set aside.
Grab a large mixing bowl and make the custard for your french toast by combining all of its listed ingredients – except the bread, oil, and butter. Whisk it well.
Heat a large skillet over medium heat. Drizzle in about a 1/2 teaspoon of oil and add a tablespoon or so of butter. Swirl it around to coat the pan.
Dip your bread slices in the custard, toss to coat, and lay gently on the skillet. Don’t crowd the pan. Cook for 3 minutes or until golden brown, then flip.
Cook for another 3 minutes, then remove. Keep the slices warm in a 200ºF oven on a baking sheet as you continue cooking in batches until all the french toast is done.
If you’re a good multitasker while you’re working on the last batch of french toast go ahead and make the whipped cream (if not, just wait until it’s all done): put everything in a small bowl and use a hand mixer, immersion blender or your whisk and hella arm strength to beat it until it forms stiff peaks.
Serve the peaches on top of the french toast, and the whipped cream on top of the peaches. Enjoy!
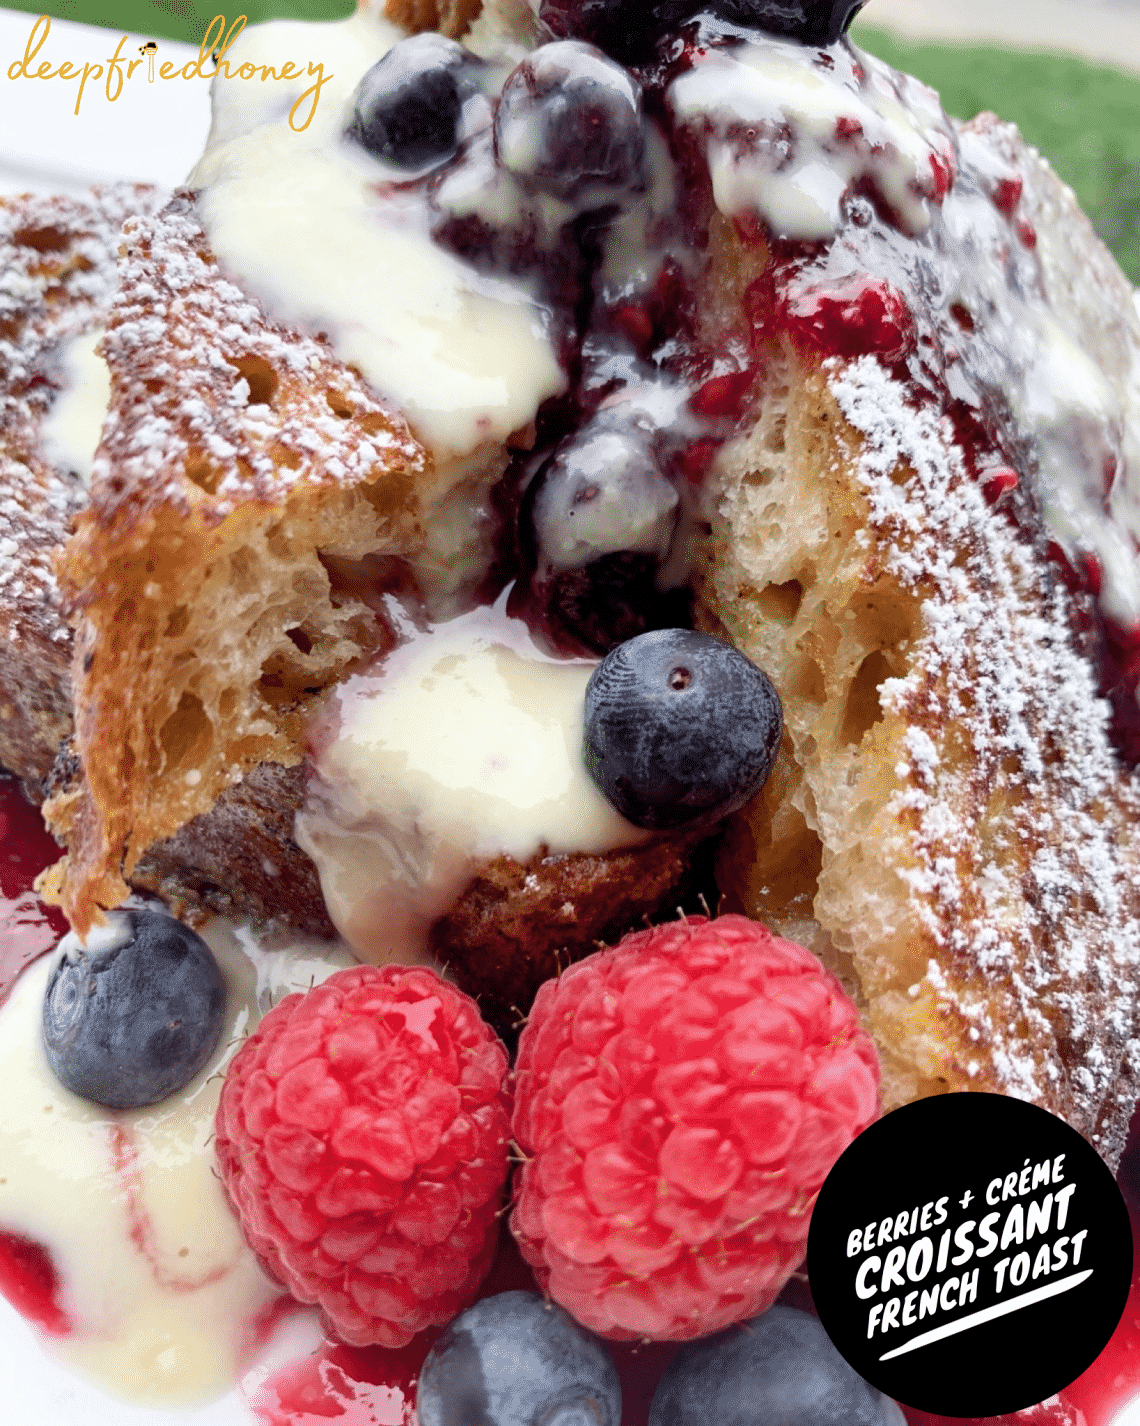
I recently discovered the glory that is La Boulangerie croissant toast and I’m obsessed! It’s expensive, but it’s so good and makes the best french toast! It’s delicious even just warmed in the toaster and slathered with butter.
I’ve found all sorts of uses for it – including this Berries & Crème Croissant French Toast – and it’s a perfect vehicle for the chicken salad I posted recently as well.
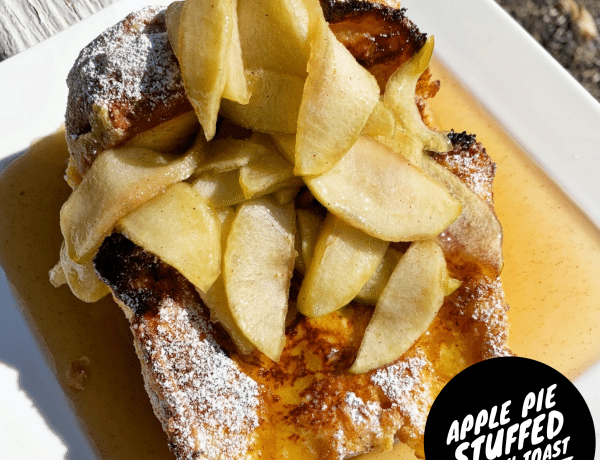
Today is my husband’s birthday. I’m excited because it’s one of the few times a year he will actually tell me what he wants to eat instead of the usual “idc whatever you make is fine.”
He requested stuffed french toast, but strawberries aren’t in season yet so my Strawberry Cheesecake Crunch French Toast wasn’t a good option. He decided on apples as a replacement, and I took it from there. Introducing Apple Pie Stuffed French Toast.
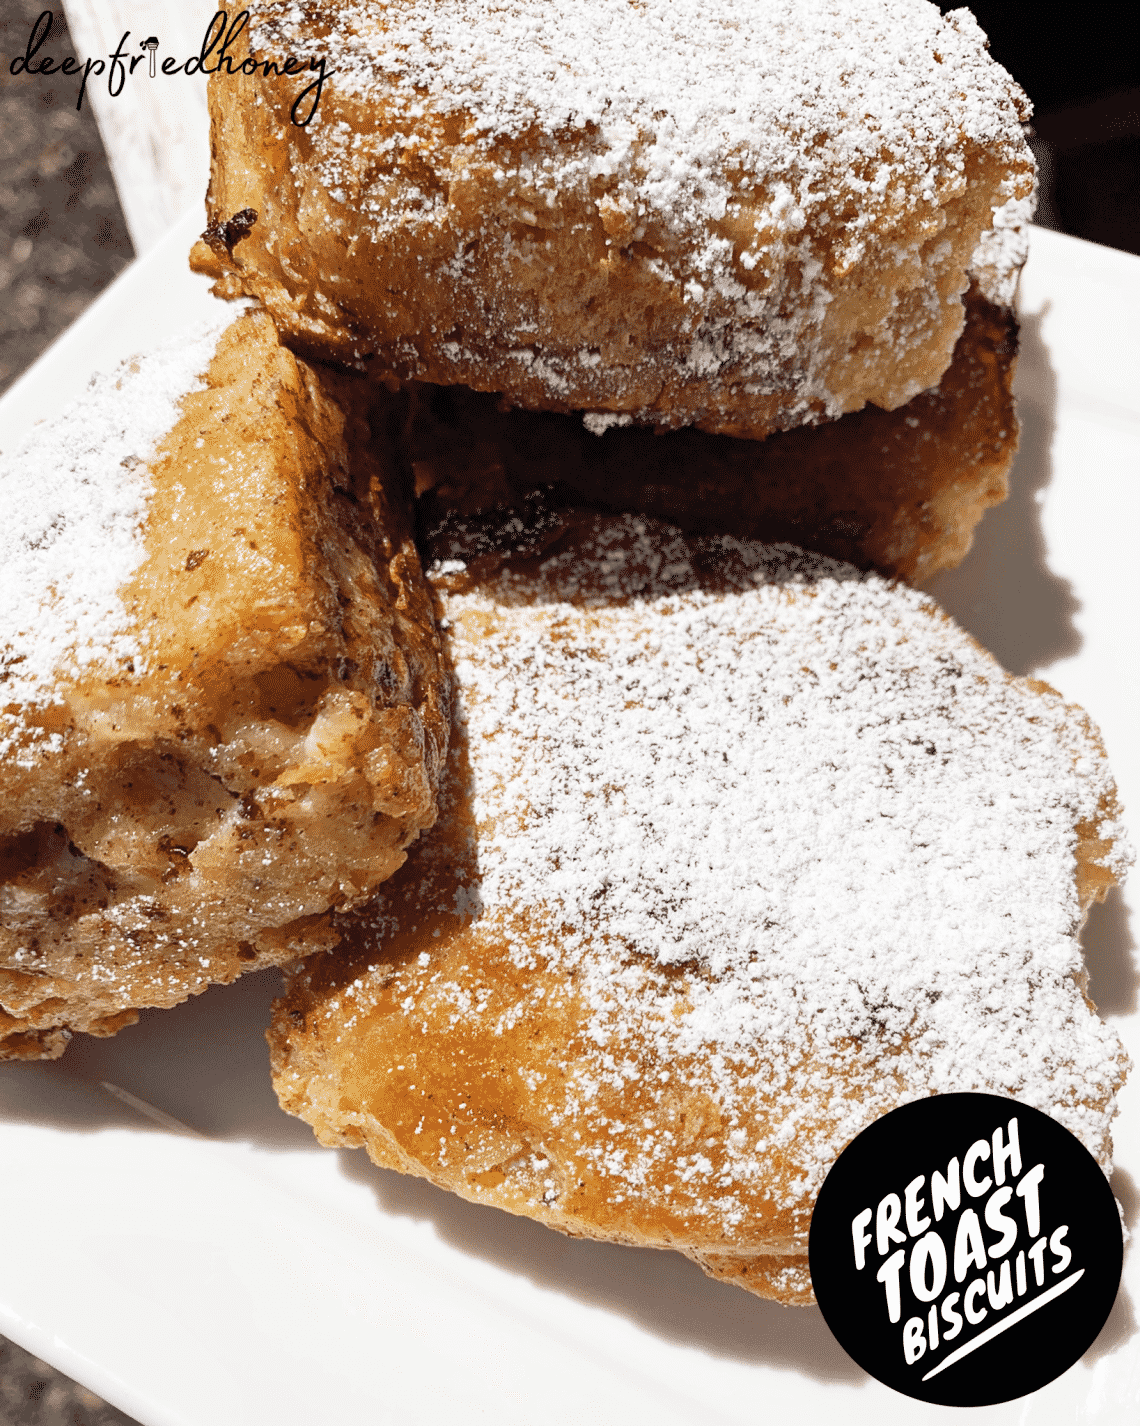
I wish I could take the credit for this wonderful creation that is French Toast Biscuits, but I can’t. I first saw them on Twitter years ago. I immediately saved the picture to my phone and made a mental note to try making it, but I somehow lost the source and I’m a stickler about giving credit where it’s due.
It bothered me so much I just didn’t make them – until now! I posted the photo that had been saved in my phone since 2017 to my Instagram story and immediately people began to message me about Denver Biscuit Company.
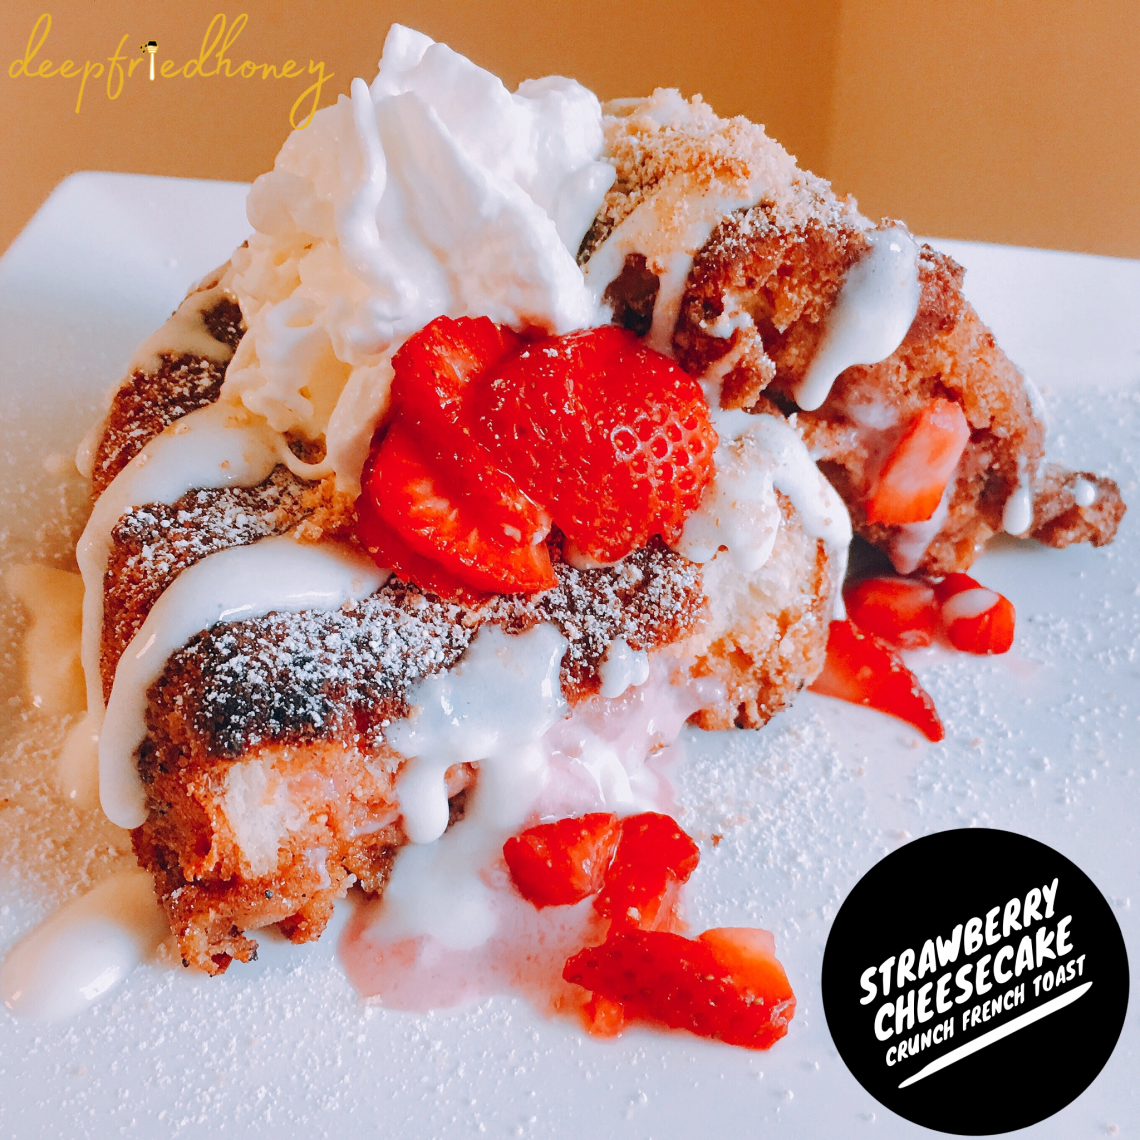
The first time I made this was when my daughters were in elementary school. I mixed up some whipped cream cheese and strawberry preserves and slathered that between two slices of honey wheat bread, then griddled it and tossed it in cinnamon sugar like one of the Fat Elvis sammiches they often asked for.
They loved it, so I kept making it, and over the years it’s evolved into what you see above: Strawberry Cheesecake Crunch French Toast. I know it’s a mouthful but each word is important!
It’s thick slices of King’s Hawaiian Bread stuffed with a strawberry and cream cheese filling, then coated in crushed Cinnamon Toast Crunch cereal and fried in butter just like traditional french toast. It’s incredible, trust me.
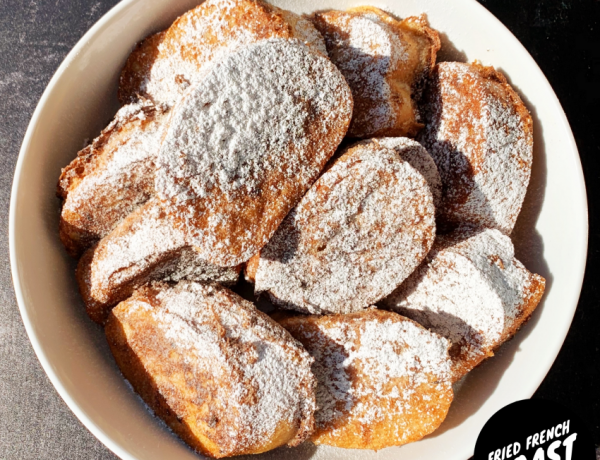
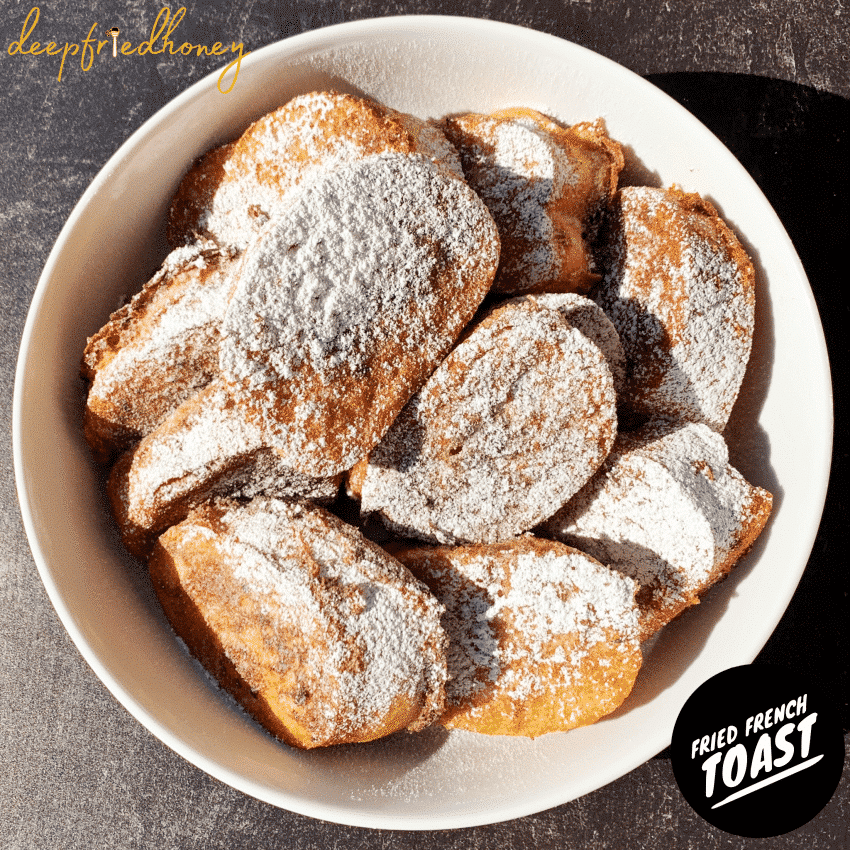
You might already know that I am a very picky eater. It’s not something I’m proud of – I spent an entire year in my mid-twenties determined to try every food offered to me in order to attempt to expand my palate – but it is what it is.
I mention this because I like French Toast, but I am very particular about texture and mouthfeel. Soggy bread is not where it’s at (not for me, at least) and in order to try to fix this problem for myself, I came up with Fried French Toast. I think I did, at least.*
This post may contain affiliate links, which means I get a little off the top to help me keep this website running. It doesn't cost you extra or affect my opinion.
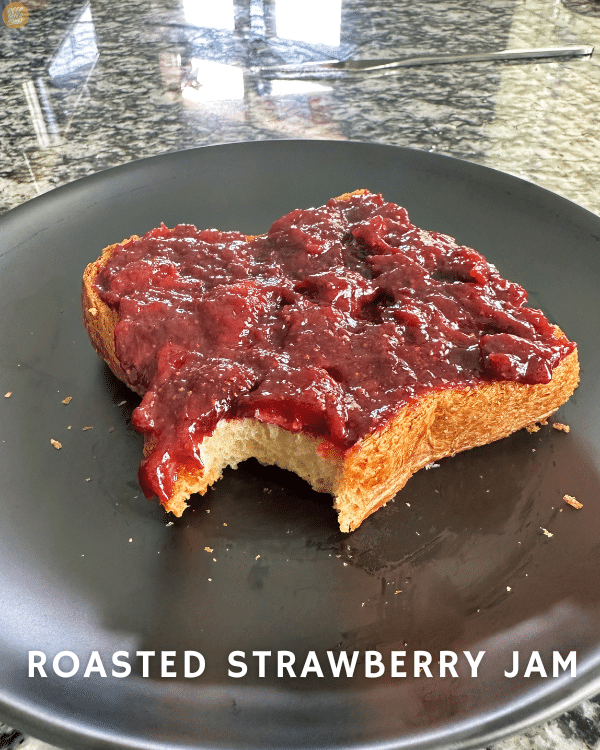
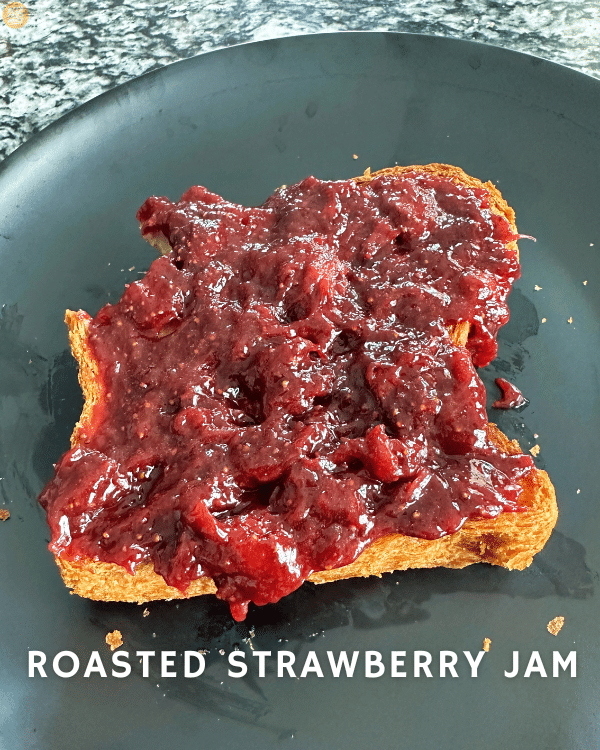
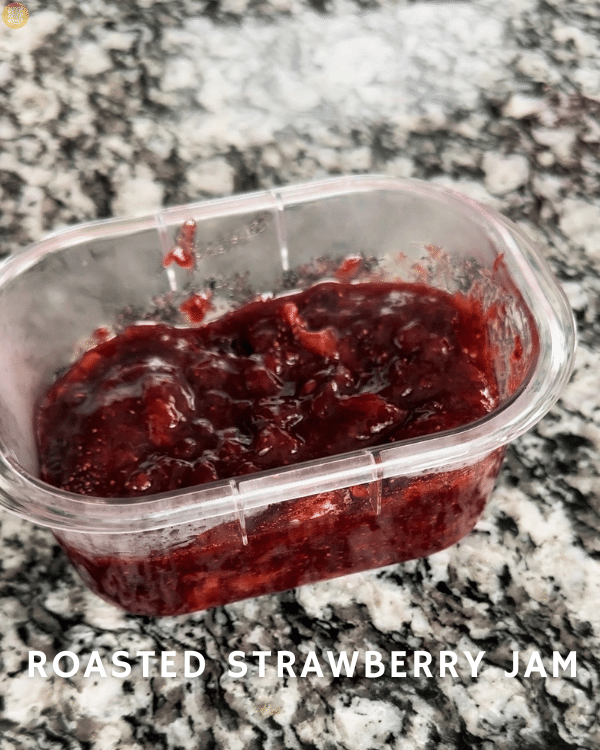
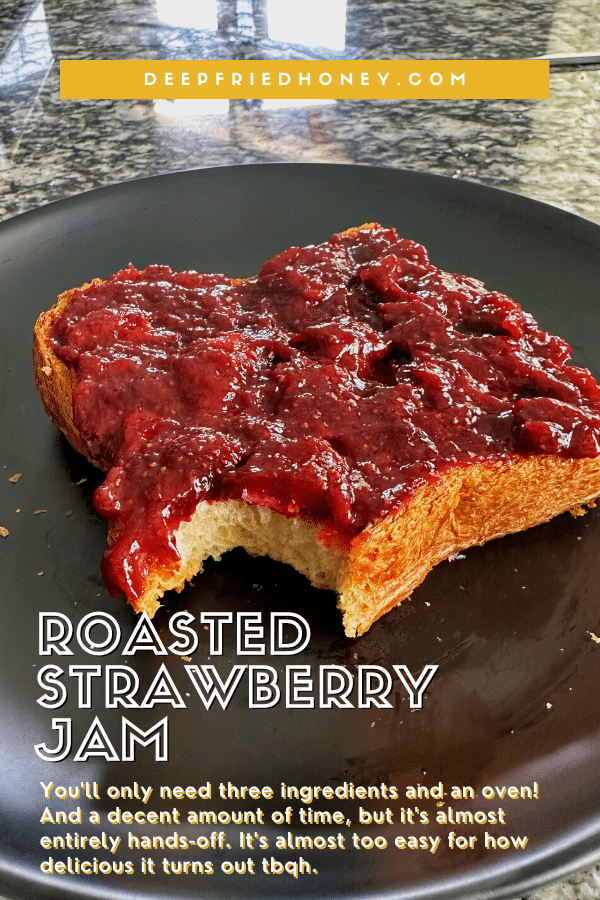
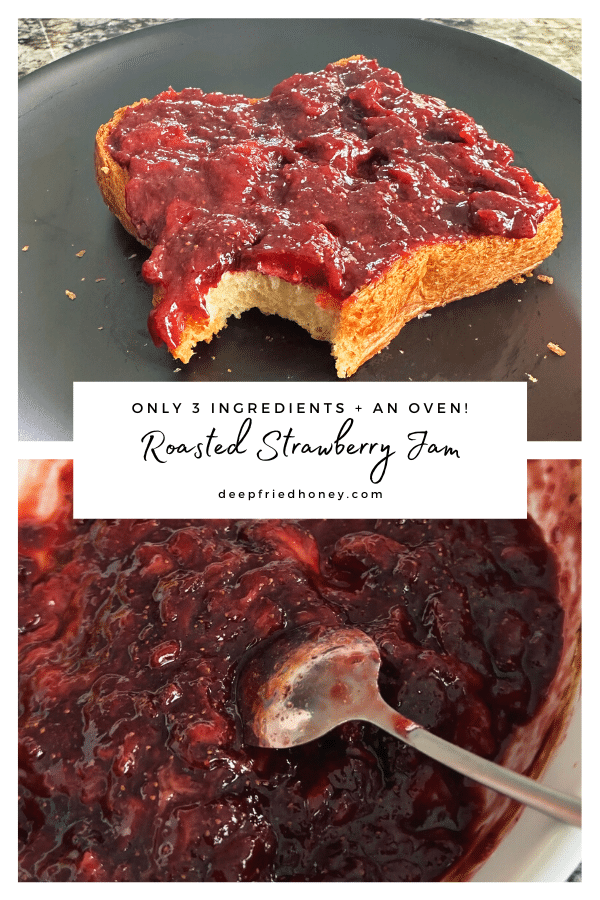
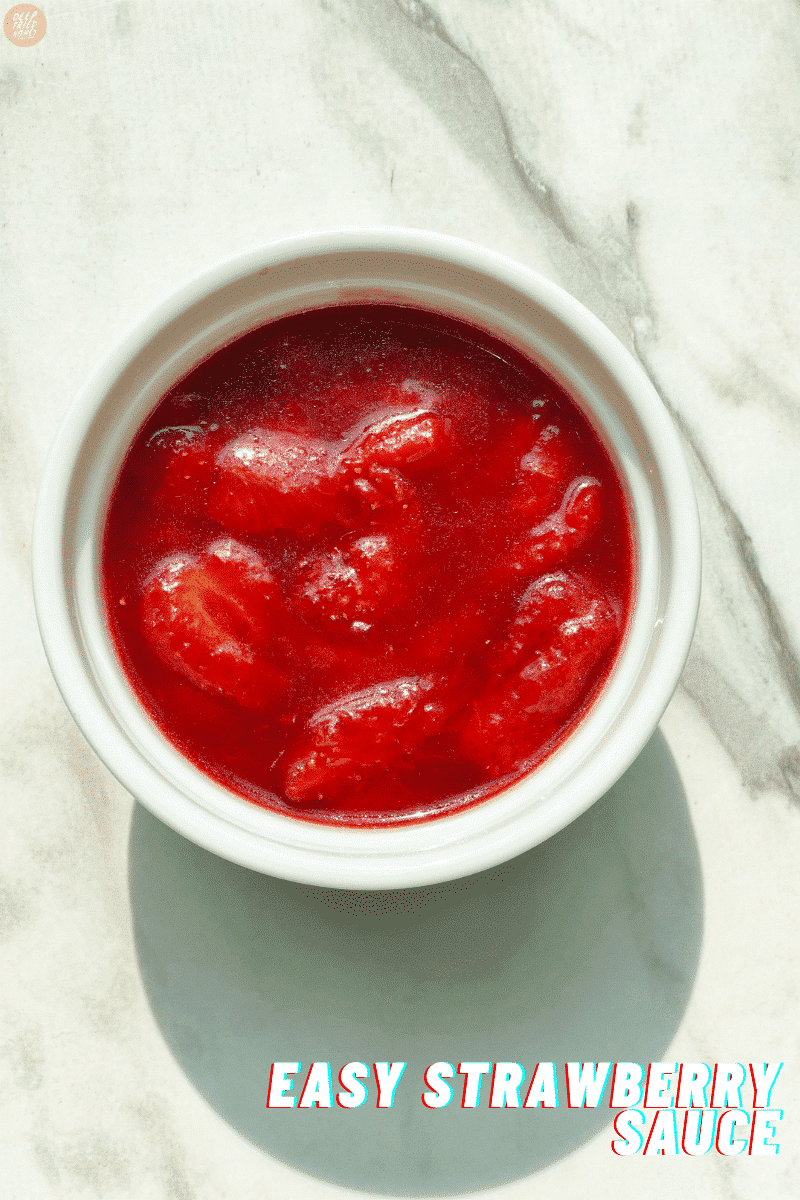
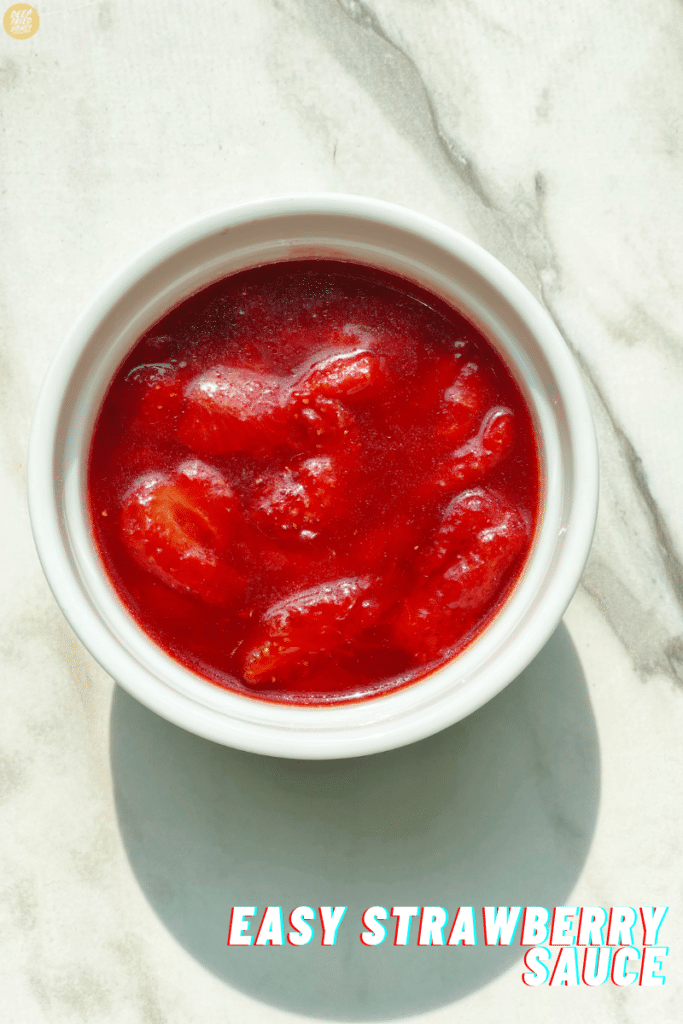
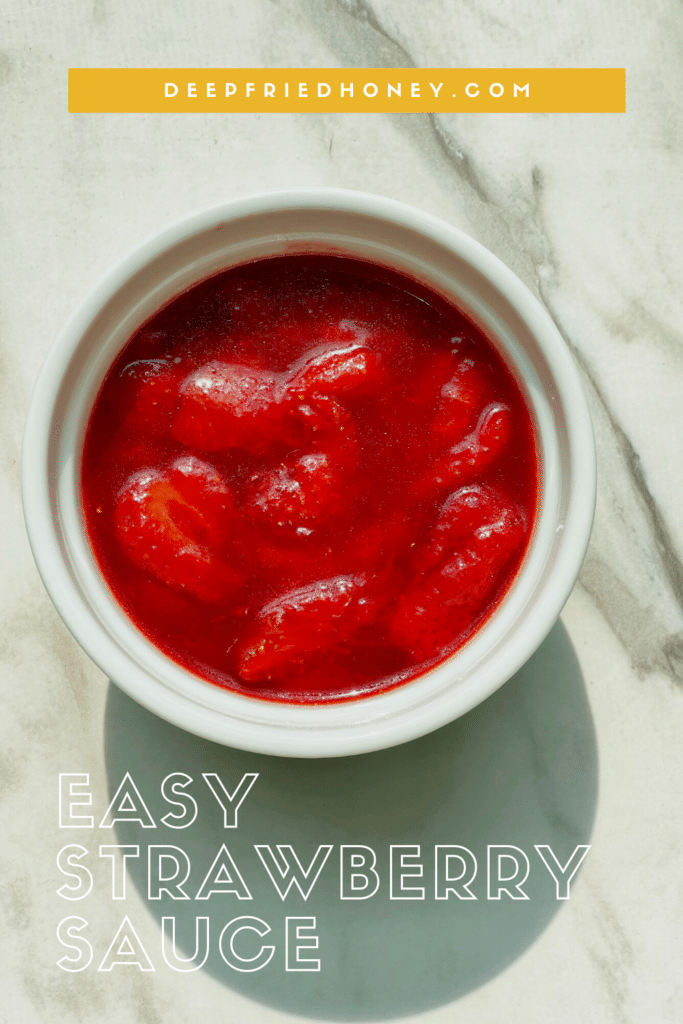
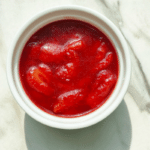
This Roasted Strawberry Jam is probably the easiest and most straightforward recipe – that involves cooking, at least – here on deepfriedhoney.com. Even easier than its cousin Easy Strawberry Sauce. I originally wanted to call it Slow-Roasted, but I realize my penchant for slow-roasting things isn’t widely shared so I offer instructions for both slowly and normally roasting this jam.
Most jam and jelly recipes either require pectin, or a complicated old-fashioned method of boiling the jam until it reaches the ‘gelling’ point and some other stuff. This one? Just toss the ingredients in the oven, give them a stir when they’re done roasting, and refrigerate and use within three weeks (no pectin means a shorter shelf life, too). I love it in a PB+J, on French toast, and my kid is obsessed with using it for parfaits.
Roasted Strawberry Jam Ingredients
Feel free to jump to the full recipe, but here are useful notes about the ingredients you will need to make this Roasted Strawberry Jam recipe:
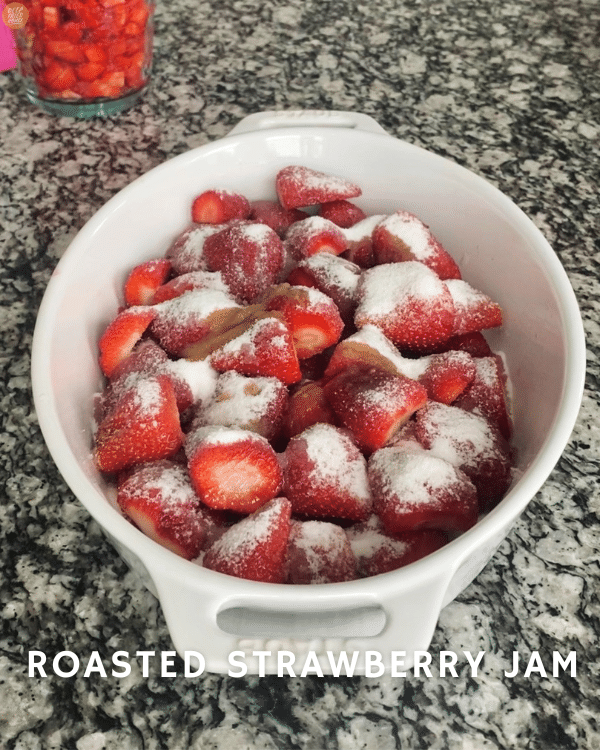
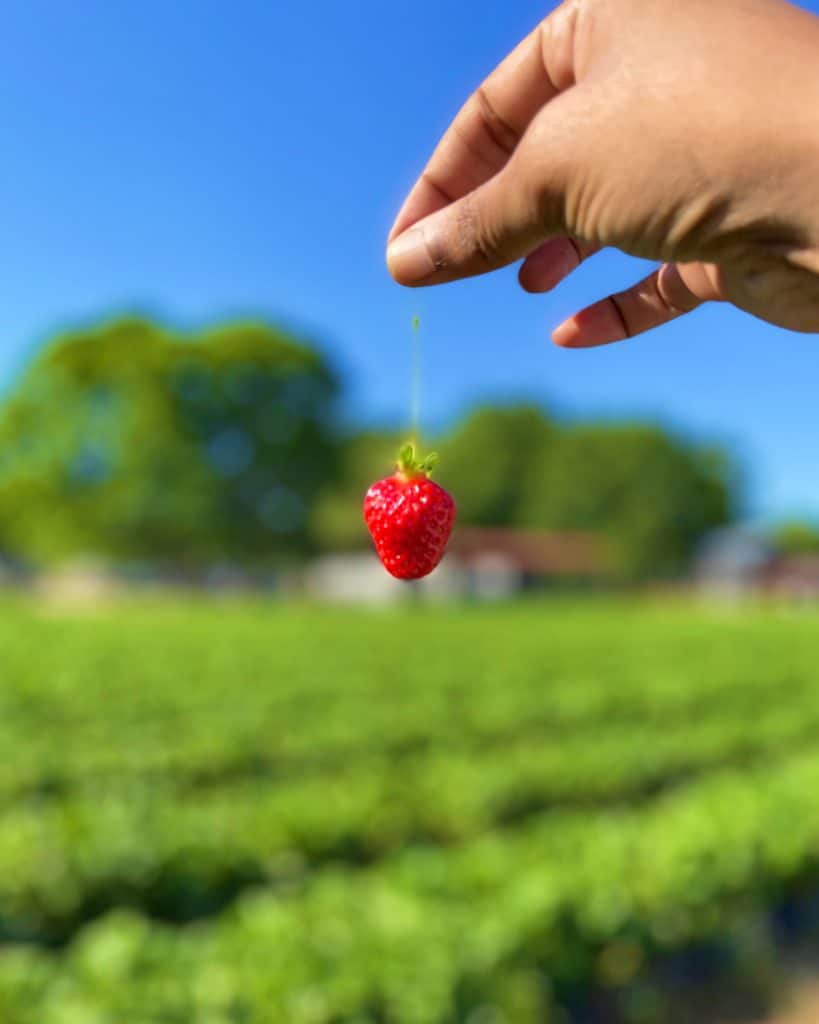
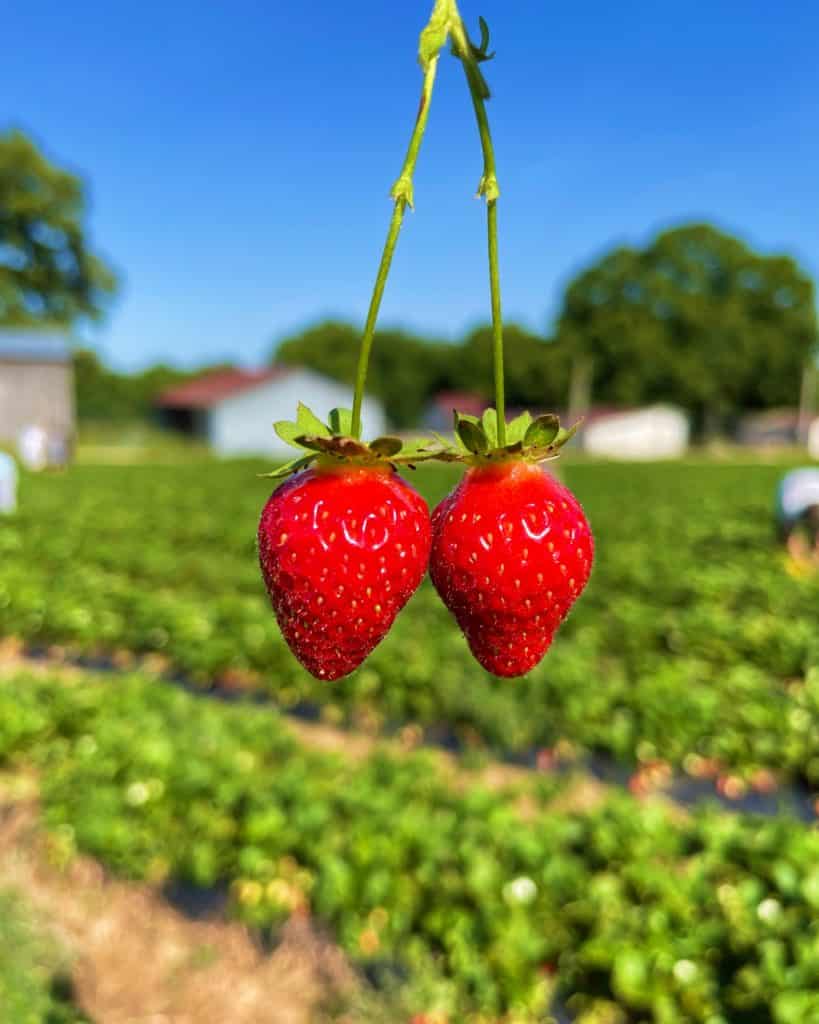
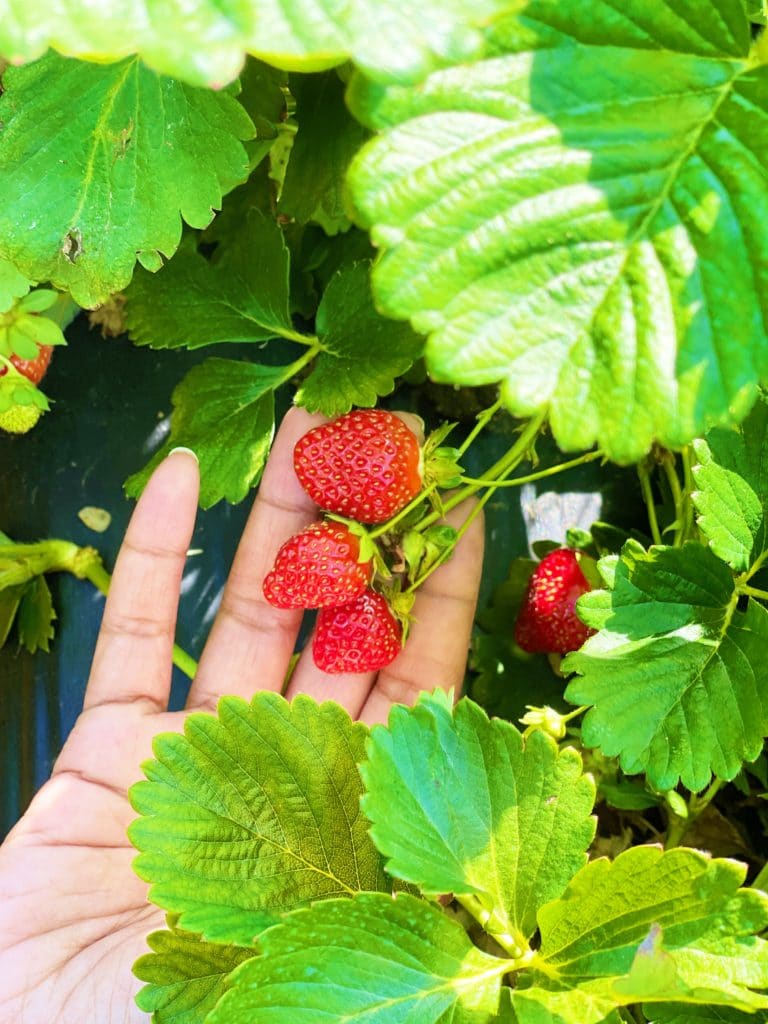
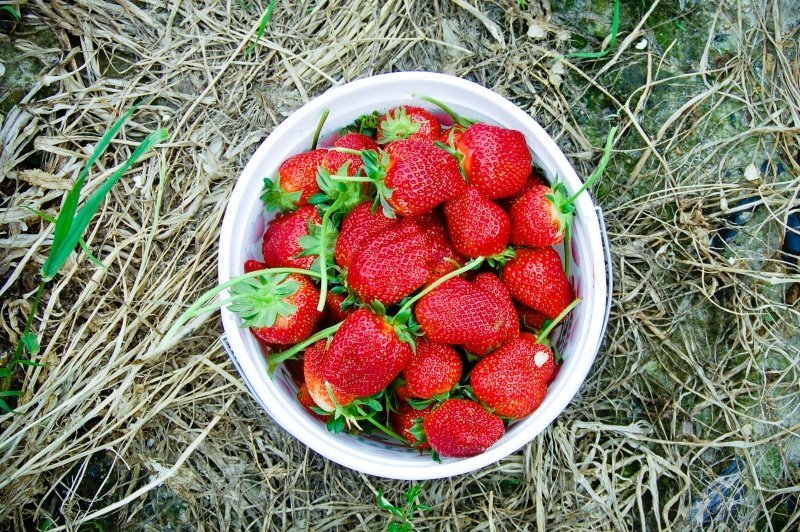
Fresh strawberries: It’s strawberry season here in North Carolina, and it’s my favorite time of year. I’ve gone picking twice so far this year, and I don’t think I’m finished yet. If you use frozen berries you’ll need to thaw and drain them before you begin with the Roasted Strawberry Jam recipe.
Vanilla extract: Just a touch, for warmth and body. You can omit it, but I think it really rounds out the intense flavor roasting the strawberries creates.
Granulated sugar: It’s not Roasted Strawberry Jam without sugar! If you’re using berries out of season or shipped from other states you might need to increase the amount of sugar, maybe up to a full cup. Taste the berries before roasting and you should be able to tell. You know your tastebuds better than anyone, so trust them.
How to Make Roasted Strawberry Jam
Full instructions are included in the recipe below, but here is a basic overview of what you’ll need to do, along with some important tidbits to help you make the most of this Roasted Strawberry Jam recipe:
Prepare for Roasted Strawberry Jam. Preheat your oven to 250°F* and place a rack in the center. Turn on your oven light so that you’ll be able to check their progress without opening the door. Transfer your strawberries to an oven-safe dish and sprinkle the sugar and vanilla extract over them. You don’t need to stir, but you can if you like. If you don’t want to slow-roast them, preheat the oven to 400°F instead.
Roast the Strawberries. Place the strawberries in the oven and walk away. Let them roast, undisturbed, for at least 4 hours (1-2 hours if you’re roasting at 400°F) – but you’re looking for consistency more than time-passed here for this Roasted Strawberry Jam. The strawberries will darken slightly and release their juices, and we’re going to let them continue roasting until they’ve darkened deeply and the juice has reduced into a thick, sticky syrup. Sometimes, depending on the berries, it will take longer than four hours. Only on very rare occasions would it take less.
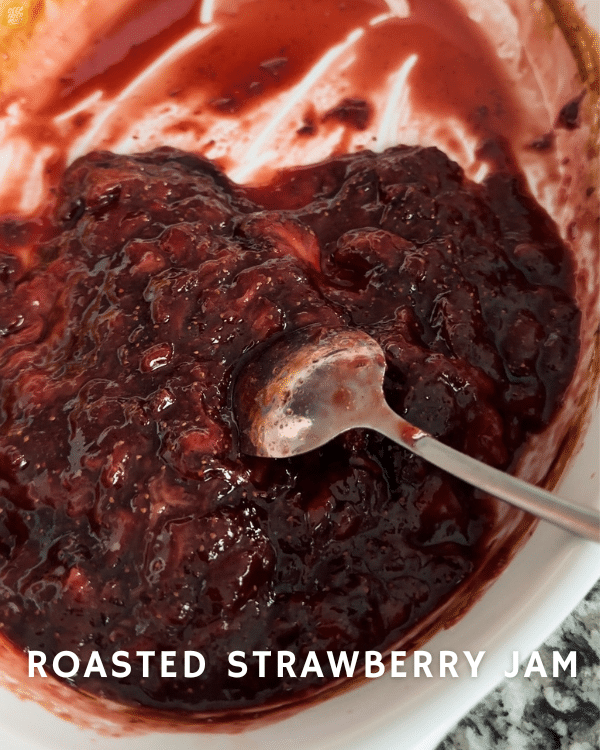
Continue Roasting. Once the berries are darkened and the liquid has reduced into a syrup, remove the berries from the oven. Use a wooden spoon or potato masher to break the berries into small pieces, stirring them into the syrup as you go.
You’ve Got Jam! When you are happy with the breakdown of the berries, transfer the jam to a mason jar and allow it to cool to room temperature. You shouldn’t need to pour off any excess liquid if they roasted for long enough. Affix the lid tightly and refrigerate the Roasted Strawberry Jam for up to three weeks.
You’re only a few hours away from your new favorite condiment.
Ingredients
UnitsScale
1lb strawberries, hulled
1/2 C granulated sugar
1 tsp vanilla extract
Instructions
Preheat your oven to 250°F* and place a rack in the center. Turn on your oven light so that you’ll be able to check their progress without opening the door.
Transfer your strawberries to an oven-safe dish and sprinkle the sugar and vanilla extract over them. You don’t need to stir, but you can if you like.
Place the strawberries in the oven and walk away. Let them roast, undisturbed, for at least 4 hours – but you’re looking for consistency more than time-passed here. The strawberries will darken slightly and release their juices, and we’re going to let them continue roasting until they’ve darkened deeply and the juice has reduced into a thick, sticky syrup. Sometimes, depending on the berries, it will take longer than four hours. Only on very rare occasions would it take less.
Once the berries are darkened and the liquid has reduced into a syrup, remove the berries from the oven. Use a wooden spoon or potato masher to break the berries into small pieces, stirring them into the syrup as you go.
When you are happy with the breakdown of the berries, transfer the jam to a mason jar and allow it to cool to room temperature. Affix the lid tightly and refrigerate for up to three weeks.
Notes
You can quick-roast your way into Roasted Strawberry Jam: crank the oven up to 450°F and let them roast for an hour or two. As stated above, consistency matters more than the amount of time that passes.
This post may contain affiliate links, which means I get a little off the top to help me keep this website running. It doesn't cost you extra or affect my opinion.
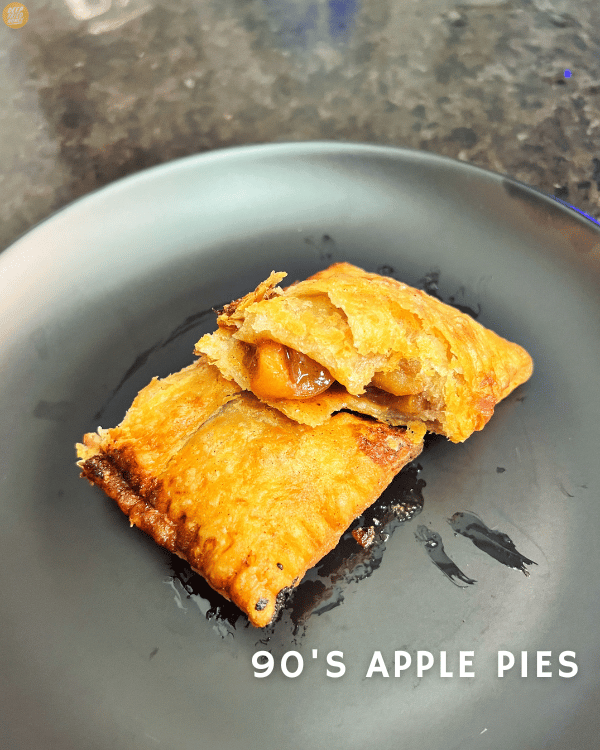
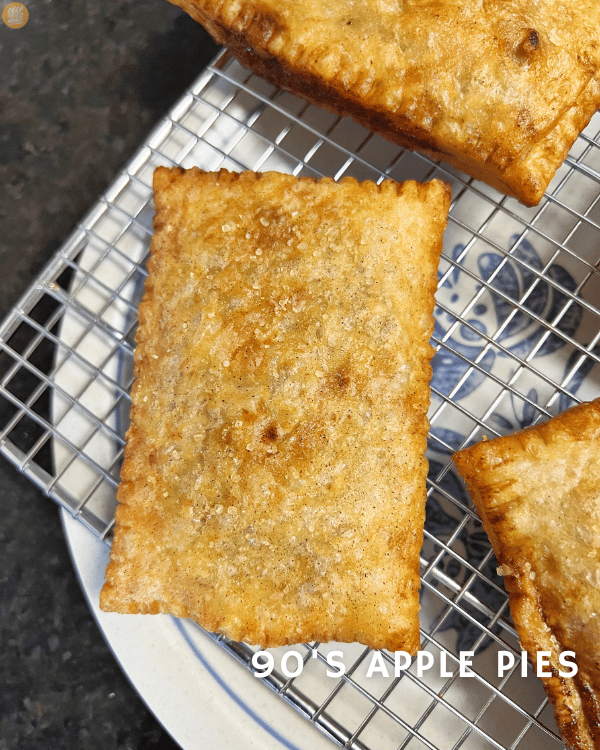
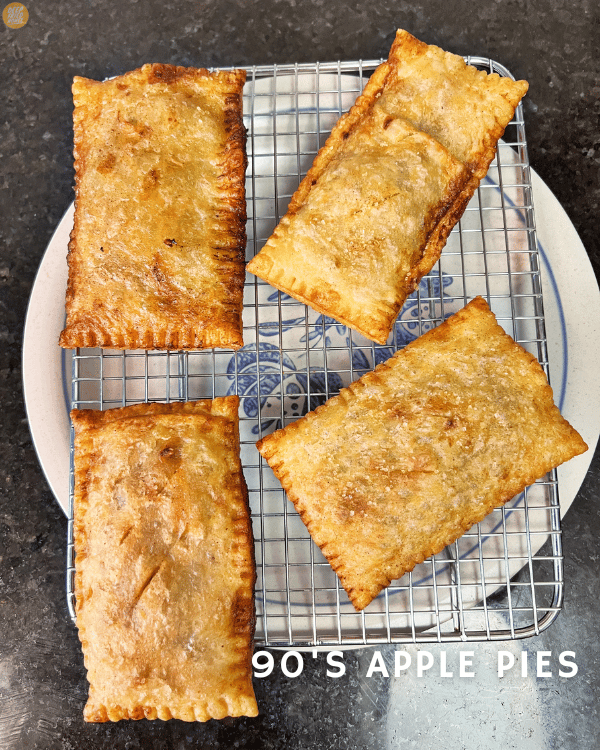
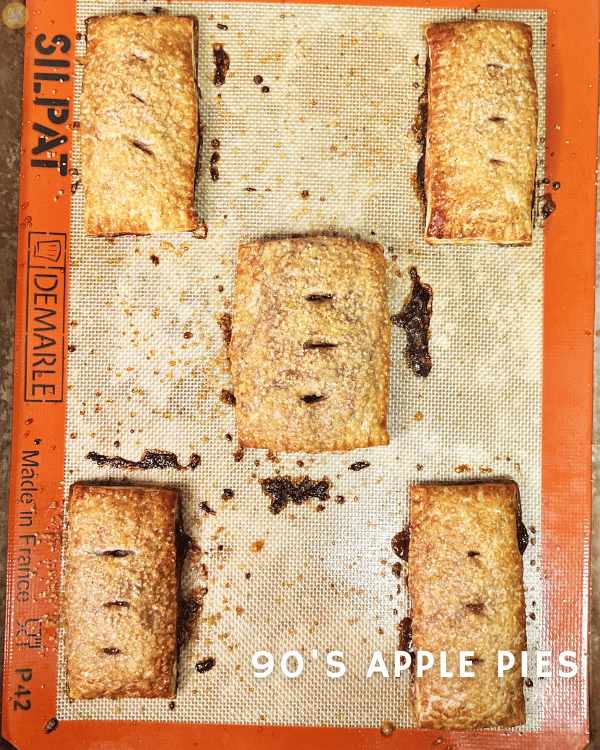
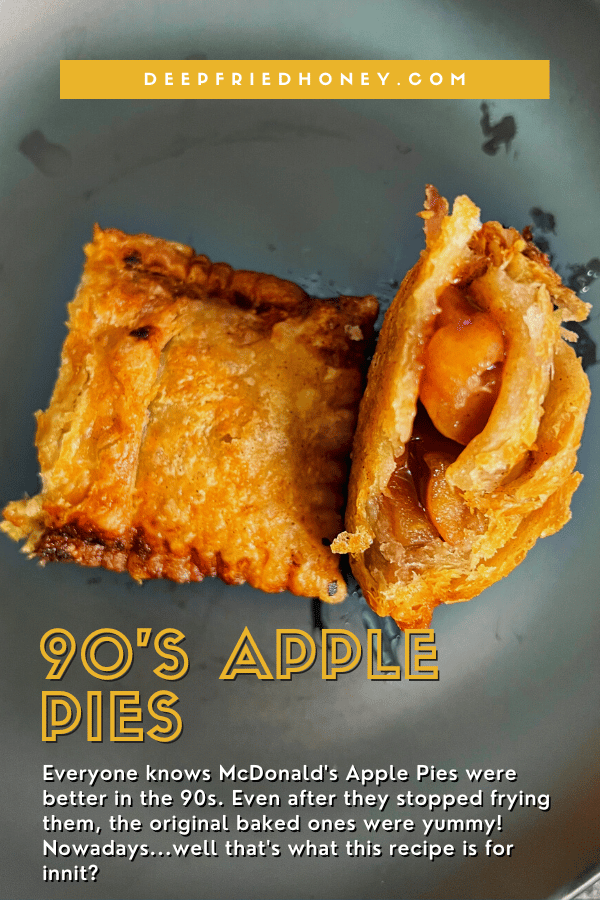
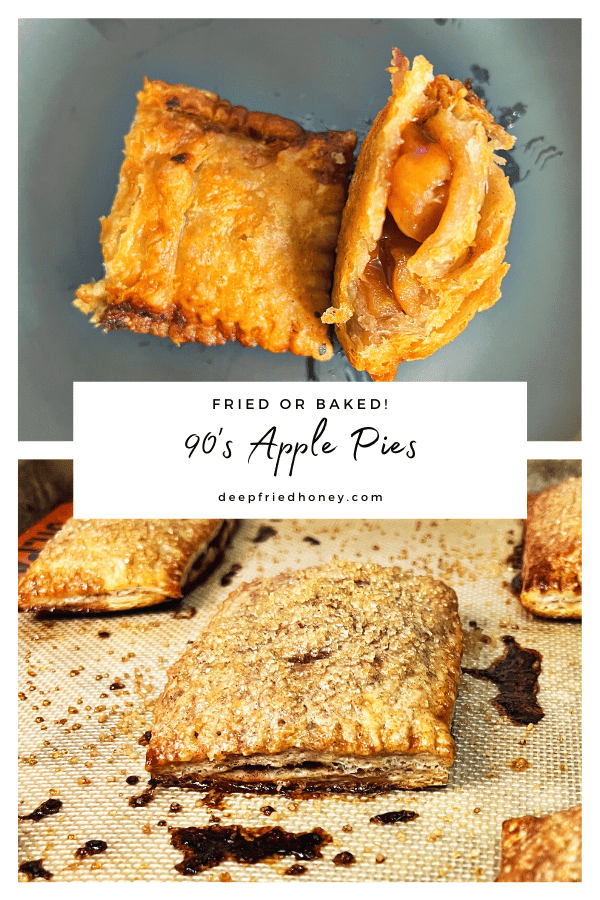
Everyone knows McDonald’s Apple Pies were better in the 90s. Even after they stopped frying them, the original baked ones were yummy! Nowadays…maybe it’s just me but the lattice-topped version is damn near tasteless. So let’s take it back! These Apple Pies are full of sweet and spiced tender apple chunks, encased in a flaky all-butter pastry crust, and either deep fried or sprinkled with sugar and baked in the oven.
I love Apple Pie – it’s pretty much the only pie I’ll eat – but this site is surprisingly sparse when it comes to apple pie recipes! If you haven’t checked out my Apple Crumble French Toast recipe let me take this time to plug it: it’s AMAZING. Alright, onto the 90s Apple Pies recipe!
90s Apple Pies Ingredients
Feel free to jump to the full recipe, but here are useful notes about the ingredients you will need to make this 90s Apple Pies recipe:
All-purpose flour: For the pastry (pie) dough. Use unbleached, always.
Salted butter: If you choose to use unsalted you’ll want to add a teaspoon or so of fine sea salt to your flour. The crust for these 90s Apple Pies will be flavorless without it!
Granulated sugar, dark brown sugar, turbinado sugar: White sugar in the crust and the filling, brown sugar in the filling to add some caramel notes and deepen the color, and turbinado sugar just for sprinkling on top.
Ice water, cold water: Ice water for the crust, cold water for the cornstarch slurry. Make sure the ice water is actually ice water – we want to keep the butter cold as we process the dough so the crust is flaky.
Granny Smith apples: Green apples! Don’t use red! Too soft! Too much moisture! If you don’t like ‘tart’ apples just add a bit more sugar: we need the texture of granny smiths or another tart apple or else you’ll end up with a 90s Apple Pie full of applesauce.
Lemon juice: Freshly squeezed, please. Adds brightness to the filling so it’s not just sweet and cinnamon.
Ground cinnamon, ground ginger, ground nutmeg, fine sea salt: Spices for our filling! Only a pinch of ginger and nutmeg, as cinnamon is the star. I like to roll the crust out on a surface dusted with both flour and a pinch of cinnamon for appearances and a hint of that extra flavor.
Cornstarch: Optional. Dissolved into the aforementioned cold water it’ll serve as a thickener for the filling. If your filling is already thick and kinda dry, you won’t need this.
Egg: For brushing and sealing the edges of the pies. If you’re baking them you’ll also use this to brush the tops of the 90s Apple Pies.
How to Make 90s Apple Pies
Full instructions are included in the recipe below, but here is a basic overview of what you’ll need to do, along with some important tidbits to help you make the most of this 90s Apple Pies recipe:
Make the crust. Add the flour, sugar, and frozen butter to the bowl of your food processor.* Pulse the ingredients together in 2-second pulses until combined – the mixture should resemble coarse crumbs. Pour in the ice water and continue pulsing just until a dough has formed – don’t let it pull into a ball – as soon as you start being able to see large gaps between the coarse crumbs as they congeal, stop processing. Transfer the dough to a clean work surface and form it into a ball with your hands. Divide that bowl into two even parts, shape those into discs, wrap them tightly in plastic wrap and refrigerate them for at least two hours. You need the butter to chill completely. In the meantime, start on the filling so it has time to cool to room temperature before assembly.
Prepare the 90s Apple Piesfilling. In a mixing bowl – or directly in the medium-sized saucepan you’ll be cooking the filling in – stir together the diced apples, lemon juice, granulated sugar, and brown sugar. Make sure the apples are coated in the sugar, then set them aside to let the apples macerate for about 10 minutes. After 10 minutes place the saucepan with the apples over medium-high heat. Simmer until the remaining sugar is dissolved, then stir in the cinnamon, ginger, nutmeg, and salt. Bring the mixture to a boil, then reduce the heat to medium-low and simmer it until thickened and reduced, about 15 minutes, stirring occasionally. While the filling is simmering dissolve the cornstarch in the cold water. Remove the filling from heat and stir in the cornstarch slurry. Once it’s been incorporated fully – no streaks of white – set the filling aside to cool and thicken further.
Roll out the dough. Flour a clean work surface lightly with all-purpose flour*. Roll out your pie dough, one disc at a time until it’s about 1/4″ thick. Try to work it into a rectangle if you can so it’s easier to cut the pies out. With a sharp knife cut the dough into long strips about 3 inches wide, then cut those strips into rectangles, just under 5″ if you can. If your dough is 1/4″ thick you shouldn’t have any problems with this. Place the cut-outs on a plate and stick them in the fridge while you roll out the other disc of dough. Expect to end up with between 10-15 rectangles, I usually end up with 12.
Assemble the 90s Apple Pies. In a small bowl whisk together the large egg and water. Give the cooled filling a good stir. Spoon about a tablespoon or so of filling in the center of half of the rectangles, spreading it the length of the pie but not too close to the edges. Brush the edges of each lightly with egg wash. Top the filling with a second rectangle. Press it down with flat fingers and flatten the pie a little to express any trapped air, then press the edges together. Use a fork to crimp the edges together for an extra tight seal. After all the pies have been assembled and sealed take the tip of a chef’s knife and jab the tops of the pies in three places. You don’t need to widen or open the cut, just up and down is fine. Then, continue based on which version of the pies you want —
The (Superior) Fried Version:
Fill a large stockpot or dutch oven halfway with vegetable oil and heat it to around 325°F. Add your pies to the oil gently, taking care not to crowd the pan. Fry the pies for 2 minutes, then flip and fry for another 2 minutes. Transfer the pies to a wire rack over a baking sheet. Continue until all the pies have been fried.
Increase the heat and bring the oil up to 375°F degrees. Add the 90s Apple Pies back to the oil, this time frying them until they’re as golden brown as you want them to be – for me about 4 minutes more, total.
Transfer the cooked pies back to a wire rack above a baking sheet and sprinkle them with the turbinado sugar. Continue until all the pies have been double-fried to crisp, golden perfection. Serve hot!
The (Also Very Good!) Baked Version:
Preheat your oven to 425°F and place a rack in the center of the oven. Line a baking sheet with parchment paper or a silicone baking sheet and set it aside.
Arrange the pies on the baking sheet, leaving a couple of inches between them. Brush the tops of the 90s Apple Pies with egg wash, taking care to apply it evenly, then sprinkle the tops of each pie with turbinado sugar.
Bake the pies in the preheated oven for 16-20 minutes, until deeply golden brown. Serve hot. Dassit!
Back in my day, McDonald’s Apple Pies were delicious!
Ingredients
Scale
Pie Crust:
2 C all-purpose flour, sifted
1 C salted butter, frozen and cut into 1/2” pieces
1 tbsp granulated sugar
1/4 C ice water
Filling:
5 Granny Smith apples, peeled and diced
1/2 C granulated sugar
1/2 C dark brown sugar
1 1/2 tbsp lemon juice, freshly squeezed
2 tsp ground cinnamon
2 tbsp cornstarch
1 tbsp cold water
1/4 tsp fine sea salt
1/4 tsp ground ginger
1/8 tsp ground nutmeg
Pies:
1 large egg
2 tbsp turbinado sugar
1 tsp water
Instructions
90s Apple Pies:
Add the flour, sugar, and frozen butter to the bowl of your food processor.* Pulse the ingredients together in 2-second pulses until combined – the mixture should resemble coarse crumbs. Pour in the ice water and continue pulsing just until a dough has formed – don’t let it pull into a ball – as soon as you start being able to see large gaps between the coarse crumbs as they congeal, stop processing.
Transfer the dough to a clean work surface and form it into a ball with your hands. Divide that bowl into two even parts, shape those into discs, wrap them tightly in plastic wrap and refrigerate them for at least two hours. You need the butter to chill completely. In the meantime, start on the filling so it has time to cool to room temperature before assembly.
In a mixing bowl – or directly in the medium-sized saucepan you’ll be cooking the filling in – stir together the diced apples, lemon juice, granulated sugar, and brown sugar. Make sure the apples are coated in the sugar, then set them aside to let the apples macerate for about 10 minutes.
After 10 minutes place the saucepan with the apples over medium-high heat. Simmer until the remaining sugar is dissolved, then stir in the cinnamon, ginger, nutmeg, and salt. Bring the mixture to a boil, then reduce the heat to medium-low and simmer it until thickened and reduced, about 15 minutes, stirring occasionally. While the filling is simmering dissolve the cornstarch in the cold water.
Remove the filling from heat and stir in the cornstarch slurry. Once it’s been incorporated fully – no streaks of white – set the filling aside to cool and thicken further.
Flour a clean work surface lightly with all-purpose flour*. Roll out your pie dough, one disc at a time until it’s about 1/4″ thick. Try to work it into a rectangle if you can so it’s easier to cut the pies out. With a sharp knife cut the dough into long strips about 3 inches wide, then cut those strips into rectangles, just under 5″ if you can. If your dough is 1/4″ thick you shouldn’t have any problems with this. Place the cut-outs on a plate and stick them in the fridge while you roll out the other disc of dough. Expect to end up with between 10-15 rectangles, I usually end up with 12.
In a small bowlwhisk together the large egg and water. Give the cooled filling a good stir. Spoon about a tablespoon or so of filling in the center of half of the rectangles, spreading it the length of the pie but not too close to the edges. Brush the edges of each lightly with egg wash.
Top the filling with a second rectangle. Press it down with flat fingers and flatten the pie a little to express any trapped air, then press the edges together. Use a fork to crimp the edges together for an extra tight seal.
After all the pies have been assembled and sealed take the tip of a chef’s knife and jab the tops of the pies in three places. You don’t need to widen or open the cut, just up and down is fine. Then, continue based on which version of the pies you want —
Fried Pies:
Fill a large stockpot or dutch oven halfway with vegetable oil and heat it to around 325°F. Add your pies to the oil gently, taking care not to crowd the pan. Fry the pies for 2 minutes, then flip and fry for another 2 minutes. Transfer the pies to a wire rack over a baking sheet. Continue until all the pies have been fried.
Increase the heat and bring the oil up to 375°F degrees. Add the pies back to the oil, this time frying them until they’re as golden brown as you want them to be – for me about 4 minutes more, total.
Transfer the cooked pies back to a wire rack above a baking sheet and sprinkle them with the turbinado sugar. Continue until all the pies have been double-fried to crisp, golden perfection. Serve hot!
Baked Pies:
Preheat your oven to 425°F and place a rack in the center of the oven. Line a baking sheet with parchment paper or a silicone baking sheet and set it aside.
Arrange the pies on the baking sheet, leaving a couple of inches between them. Brush the tops of the pies with egg wash, taking care to apply it evenly, then sprinkle the tops of each pie with turbinado sugar.
Bake the pies in the preheated oven for 16-20 minutes, until deeply golden brown. Serve hot. Dassit!
Notes
Make the dough by hand: You can make this dough in a bowl with your fingers, a fork, or a pastry cutter. Stir together the salt and flour, then cut the butter into the flour until all of the butter is worked in. There shouldn’t be any noticeably large pieces of butter. Stir the water in with the fork one tablespoon at a time until you have a cohesive dough – you might not need all of the water. Shape it into a ball and continue with the recipe as written.
Rolling the dough out: I like to dust the work surface with both flour and ground cinnamon. It’s pretty, and tastes amazing! Not too much cinnamon, tho.
This post may contain affiliate links, which means I get a little off the top to help me keep this website running. It doesn't cost you extra or affect my opinion.
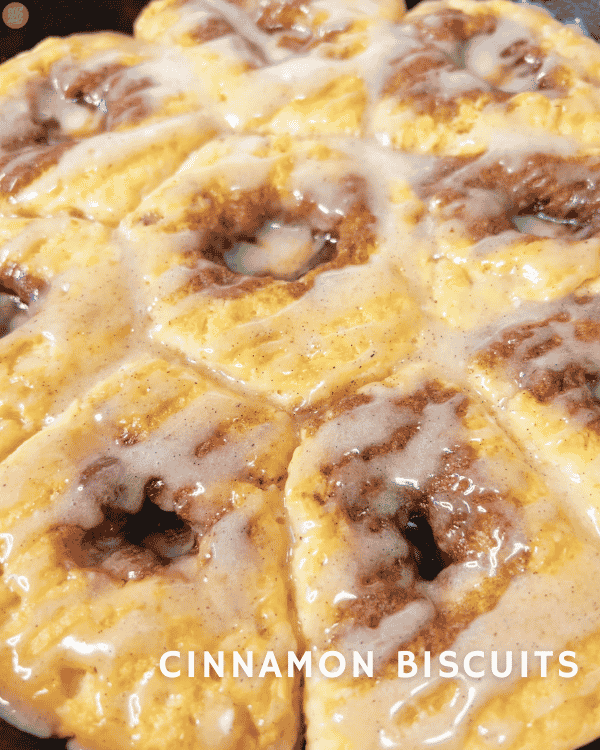
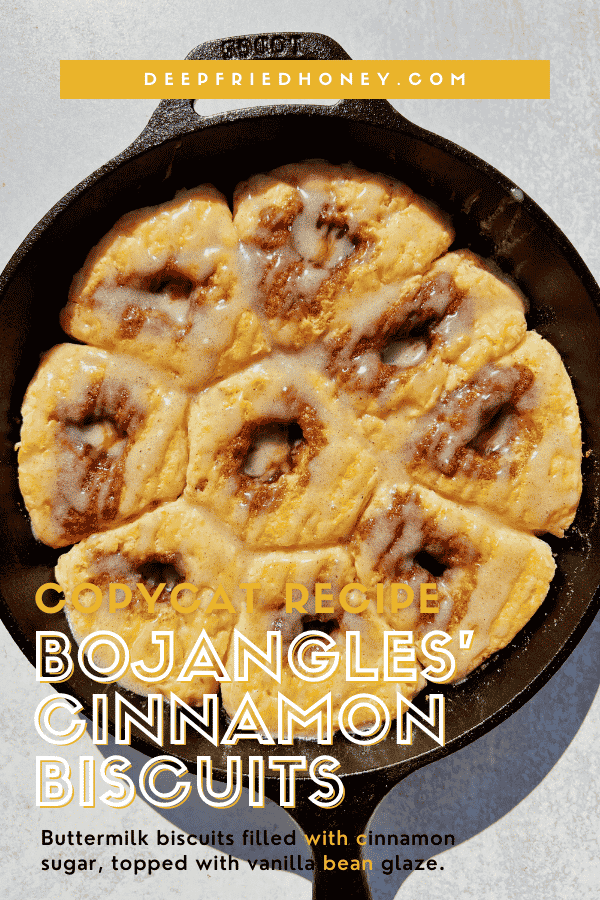
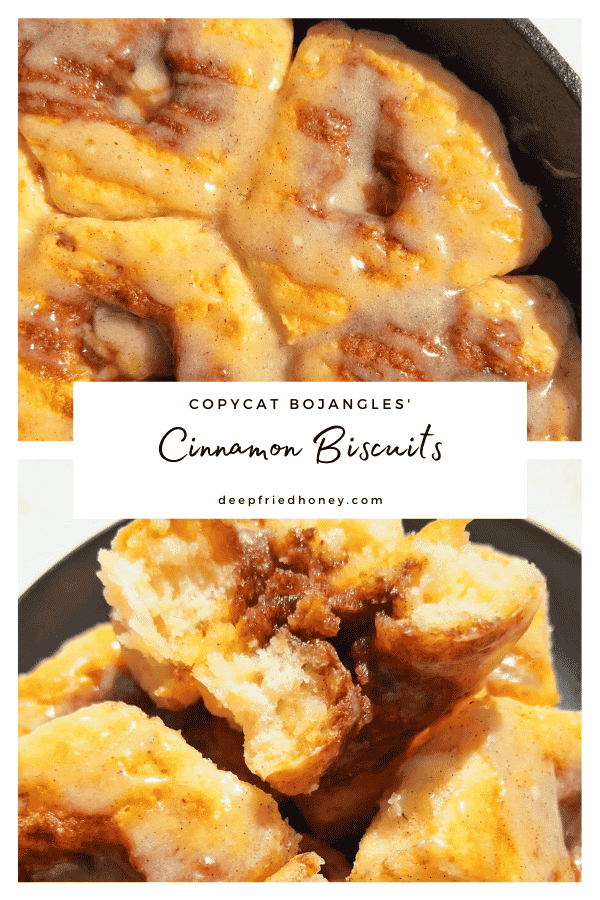
This recipe for Bojangles Copycat Cinnamon Biscuits has lived in my ebook We Got Food at The House for the last few years, and I’m finally bringing it from behind the paywall directly to the site! Bojangles is a fried chicken fast-food chain in the Southeast, known for their biscuits and fries just as much as the chicken. Their Cinnamon Biscuits aren’t available at every location, but when they are my youngest kid lights up: she loves them!
Speaking of Bojangles tho, I am quite certain that the main company is racist as hell (I mean, Bojangles!?? And they were one of the very few companies to not even offer empty platitudes when the unrest after George Floyd had almost every company operating in the US saying SOMETHING). The locations are almost always owned and operated by locals and there was a racially-motivated incident at one of the Greensboro, NC locations back in 2020 that went largely unreported. Bojangles did not support the employee on any level. Anyway, I’m just passing this along so y’all can be mindful.
Bojangles Copycat Cinnamon Biscuits Ingredients
Feel free to jump to the full recipe, but here are useful notes about the ingredients you will need to make this Bojangles Copycat Cinnamon Biscuits recipe:
Self-rising flour, baking powder: If you use all-purpose flour you’ll need to increase the baking powder by 1/2 of a teaspoon and add 1/2 teaspoon of baking soda to the flour. I like to sift these ingredients together, but that’s optional and up to you. Tends to help achieve a lighter, fluffier biscuit.
Granulated sugar, light brown sugar, powdered sugar: All of the sugars! In the biscuit dough, in the cinnamon filling, and in the vanilla bean glaze.
Salted butter, unsalted butter: You can use all salted butter if you like, but I don’t recommend unsalted. If that’s all you’ve got you’ll need to add 1 tsp of salt to the flour mixture, and about 1/2 teaspoon of salt to the cinnamon filling.
Buttermilk: It’s not biscuits around here without buttermilk! If you don’t have any mix two teaspoons of lemon juice or vinegar into a cup of whole milk and let it sit for 10 minutes.
Cinnamon, vanilla bean paste: I mean they’re Cinnamon Biscuits, after all. Vanilla extract would be fine if you don’t have the bean paste. Use clear extract if you can find it: it looks better.
How to Make Bojangles Copycat Cinnamon Biscuits
Full instructions are included in the recipe below, but here is a basic overview of what you’ll need to do, along with some important tidbits to help you make the most of this Bojangles Copycat Cinnamon Biscuits recipe:
Get ready to bake. Preheat your oven to 425°F and lightly oil a 10″ cast iron skillet with butter or vegetable shortening. Set it aside. Sift the dry biscuit ingredients into a metal bowl and stir together to combine. Go ahead and toss all of the cubed butter into the bowl too and stick the bowl and your pastry cutter in the freezer or refrigerator.
Make the filling. Grab another bowl, a small one this time. To it, add all of the ingredients for the cinnamon filling. Whisk together well until a thick brown paste has formed, then set that aside. Don’t go nuts, you don’t need that much. Pull your bowls from the freezer and cut the butter into the flour. There should be chunks of butter throughout, but none larger than a pea.
Prepare the Bojangles Copycat Cinnamon biscuits. Make a well in the center and pour in the cold buttermilk. Use a silicone or wooden tool to everything stir together, just until mixed. It shouldn’t take you more than 10-15 stirs. Too much stirring makes tough biscuits. Flour a clean work surface – not too much, just a small dusting should be fine – and then turn the dough out and form into a large mound. Press it down and out with your fingers until the dough is about 1/2” thick. Grab your biscuit cutter or glass. Press the cutter or glass directly down to the dough and do not twist, but spin. Move your hand around in a tight circle, keeping the cutter pressed against the work surface. This movement will form the biscuits into puffy circles and release them from the work surface without sticking. Repeat until you’ve cut as many circles out of the dough as you can.
Fill the biscuits. Place your biscuits in the skillet, sides touching. There should be just enough to fit the pan, with maybe one extra biscuit’s worth of dough left over. Once all of your biscuits are placed, stick the handle of a wooden utensil into some flour, then use the handle to make a small indentation in the center of each biscuit. I like to twist the handle around and widen the opening. Spoon about 1/2 tablespoon into each indentation, then add the unsalted butter to the top of the biscuits, around the filling – alternatively, you can butter the tops before you fill them. Reserve the leftover filling.
Bake the Bojangles Copycat Cinnamon Biscuits. for 20-29 minutes, until golden brown on top. While the biscuits are baking make the glaze by combining the powdered sugar, vanilla bean paste, and milk in a small bowl. When you pull the biscuits from the oven you’ll notice that most of the cinnamon filling has been absorbed into the biscuit. Go ahead and spoon a little more filling into each indentation again. Then, drizzle the biscuits with the prepared glaze. Serve hot. Dassit!
What To Serve With Bojangles Copycat Cinnamon Biscuits
These Bojangles Copycat Cinnamon Biscuits are the perfect accompaniment to any breakfast or brunch. Check out some other breakfast recipes below! Oh, and if you’re into sweet biscuits don’t miss my French Toast Biscuits recipe. It’s exactly what it sounds like and is as glorious as you imagine.
Preheat your oven to 425oF and lightly oil a 10″ cast iron skillet with butter or vegetable shortening. Set it aside.
Sift the dry biscuit ingredients into a metal bowl and stir together to combine. Go ahead and toss all of the cubed butter into the bowl too and stick the bowl and your pastry cutter in the freezer or refrigerator.
Grab another bowl, a small one this time. To it, add all of the ingredients for the cinnamon filling. Whisk together well until a thick brown paste has formed, then set that aside. Don’t go nuts, you don’t need that much. Pull your bowls from the freezer and cut the butter into the flour. There should be chunks of butter throughout, but none larger than a pea.
Make a well in the center and pour in the cold buttermilk. Use a silicone or wooden tool to everything stir together, just until mixed. It shouldn’t take you more than 10-15 stirs. Too much stirring makes tough biscuits.
Flour a clean work surface – not too much, just a small dusting should be fine – and then turn the dough out and form into a large mound. Press it down and out with your fingers until the dough is about 1/2” thick.
Grab your biscuit cutter or glass. Press the cutter or glass directly down to the dough and do not twist, but spin. Move your hand around in a tight circle, keeping the cutter pressed against the work surface. This movement will form the biscuits into puffy circles, and hell them release from the work surface without sticking. Repeat until you’ve cut as many circles out of the dough as you can.
Place your biscuits in the skillet, sides touching. There should be just enough to fit the pan, with maybe one extra biscuit’s worth of dough left over. Once all of your biscuits are placed, stick the handle of a wooden utensil into some flour, then use the handle to make a small indentation in the center of each biscuit. I like to twist the handle around and widen the opening.
Spoon about 1/2 tablespoon into each indentation, then add the unsalted butter to the top of the biscuits, around the filling – alternatively, you can butter the tops before you fill them. Reserve the leftover filling.
Bake the Cinnamon Biscuits for 20-29 minutes, until golden brown on top. While the biscuits are baking make the glaze by combining the powdered sugar, vanilla bean paste, and milk in a small bowl.
When you pull the biscuits from the oven you’ll notice that most of the cinnamon filling has been absorbed into the biscuit. Go ahead and spoon a little more filling into each indentation again. Then, drizzle the biscuits with the prepared glaze. Serve hot. Dassit!
This post may contain affiliate links, which means I get a little off the top to help me keep this website running. It doesn't cost you extra or affect my opinion.
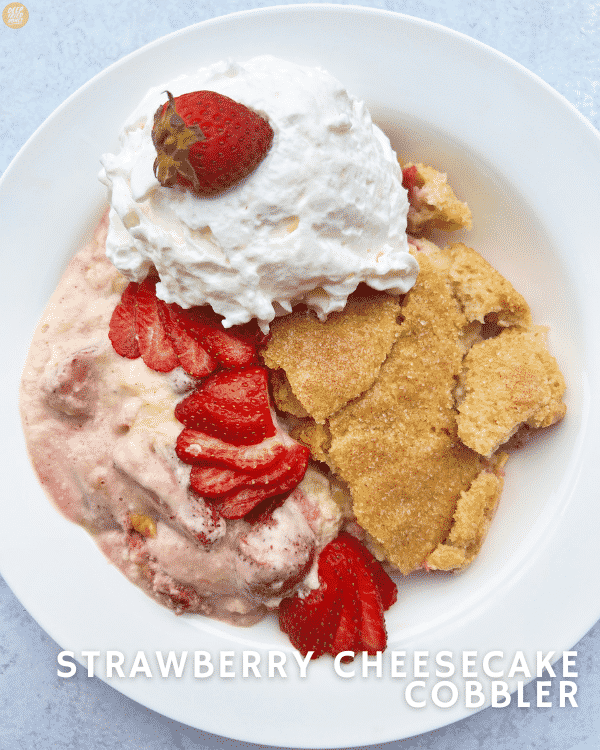
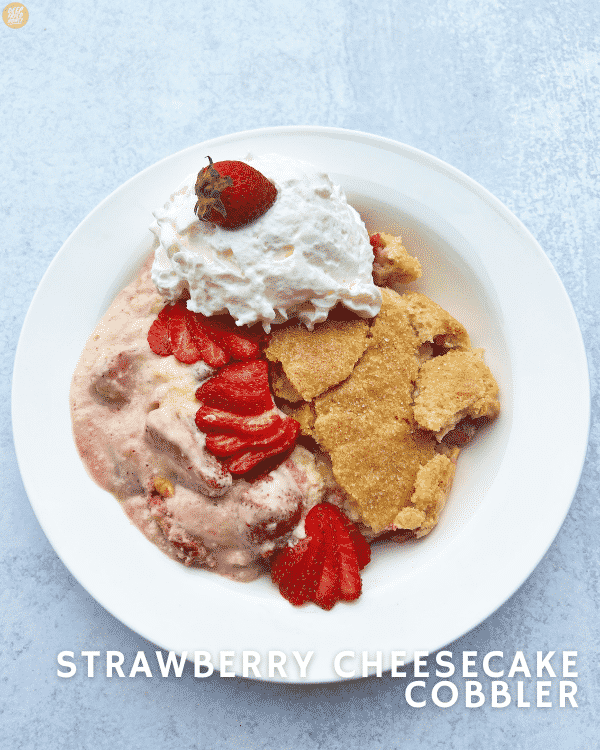
You can thank City BBQ for this recipe, and I think after you taste it you’ll definitely want to thank somebody! A year or so ago I saved a screenshot of City BBQ’s Uber Eats menu, depicting their Strawberries and Cream Cobbler. It’s described as “our classic cobbler batter swirled with homemade cheesecake, bursting with strawberries, and topped with fresh whipped cream” and yeah, that sounds delicious, right? Yes, it does! Oh, if you haven’t yet tried my Strawberry Cheesecake Crunch French Toast recipe, you should!
I never ordered it, and it was a limited-time option so I don’t think I ever will, but I saved the screenshot with the intention of making it, not eating it, and here we are! It’s delicious, y’all. Every single person that I’ve served this to has looked up at me with lifted brows and widened eyes at the very first bite, shocked at just how delicious it is. And almost everything I serve is received as delicious – that sounds boastful but it’s just true! – so that expression says so much.
Full disclosure: this recipe will very likely change because I’m not entirely happy with it (appearance, not taste) but y’all were on my neck for it and I didn’t want to keep you waiting longer!
Strawberry Cheesecake Cobbler Ingredients
Feel free to jump to the full recipe, but here are useful notes about the ingredients you will need to make this Strawberry Cheesecake Cobbler recipe:
Strawberries: It’s strawberry season here in North Carolina, the best time of year! Frozen strawberries will work if it’s hard to find good fresh strawberries in your area – just make sure to thaw them and drain the liquid completely before you start on this recipe.
Cream cheese, condensed milk, eggs: These three ingredients are all we need for our cheesecake batter.
All-purpose flour, baking powder, salted butter, boiling water: For the cobbler. Sef rising and unsalted butter are fine substitutes. Make sure the water is actually boiling!
Granulated sugar, brown sugar, turbinado sugar: It’s a dessert, after all. Notice that I don’t specify dark or light brown sugar; that’s because either works just fine in this recipe. If you follow me on socials you’ll know that I made this quite a few times in order to get it how I wanted it.
Ground coriander, ground cinnamon, ground ginger, vanilla extract, lemon juice: Flavorings. Coriander adds a bit of zing to the cobbler, the others create a warm, round, flavorful sauce to coat the berries along with a little sugar and some of their natural moisture.
How to Make Strawberry Cheesecake Cobbler
Full instructions are included in the recipe below, but here is a basic overview of what you’ll need to do, along with some important tidbits to help you make the most of this Strawberry Cheesecake Cobbler recipe:
Macerate the strawberries. Grab a large mixing bowl and to it add all of the ingredients listed under ‘filling’: the berries, sugars, vanilla, lemon juice, cinnamon, and ginger. Stir them together so that the berries are coated in the spiced sugar mixture that develops, then set them aside to macerate for 30 minutes.
Make the cheesecake. Grab your stand mixer (or a hand mixer and another large mixing bowl). On medium-high speed beat together the cream cheese, eggs, and condensed milk until light and a bit fluffy, about 10 minutes.
Make the cobbler batter. Start boiling your water, and grab another mixing bowl. We’re going to whisk together the flour, coriander, baking powder, and remaining sugars in this one. Once well combined, add the cold, cubed butter to the bowl. Use a pastry cutter – or a really sturdy fork – to cut the butter into the flour mixture. Work the butter through the flour until there are no chunks larger than a pea, then make a well in the center of the bowl. When the water is boiling – a rolling boil, popping bubbles, and all that jazz – pour it into the well you made in the center of the flour mixture. Fold the water in with a silicone spatula, working quickly. It might seem like there isn’t enough water but just keep stirring and folding until you see no more dry streaks.
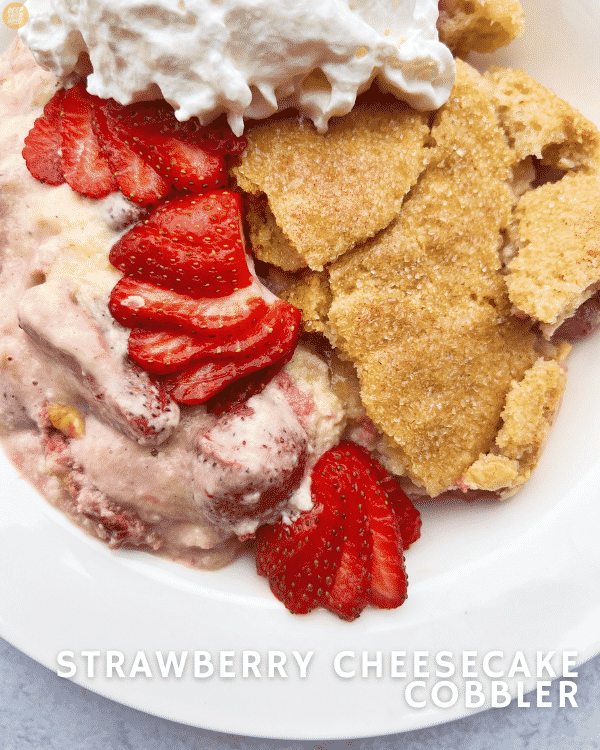
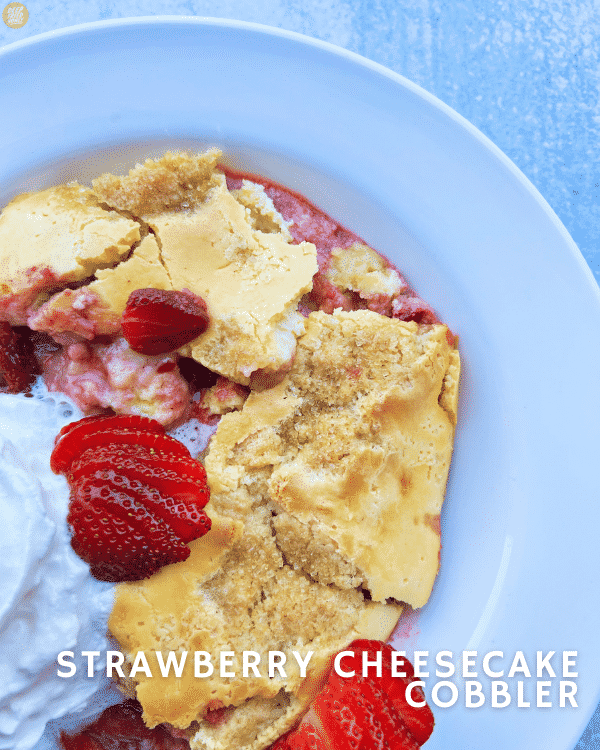
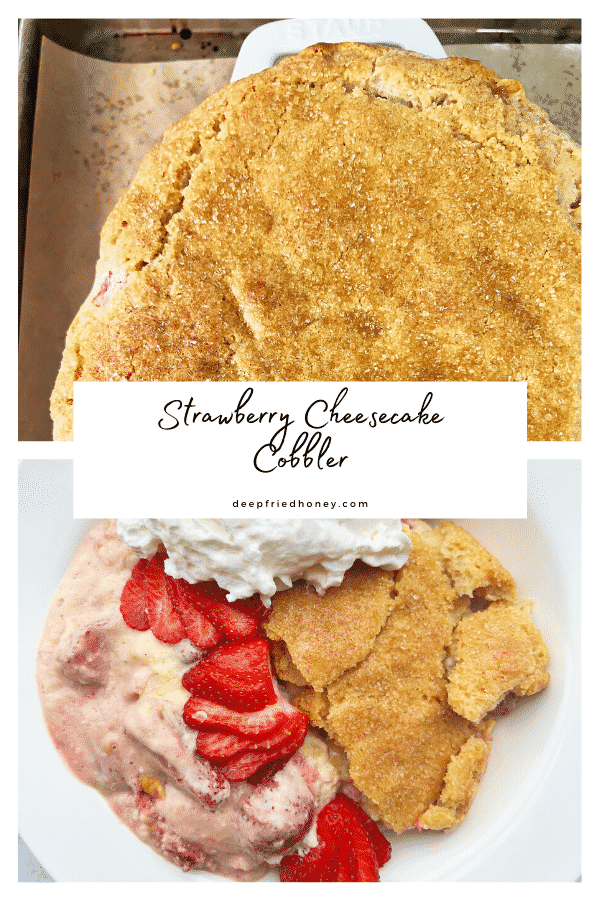
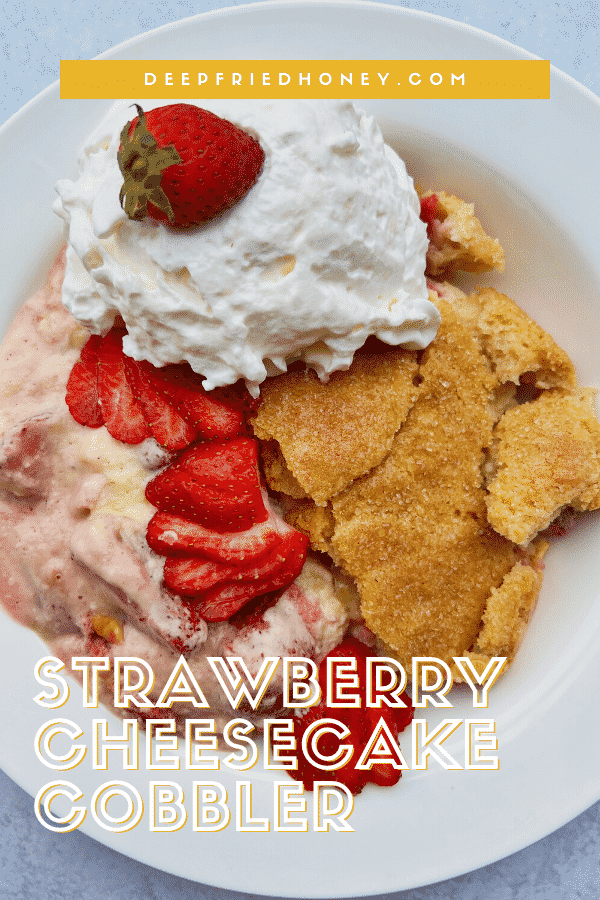
Build the Strawberry Cheesecake Cobbler. Grease a baking dish – I recommend a 9×13″ pan, but any with at least a 12-cup capacity should work – lightly with baking spray or oil. Grab that bowl of strawberries. Give them a stir so they’re lightly coated in the sauce that’s formed at the bottom of the bowl, then drain them. I recommend reserving that liquid, it’s nice over ice cream and other fruit, but it’s up to you. Drain the berries well, in a colander or strainer, shaking off the excess liquid. Pour the strawberries into the pan, and spread them out into an even layer. Next, pour the cheesecake batter over the strawberries and stir them together. Dollop the cobbler batter on top of the strawberries and cheesecake. Spread the cobbler batter out over the strawberries and cheesecake. It’s up to you if you want the top completely covered – I did, see the photos above for an example, or to leave space for the cheesecake and berries to poke through.
Alternatively, you can pour the cheesecake over the top of the berries, not mix them together, and dollop the cobbler batter on top. It will sink into the cheesecake, so there will be less of the crispy top. See the photo below for an example of what it will look like if you go that route.
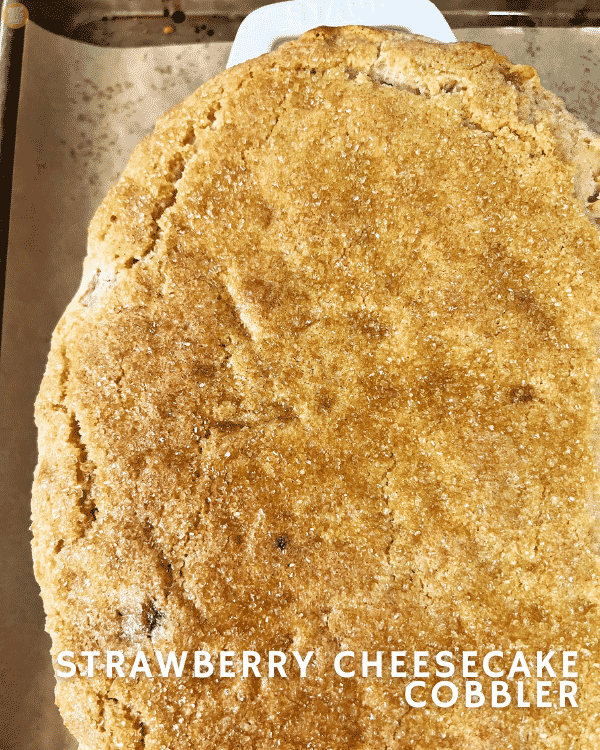
Bake. Next, sprinkle the turbinado sugar over the surface, entirely coating all of the cobbler topping. Place the baking sheet onto a baking tray to catch any drippage, and place the cobbler in the center of the oven. Bake for 55 minutes. The cobbler should be noticeably puffy, and the sugar hardened into a crust. Let the cobbler rest on the counter for 20-30 minutes before spooning in, to allow the cheesecake to set. Or don’t, and eat it burning hot. Dassit!
I mean, it’s exactly what it sounds like. But better? You’ll understand what I mean when you taste it.
Ingredients
UnitsScale
Cheesecake:
1lb cream cheese, room temperature
1/2 C condensed milk
2 large eggs
Cobbler:
2 C all-purpose flour
3/4 C salted butter, cold and diced
1/2 C + 2 tbsp boiling water
1/2 C granulated sugar
1/2 C brown sugar
1/4 C turbinado sugar
2 tsp baking powder
1/4 tsp ground coriander
Filling:
3lbs strawberries, halved
1/4 C granulated sugar
1/4 C brown sugar
1 1/2 tsp vanilla extract
1 tsp lemon juice
1/2 tsp ground cinnamon
1/4 tsp ground ginger
Instructions
Grab a large mixing bowl and to it add all of the ingredients listed under ‘filling’: the berries, sugars, vanilla, lemon juice, cinnamon, and ginger. Stir them together so that the berries are coated in the spiced sugar mixture that develops, then set them aside to macerate for 30 minutes.
Grab your stand mixer (or a hand mixer and another large mixing bowl). On medium-high speed beat together the cream cheese, eggs, and condensed milk until light and a bit fluffy, about 10 minutes.
Start boiling your water, and grab another mixing bowl. We’re going to whisk together the flour, coriander, baking powder, and remaining sugars in this one. Once well combined, add the cold, cubed butter to the bowl. Use a pastry cutter – or a really sturdy fork – to cut the butter into the flour mixture. Work the butter through the flour until there are no chunks larger than a pea, then make a well in the center of the bowl.
Grab that bowl of strawberries. Give them a stir so they’re lightly coated in the sauce that’s formed at the bottom of the bowl, then drain them. I recommend reserving that liquid, it’s nice over ice cream and other fruit, but it’s up to you. Drain the berries well, in a colander or strainer, shaking off the excess liquid.
Grease a baking dish – I recommend a 9×13″ pan, but any with at least a 12-cup capacity should work – lightly with baking spray or oil. Pour the strawberries into the pan, and spread them out into an even layer. Next, pour the cheesecake batter over the strawberries and stir them together. Go ahead and preheat the oven to 350°F and make sure a rack is in the dead center.
Return to the bowl you’re making the cobbler batter in. When the water is boiling – a rolling boil, popping bubbles, and all that jazz – pour it into the well you made in the center of the flour mixture. Fold the water in with a silicone spatula, working quickly. It might seem like there isn’t enough water but just keep stirring and folding. Once you see no more dry streaks in the cobbler batter, dollop the cobbler batter on top of the strawberries and cheesecake. Spread the cobbler batter out over the strawberries and cheesecake. It’s up to you if you want the top completely covered – I did, see the photos above for an example, or to leave space for the cheesecake and berries to poke through.
Next, sprinkle the turbinado sugar over the surface, entirely coating all of the cobbler topping. Place the baking sheet onto a baking tray to catch any drippage, and place the cobbler in the center of the oven. Bake for 55 minutes. The cobbler should be noticeably puffy, and the sugar hardened into a crust. Let the cobbler rest on the counter for 20-30 minutes before spooning in, to allow the cheesecake to set. Or don’t, and eat it burning hot. Dassit!
Notes
Allergic to strawberries? Check out the Peach version of this recipe!
This post may contain affiliate links, which means I get a little off the top to help me keep this website running. It doesn't cost you extra or affect my opinion.
I’ve been meaning to add this recipe for Easy Strawberry Sauce to the site for a while now. I say that all the time, don’t I? Well, it’s true! There are so many requests, it’s like Mount Everest!!
This recipe is probably the simplest and easiest I’ve got coming for you. It only takes a handful of ingredients, comes together in minutes, and is good on so, so many things. Before we get into the recipe, tho, let me dump some photos from my most recent strawberry picking trip!
oh hello there
Easy Strawberry Sauce Ingredients
Feel free to jump to the full recipe, but here are useful notes about the ingredients you will need to make this Easy Strawberry Sauce recipe:
Strawberries: Fresh ones. A whole pound! Check out the section below titled ‘How to Clean your Strawberries‘ for tips on cleaning them. How you cut them is up to you: sometimes I will dice them, sometimes I only cut them in half. Play with it and see what you like best.
Granulated sugar: Raw sugar would work fine. How much you need will depend on your tastes and how sweet your berries are. Outside of NC berry season, I increase the amount to about 1/2 cup.
Salted butter: This can be omitted if you want to keep things vegan (make sure your sugar is organic if so), but it adds a silkiness to the sauce that can’t be replaced. Well, it probably can, but I haven’t tried. I like my butter. Maybe vegan butter?
Lemon juice: Just a bit to bring freshness to the sauce, and balance out the sugar.
Vanilla extract, ground ginger: These add a warm brightness to the sauce you’ll miss without it.
Equipment: You don’t need much! Just a sharp knife, a cutting board, a saucepan with a tight-fitting lid, and a silicone spatula or wooden spoon for stirring. Here’s what I used:
How to Clean your Strawberries
Last year when TikTok had the world in a tizzy because folks found bugs coming out of their berries I covered how I clean mine, and also how I thought the uproar was a bit nonsensical. This is because I’m country. Here’s that portion of my Strawberries + Cream Oatmeal Bars post:
Growing up the way I did – very familiar with where food comes from – desensitized me to things like this. Think cornfields, turkey farms, and peach groves. Raising chickens from hatchlings until they were big enough to butcher and turn into supper (I never ate them, it felt like cannibalism). I used to drink honeysuckle nectar straight from the flowers on the bush while waiting for the school bus to arrive.
I don’t want to eat bugs of course, but finding a worm in an apple is pretty low on my list of concerns. I just wash everything well and carry on about my day.
Fruit & Veggie Wash
Here’s how to make a fruit and vegetable wash that’s sold at many local fruit stands around here:
Fill your (cleaned and sanitized) sink with cool water. My sink holds 25 gallons, but I don’t fill it up all the way – just about 3/4 of the way.
Add 1 C of distilled white vinegar and 2 tbsp of kosher salt.
Soak your produce for about 5 minutes – longer if we’re talking something fibrous like broccoli or lettuce.
Rinse thoroughly with cold water.
Cut any bruised or damaged pieces off of the produce.
Pat the fruits and or veggies dry with paper towels if not using right away.
I don’t recommend doing this more than a day or two before you want to use them: in my experience produce spoils much quicker after washing. You can also combine everything to a spray bottle (4 : 1 water to vinegar, eyeball the salt) and keep that in the fridge to clean things as needed.
How to Make Easy Strawberry Sauce
Full instructions are included in the recipe below, but here is a basic overview of what you’ll need to do, along with some important tidbits to help you make the most of this Easy Strawberry Sauce recipe:
Prep your strawberries. Decide how you’re cutting them up. You can see how the sauce looks when I dice the berries in the photo of Pancakes below. I sliced them lengthwise where you see the Strawberry Shortcakes. The flavor will be the same no matter what, so it very much depends on the mouthfeel you’re going for.
Add everything to the saucepan. Melt the butter over medium heat, then add the berries, sugar, lemon juice, and vanilla. After that’s stirred together well, stir in the ground ginger if using.
Simmer and reduce. Cover with a lid and simmer the berries for 5-7 minutes, until foam begins to form on top.
Cool and serve. Transfer the Easy Strawberry Sauce to another container and allow it to cool to room temperature. Serve, or store in the fridge in an airtight container for up to a week.
What to Serve with thisEasy Strawberry Sauce
There are endless variations that you can make with this Easy Strawberry Sauce recipe, so please feel free to customize yours to taste! For example, you could…
How High? Buttermilk Biscuits: See the Strawberry Shortcake pictured above? That was this sauce, those biscuits, and a hefty portion of vanilla bean whipped cream!
I hope you’ll come back and let me know what you thought of this Easy Strawberry Sauce recipe when you make it. Here are the obligatory Pinterest graphics:
It’s berry season here in North Carolina. The best time of the year!
Ingredients
UnitsScale
1lb fresh strawberries, sliced
1/3 C granulated sugar
1 tbsp salted butter
1 tsp lemon juice
1 tsp vanilla extract
1/8 tsp ground ginger
Instructions
Place a small saucepan with a lid over medium heat and let it preheat for a few minutes. Once the pan is warmed, add the butter. Let it melt, swirling it around to coat the bottom of the pan.
Add the strawberries, sugar, and lemon juice. Stir together well, until the sugar has dissolved and coats the berries. Stir in the ground ginger and cover with a lid.
Simmer the mixture for 5 minutes, then turn off the heat. Use a spoon to skim off any foam that’s accumulated on the surface, then transfer the sauce to a container to cool completely.
Once cooled, cover and refrigerate for up to 7 days. It can be served cool or reheated.
Notes
Read the post above the recipe for advice and tips.
This post may contain affiliate links, which means I get a little off the top to help me keep this website running. It doesn't cost you extra or affect my opinion.
It might not be the best climate for a strawberry recipe right now, but I’m humbly presenting my Strawberries and Cream Oatmeal bars today anyway because it’s North Carolina Strawberry Season and I haven’t posted any strawberry recipes yet!
This is my favorite time of year. Strawberries are my very favorite fruit, but I don’t eat many of them outside of the season here which is from March to May. I can’t describe how big the difference is between berries trucked in from California and those I’ve picked myself locally. I mean just look at them…
Beautiful, right?! I picked those at Cottle Farms in Faison, NC.
#strawberrieswithbugs
Strawberries have been getting a lot of flack recently! First there was this tweet, disrespecting their whole ass existence, and now everyone’s deemed them gross because of the TikTok videos. My kid was so somber when she came to show me, knowing how much I love me some strawberries!
I’m not really bothered tho. I’m country.
Think cornfields, turkey farms, and peach groves. Raising chickens from hatchlings until they were big enough to butcher and turn into supper (I never ate them, it felt like cannibalism). I used to drink honeysuckle nectar straight from the flowers on the bush while waiting for the school bus to arrive.
All of this is to say that I think growing up the way I did – very familiar with where food comes from – desensitized me to things like this. I don’t want to eat bugs of course, but finding a worm in an apple is pretty low on my list of concerns. I just wash everything and carry on about my day.
Fruit & Veggie Wash
Here’s how to make a fruit and vegetable wash that’s sold at many local fruit stands around here:
Fill your (cleaned and sanitized) sink with cool water.
Add 1 C of distilled white vinegar and 2 tbsp of kosher salt.
Soak your produce for about 5 minutes – longer if we’re talking something fibrous like broccoli or lettuce.
Rinse thoroughly with cold water.
Cut any bruised or damaged pieces off of the produce.
Pat the fruits and or veggies dry with paper towels if not using right away.
I don’t recommend doing this more than a day or two before you want to use them: in my experience produce spoils much quicker after washing. You can also combine everything to a spray bottle (4 : 1 water to vinegar, eyeball the salt) and keep that in the fridge to clean things as needed.
Strawberries and Cream Oatmeal Bars
I’d argue that Strawberries and Cream is superior even to Peanut Butter and Chocolate as far as delicious duos go. Between the Strawberries and Cream Hand Pies in my ebook As Seen on IG and my Strawberry Cheesecake Crunch French Toast recipe this is probably not surprising.
My Strawberries and Cream Oatmeal Bars recipe is pretty simple, and you probably have the main components at home already: oats, sugar, flour, cream cheese, and vanilla.
Agar Agar Powder might be new to you and a bit harder to find. It’s a vegetarian gelatin substitute made of red sea algae – gelatin is usually derived from beef or pork bones. You can find it in most health food or herbalist stores, some specialty markets, and also on Amazon.
The recipe also calls for ground coriander. It, combined with the vanilla in the cookie and crumble layers add a wonderful warmth. You can find coriander whole or already ground in most grocery stores.
The recipe is also very versatile and we love those around here! Check out some easy ways to make it your own.
Switch it Up:
Instead of layering the cream cheese filling both below and above the strawberries, take the reserved filling and drizzle it over the top of the oatmeal bars instead. You can do this before or after you bake them.
Swap the strawberries out for another fruit. Try other berries like blackberries or blueberries; cook down some apples or peaches. Use lemon curd! Just make sure you don’t use raw fruit: the moisture will make the bottom cookie layer soggy.
Leave out the cream cheese filling entirely and you have traditional Strawberry Oatmeal Bars. You’ll only need to reduce the baking time by 10 minutes, otherwise, the recipe is exactly the same.
The recipe for the Cookie + Crumble is the same one I use when I make Dutch Apple Pies or any Fruit Crumble. It also makes a great topping for oatmeal, yogurt and smoothie bowls. Spread the crumble on a baking sheet and place it in a 350ºF oven. Toss it around with a spatula every couple of minutes so it browns evenly, and bake it for about 15 minutes. Dassit.
If you make these Strawberries and Cream Oatmeal Bars I hope you’ll come back and let me know what you thought by rating it and leaving a comment. Scroll down past the recipe for a nice big Pinterest-friendly graphic and check out the extended tutorial on my YouTube channel.
Preheat your oven to 350ºF and prepare an 8×8″ baking dish by either lining it with parchment paper, or greasing it with baking spray or a light coat of oil.
Begin with the cookie: Add the rolled oats, flour, baking powder and coriander to a large mixing bowl. Stir well. In another bowl, whisk together the brown sugar and melted butter.
Once the butter and brown sugar are blended, add the mixture to the dry ingredients along with the vanilla extract. Use a wooden spoon or silicone spatula to stir well. You want to distribute the butter mixture into the dry ingredients as much as you can. Look for chunks of various sizes, as well as some oats still loose. Try to incorporate as much loose flour as you can.
Scoop a little less than 2/3 of the mixture into the prepared pan and spread it around the bottom evenly. Use the bottom of a dry measuring cup to really pack it in, pressing down and using as much force as you can. You want it to be tight so it doesn’t break apart when cutting and eating later.
Bake the cookie layer in your oven on the middle rack for 10 minutes, then remove and set aside to cool.
Start on your strawberry filling: add the sliced berries – reserve some slices for topping later – along with the lemon juice and sugar to a small saucepan over medium heat. Cover and bring to a boil. Let boil for 2 minutes, then turn off the heat. Sprinkle in your agar agar powder and whisk it in well. Work quickly so the powder doesn’t set in one place.
Set the strawberry mixture aside to cool for at least 30 minutes, stirring occasionally.
Make the cream filling by combining the cream cheese, powdered sugar, and milk in a small bowl. Whisk until most of the lumps are gone. You can whisk until it’s completely smooth if you want but it’s not necessary.
Spoon half of the mixture over the cookie layer and spread it around in an even layer.
Check to see if the strawberry filling has cooled. It can be warm, but it shouldn’t be so hot it’s uncomfortable to touch. When it’s ready, pour the strawberry filling over the top and spread it around evenly as well, all the way to the edges.
Use a spoon to add dollops of the remaining cream filling around the top of the strawberry layer. Once you’ve added it all use a butter knife to swirl it together. Make sure not to push the knife in too far: don’t disturb the cookie layer at the bottom.
Sprinkle the remaining cookie mixture over the entire top, from edge to edge. You can leave some of the berries and cream mixture showing if you like.
Arrange your strawberry slices over the top of the crumble in whatever pattern you’d like.
Finish with a light sprinkle of extra crumble if you have any, then place the pan back into the oven for 40-50 minutes. It’s ready with the jam is bubbling around the edges and the top is golden brown. Trust your nose; don’t let it burn.
Let it cool completely – it takes HOURS but it’s necessary. Once it’s cooled, remove the cookie from the pan, then slice it into squares. It will keep in the fridge in an airtight container for 4 days.
A 9×13″ baking dish is the perfect size for doubling this recipe.
You can prepare the strawberry filling in advance and let it cool completely. I don’t do this because I don’t want the filling to set in the shape of the bowl, causing me to have to stir TF out of it to get it back into a pourable/smoothable state.
This post may contain affiliate links, which means I get a little off the top to help me keep this website running. It doesn't cost you extra or affect my opinion.
I’ve been wanting to develop an oatmeal recipe, but one that was different from the hundreds already available if you browse Pinterest.
While brainstorming different ways to make plain ol’ oatmeal more original I found a bag of pecans in my pantry which always makes me think of Butter Pecan, and here we are!
Butter Pecan Oatmeal is creamy, buttery oatmeal topped with crunchy candied pecans. Both sweetened with vanilla and brown sugar along with a bit of cinnamon. It’s a wonderful, filling combination of flavors and textures.
Butter Pecan is a flavor popular here in The South, especially amongst older black folk like my grandparents. In the fall my grandfather always filled the pantry closet with bags of pecans waiting to be shelled and roasted (Pecan season is September – November). My gramma could probably exist on solely Häagen-Dazs Butter Pecan ice cream for the rest of her days.
I can’t say I love it as they do, but I can definitely see the appeal: it’s a perfect blend of salty and sweet and y’all know I love butter.
Butter Pecan Oatmeal is actually two recipes in one – first the candied pecans, then the oatmeal. If you’ve never made candied nuts before you’ll probably be surprised at how simple and easy it is to do.
You can make them 2-3 days in advance – just keep ’em in an airtight container. I like making them just before, so they’re cooled enough to be crunchy and no longer sticky on the outside, but still a tad warm on the inside.
Things to Note:
This recipe calls for rolled oats. I’ve not tested it with steel-cut or instant oats, so I can’t say if it would work or not.
You might need to increase – or decrease – the amount of liquid called for to achieve your preferred consistency. Oatmeal is especially individual-specific food.
The candied pecan recipe will work with the same amount of any other type of nut, and both raw and roasted nuts work equally as well.
Toasting the oats brings out a wonderful nutty flavor and really infuses them with butter. I don’t recommend skipping this step, but the recipe will turn out well f you do.
If you make this Butter Pecan Oatmeal recipe let me know what you think by rating it or leaving a comment below.
Make the candied pecans first, at least an hour prior to starting the oatmeal. Preheat your oven to 350ºF. Add the butter into a cast-iron skillet and place it nto the oven. Leave it there while you prepare the pecans.
In a medium-sized bowl combine the egg white, water, and vanilla extract. Whisk vigorously until the whites are a bit foamy.
Add your pecans to the bowl and stir to coat thoroughly. Add your sugars and cinnamon, and stir again. Make sure everything is evenly distributed.
Remove your cast iron skillet from the oven once the butter is melted. Pour your coated pecans into the skillet and spread them out into an even layer. Return the cast-iron skillet to the oven.
Bake the pecans for 45 minutes or so, removing every 15 minutes to gently stir and turn the pecans so they cook evenly. They will be sticky and kind of wet for most of this time, only really becoming hardened once they cool, but you’ll notice the amount of moisture will reduce toward the end of baking.
After 45 minutes remove them from the oven and let them rest. You can remove the pecans to a baking sheet to cool faster if you like. Stir them every 10 minutes or so to avoid them clumping together while you work on the oatmeal.
For your oatmeal, place a large saucepan over medium-high heat and add 2 tbsp of salted butter. Once that’s melted and begins to foam add your oats. Toast the oats, stirring as you go, for 5-7 minutes. They should look completely dry, with no more sheen or wetness from the butter.
Pour in your milk and water. Bring to a boil, then reduce the heat to medium-low and cover. Cook for 5 minutes, stirring occasionally.
Taste and make sure the oats are tender to your liking. If they aren’t, cook for a few minutes longer.
Turn off the heat and stir in the remaining butter, the brown sugar, cinnamon, and vanilla bean paste. Cover again and set aside for 2 minutes to thicken.
Serve hot, with the candied pecans on top, and an extra pat of salted butter if you’re feeling adventurous.
Notes
If your nuts are still sticky once they are completely cool to the touch, place them back in the oven for 5-10 more minutes, then cool again. You don’t need to add more butter, but stay close to the oven and pay close attention to how it smells. Don’t let it burn.
This post may contain affiliate links, which means I get a little off the top to help me keep this website running. It doesn't cost you extra or affect my opinion.
Yes, another fried chicken recipe! It is my favorite food, after all. This recipe for Easy Fried Chicken Cutlets is pretty straightforward: thin evenly sized cutlets of chicken breast are lightly breaded and deep fried just waiting to be served with your favorite sides, or in a chicken sandwich or biscuit.
You only need a handful of ingredients, but the one for the batter might seem a bit odd to you: egg whites! I have tried many ways of making fried chicken and I almost always return to buttermilk and maybe an egg because I’m a creature of habit, but I really enjoyed the lighter crispy crunchy texture of this wet batter. Shout out to SpiceNSauced on Instagram, which is where I originally saw this. Now, on to the recipe!
Easy Fried Chicken Cutlets Ingredients
Feel free to jump to the full recipe, but here are useful notes about the ingredients you will need to make this Easy Fried Chicken Cutlets recipe:
Boneless skinless chicken breasts: To make cutlets! What is a cutlet you ask? A cutlet is a chicken breast that’s been sliced through the middle horizontally into two thinner, evenly sized pieces of meat. Sometimes they’re also pounded with a mallet to make them even thinner, or to ensure they’re of even thickness. You can start with bone-in chicken if you like; that’ll be cheaper for sure. When you’ve broken them down and deboned them, set the tenderloin aside and work with just the main part of the breast.
Flour, cornstarch: Our dry dredge. Standard components. Adding cornstarch to the flour makes for a lighter crust, but you’ll be just fine if you use only flour. Self-rising flour is my preference for frying chicken for the baking powder it contains, but any flour will work.
Egg whites: Our entire wet dredge. The star of this Easy Fried Chicken Cutlets recipe is what sets it apart from the other recipes already here. I mentioned above that I saw it done on Instagram and that’s true but it’s not the whole story: she used both egg whites and sparkling water. I tried that and liked it, and then when I tried again I forgot to add the sparkling water. Well, I didn’t feel or taste any difference, so I omitted it. Feel free to test it yourself and see what you think!
Seasoned salt, ground black pepper: Simple seasonings. I prefer Lawry’s Seasoned Salt. Use your favorite. Note that I said ground black pepper instead of cracked black pepper. We want the flavor but not the texture of black pepper. I also usually add some cayenne or another spicy pepper powder.
Oil: For frying. Peanut is my preference, but any high-smoke point oil will work. I like peanut oil because it can be reused and doesn’t impart any flavor to the food. I’ve been really into Avocado oil lately, but it’s even more expensive than peanut oil.
How to Make Easy Fried Chicken Cutlets
Full instructions are included in the recipe below, but here is a basic overview of what you’ll need to do, along with some important tidbits to help you make the most of this Easy Fried Chicken Cutlets recipe:
Prepare the chicken. Grab your boneless skinless chicken breast and lay it out on your cutting board. Press the palm of your hand flat against the top of the breast to keep it still and stable. Cut the breast in half through the side of the breast – not from the top, that would be just cutting it down the middle, and you’d have to cut your hand anyway – making sure to adjust the knife as you slice to keep the meat even the entire way through. Season the chicken with seasoned salt and black pepper, then set aside to rest and marinate a bit.
Make the dredge(s). In a medium mixing bowl add your egg whites, along with about a quarter of a teaspoon of seasoned salt. Use a whisk or an immersion blender to whip the egg whites until they’re a bit frothy. Not too much or they’ll start to stiffen and we’re not making meringue. Set this mixing bowl aside and grab another one. In the second bowl whisk together the flour, cornstarch, black pepper, and the remaining seasoned salt.
Batter up! For extra crunchy bits, dip a fork into the egg white wash and flick it over the surface of the flour, then stir it in. This will create little pockets that will adhere to the chicken and create crunchy craggies! Next, dip the cutlets one by one in the egg white wash, let the excess drip off, then transfer the cutlet to the flour mixture. Coat the cutlet in the flour, using your fingers to press and squeeze the flour into the flesh. Set the breaded cutlets on a plate to rest while you prepare the oil.
Fry the Easy Fried Chicken Cutlets. Fill a stockpot or dutch oven – something with high sides and a large well – halfway up the sides with your frying oil and heat it to around 360°F. If you stick the handle of a wooden spoon into the oil it should sizzle rapidly (not violently) just as a piece of chicken would. When the oil is ready, add the cutlets to the oil one at a time, sweeping the cutlet through the oil before you release it to help the breading set. Fry, turning occasionally until the chicken is floating on the surface of the oil and cooked through, usually around 10 minutes or so. Remove the cutlets to a wire rack over a baking sheet to cool. Dassit!
What To Serve With Easy Fried Chicken Cutlets
If you’re not going to make a sandwich, here are some wonderful things you can eat alongside your wonderful fried chicken…
1 1/2lbs boneless skinless chicken breast, trimmed into cutlets
1 1/2 C self-rising flour
1/2 C cornstarch
4 large egg whites
3 1/2 tsp seasoned salt, divided
1 tsp ground black pepper
Instructions
Grab your chicken cutlets (read the post above the recipe if you’re not sure how to turn breasts into cutlets) and season them with about 1 1/2 teaspoons of seasoned salt then set aside to rest and marinate a bit while you prepare the dredges.
Add your egg whites and 1/4 teaspoon of seasoned salt. Use a whisk or an immersion blender to whip the egg whites until they’re just a tad foamy then set them aside. In the second bowl whisk together the flour, cornstarch, black pepper, and all the remaining seasoned salt.
Dip the cutlets one by one in the egg white wash, let the excess drip off, then transfer the cutlet to the flour mixture. Coat the cutlet in the flour, using your fingers to press and squeeze the flour into the flesh. Set the breaded cutlets on a plate to rest while you prepare the oil.
Fill a stockpot or dutch oven – something with high sides and a large well – halfway up the sides with your frying oil and heat it to around 360°F. If you stick the handle of a wooden spoon into the oil it should sizzle rapidly (not violently) just as a piece of chicken would. When the oil is ready, add the cutlets to the oil one at a time, sweeping the cutlet through the oil before you release it to help the breading set.
Fry, turning occasionally until the chicken is floating on the surface of the oil and cooked through, usually around 10 minutes or so. Use a thermometer or cut open a piece to be sure, if you’re not. Remove the cutlets to a wire rack over a baking sheet to cool. Dassit!
Notes
Read the post above this recipe for maximum success.
This post may contain affiliate links, which means I get a little off the top to help me keep this website running. It doesn't cost you extra or affect my opinion.
Chicken Tinga is one of those dishes that tastes as if it took hella work and time but is actually super simple and fast to throw together.
Originating in Puebla, Mexico, Chicken Tinga is a dish made with shredded chicken in a sauce of tomatoes, chipotle peppers, and onions. Adjust the number of chipotles to make it spicier or milder, depending on your tastes.
From the research and reading I did while fleshing out this recipe, this is indeed Authentic Chicken Tinga! It has all the components and the flavor is the same; the method is just a bit different.
The chicken is cooked separately, shredded, then added to the pot in most recipes. This didn’t make sense to me, for a couple of reasons. Why do more dishes than I need to, and why not let the chicken soak up the flavor of the other ingredients during its cooking process? Yeah, no.
All of that is to say to my fellow Latines: this might not be how your grandmother makes it, but it is how my possible future grandchildren’s grandmother makes it, so leave me alone! ?
Chicken Tinga Ingredients
Feel free to jump to the full recipe, but here are useful notes about the ingredients you will need to make this Chicken Tinga recipe:
Chicken: I call for boneless, skinless chicken in this recipe and I used breasts, but you can use thighs, or opt for bone-in, skin-on chicken pieces. You’ll need to adjust the cooking times, but any and all would work.
Onions: From my research, a huge component in Chicken Tinga. The onions are cooked down before the other ingredients, and some of them break completely down during the long simmer. They add a wonderful slight sweetness that is essential.
Tomatoes: It’s winter and I’m in North Carolina, so it’s time to rely on canned tomatoes to get the texture and taste I need. I call for crushed tomatoes in this recipe; you can substitute diced or peeled, or fresh (boiled, peeled, and blended!): whatever is easy, tasty, and accessible.
Chipotles in Adobo: From what I’ve gathered, chipotle peppers are traditional for authentic Chicken Tinga, but we don’t like rules, right? Do what you want! You can choose to toast, soak and blend other dried chiles like guajillo or arbol, similar to what I call for in my Birria recipe, or add a hefty amount of chili powder of your choice.
Cinnamon, garlic: Two more staple ingredients in Chicken Tinga. “It’s not tinga if there’s no canela!” said my boss, a native of Mexico that I pepper with culinary questions whenever I can. Do not use ground cinnamon. Find a cinnamon stick, or save this recipe for later. Garlic is always a welcome addition to anything, of course.
Mexican oregano, kosher salt: We need these for flavor, obviously. Please note that sometimes I will add a pinch of granulated sugar to my Tinga if the tomatoes I’m using are super tart or acidic. Not enough to sweeten, only to soften.
Optional Chicken Tinga Ingredients
Chicken broth: Optional, actually, but adds flavor and loosens the sauce. If you’re using chopped, fresh tomatoes I’d suggest omitting the broth and adding a little chicken bouillon powder. The tomatoes should have enough moisture on their own, but it varies. Do what feels right.
Bacon Fat: I like to use beef bacon fat to sear the chicken and cook the onions and garlic. You can use any type of oil or cooking fat you’d like to in its place, or if you’re using non-stick cookware you can probably just skip it altogether.
Taco seasoning: Just bumping up the flavor! I make my own Tex-Mex seasoning and I use that: you can use your favorite. Even the yellow packets of taco seasoning would work well here. Looking to be more traditional? You can opt for just salt on the chicken.
How to Make Chicken Tinga
Full instructions are included in the recipe below, but here is a basic overview of what you’ll need to do, along with some important tidbits to help you make the most of this Chicken Tinga recipe:
Prepare the ingredients. Season the chicken liberally with taco seasoning or just salt and set it aside while you use a sharp knife or mandoline to slice your onions into thin rounds, then chop up the garlic.
Sear the chicken. Adding the bacon fat and chicken to an already hot pan will ensure you get a nice sear. Don’t disturb the chicken for at least 5 minutes, to allow the sear to form and release from the pan. Flip and cook it on the other side until it’s the color you want – you’re not trying to cook it through – then remove it from the pan.
Soften the onions. Add the onions and cook them until they are softened and pliable. Sprinkle over some salt to help them release their juices faster. After about 10 minutes, stir in the garlic and let that cook while you pop your cans of tomatoes and chipotle.
Add the tomatoes, chipotle, chicken broth, oregano, and cinnamon. Stir all of the remaining ingredients in and taste. Adjust the seasonings – and add sugar – if needed.
Add the chicken. Tuck the chicken into the sauce, making sure it’s as submerged as possible. Reduce the heat to medium-low and simmer until the chicken is cooked through about 15 minutes.
Shred the chicken. Remove the chicken from the sauce, allowing all excess to drip off. I hate shredding chicken so my method is to put it in a high-sided bowl and attack it with my hand mixer and the beater attachments on medium-speed. You can feel free to use two forks and a cutting board. Add the shredded chicken back to the sauce and stir it in. Cover and continue simmering for 5-10 more minutes.
How to Serve Chicken Tinga:
There are so many meals that you can make with this Chicken Tinga recipe! For example, you could…
Chicken Tinga Tostadas. From what I’ve seen the most common way to eat chicken tinga is on a tostada with some refried beans, cojita, hot sauce, and a little crema. You can check out how I build my tostadas on TikTok or Instagram.
Rice bowl. Picture this: A bed of cilantro-lime rice, topped with seasoned black beans, chopped arugula, sauteed peppers and corn, fresh salsa, this Chicken Tinga, shredded Asadero, and maybe some tortilla strips. *chef’s kiss*
With potatoes. Any potatoes! Pile it on some roasted potatoes to make a hash type of thing; try it on top of french fries with some nacho cheese sauce; even on a bed mashed potatoes with some fresh cilantro and squeeze of lime.
As a filling. There’s not a quesadilla, wrap, or sandwich that wouldn’t benefit from a bit of this chicken added!
I hope you’ll come back and let me know what you thought of this recipe if you’ll try it. Ratings help other folks considering trying it know whether or not it’s worth their time! Here’s the obligatory Pinterest graphic for you to share:
Season your chicken liberally with the taco seasoning, rubbing it into the meat with your hands. Set it aside.
Place a deep braiser or small stockpot over medium-high heat. Once the surface is hot, add just enough bacon fat to coat the bottom. Add the chicken in a single layer.
Let the chicken cook undisturbed for 5 minutes so it gets a nice sear, then flip. Cook until browned on that side, then remove.
Add the sliced onions and sprinkle a pinch of kosher salt over them. Reduce the heat to medium and cook the onions until softened and translucent, stirring often. It should take about 10 minutes.Stir in the garlic and cook for 5 or so minutes longer.
Pour in the crushed tomatoes, chicken broth and diced chipotles. Stir in the oregano and cinnamon stick. Once everything is well combined, add the chicken, tucking it in so that it’s submerged in the sauce.
Cover, reduce the heat to medium-low and let simmer for 20 minutes.
After 20 minutes the chicken should be cooked through completely. Remove it from the pot and shred it. Stir the shredded chicken back into the sauce and let simmer for another 5-10 minutes. Dassit!
This post may contain affiliate links, which means I get a little off the top to help me keep this website running. It doesn't cost you extra or affect my opinion.
Chicken Bog is a pretty famous dish around these parts. I believe it originates from and is most popular in South Carolina, along the coast in the Low-Country region, but I could be off. Some call it Chicken Pilau, or Perloo. Sometimes there’s bacon instead of sausage, and sometimes there’s no sausage at all. It is always thick and wet tho, but not too wet. Kinda like an actual bog!
A kind soul requested a YouTube tutorial for this dish a few weeks back, and being as it’s one of my husband’s favorites and I’ve never made it for this audience before I figured why not just bump it to the very front of my deepfriedhoney to-do list? And here we are.
I don’t think my Chicken Bog recipe is very different from others you’ll find, because this is a traditional dish that’s been around a very long time. Ingredients-wise, at least. I’ve added some extra steps to it that I feel add more depth and nuance, but it’s fine the old fashioned way, too.
Call-Outs:
Browning the sausage and toasting the rice is not absolutely necessary. I don’t recommend skipping it (if I did I wouldn’t have included it in the recipe) but if you’re short on time or cookware go ahead – that would make this a one-pot meal.
You can make the chicken and broth the day prior if this seems like too much work for one day. You’ll want to make sure you remove and discard the layer of fat that forms on top of the broth after it’s chilled.
Carolina Gold rice is my favorite type of rice, but it’s expensive and can be difficult to find. If you can’t find or just don’t want to use Carolina Gold rice any long-grain white rice will do. You do not rinse the rice in this recipe. If you choose to, make sure you spread it out on a baking sheet or something and allow it to dry out some before you add it to the bog, else you’ll water it down.
Add the chicken pieces, carrot, celery, onion, garlic and 1 tsp of salt to a large stockpot over medium-high heat. Add the water – it should be enough to submerge everything but if it’s not, add more water. Stir together to make sure the salt is dispersed throughout the water.
Bring the chicken to a simmer. Once it’s been simmering for a few minutes, use a spoon to remove the foamy layer that has formed. After you’ve removed as much of that stuff as you can, reduce the heat to low and cover with the lid.
Simmer until the chicken is cooked through – about an hour – then remove all of the solids from the liquid. Pour it through a colander into a bowl if you need to, in order to catch all the peppercorns and garlic.
When the chicken has cooled enough for you to handle, strip the meat from the bones and set it aside. Add the bones back to the pot, along with the paprika, dried thyme, chicken bouillon powder, and 1 tsp of salt.
Bring the broth a boil, then reduce the heat to medium and cover. At this point, you should have a little more than 7 C of liquid. Simmer until the liquid has reduced to about 6 cups, maybe a little more. It should take around another hour or so, then turn off the burner.
Strain the liquid thru a sieve or fine mesh strainer, then add it back to the pot. Add the chicken meat. Turn the burner back on to medium-low.
On another burner place a large skillet and add 1 tbsp of butter. Let it melt over medium-high heat, then add your sliced smoked sausage, and allow the edges to brown a bit. The sausage should begin to release moisture.
Once the sausage is browned to your liking, add it to the pot with the chicken. Pour the dry rice into the skillet, and toss it around so it gets coated in the remaining butter and oil in the skillet. Continue tossing so it toasts evenly for about 3 minutes. When the color starts to deepen, stir the rice into the pot.
Reduce the heat to low and cook the Chicken Bog uncovered, stirring occasionally, until the rice is tender and most of the broth has been absorbed. It should be very thick like a stew, but much more dry. Not dry tho. It’s hard to explain! Look at the picture, I guess.
Fold in the remaining butter, the cracked black pepper, and minced parsley. Taste it, and add more salt if you need it.
Garnish with scallions or parsley or whatever else you’d like and serve.
This is a (new and improved!) comprehensive list of all the culinary equipment I have squeezed into my tiny kitchen, alongside a curated collection of alternative options. Where I wasn’t able to link to what I own exactly, I located a comparable alternative at a similar price point.
Check out my Pantry Essentials post for a list of what I keep stocked in my cabinets.
My Amazon Storefront – shown above – has always been available as an easy and convenient way for everyone to shop my kitchen, and it will continue to be. Thing is, I’m not able to tag everything I own because some items aren’t available via Amazon or any of its affiliates. That’s where this post comes in. Enjoy!
Prepware
Knives
A good knife is everything. It’s basically your hand when you’re prepping in the kitchen, so you want to make sure you take the time to find the right one for you. After some trial and error, I’ve settled on the 7″ Santoku as my official favorite.
Prior to breaking my right (dominant) hand a few years ago, it was the classic 8″ Chef’s knife, but the heft and weight are a little much for me now. There are many other styles besides the ones I have listed below, so research and test.
Chef’s Knife – These knives come in various lengths, the average size being 8″. It’s an all-around knife, capable of taking care of any task. The blade is broad and usually can rock on the cutting board, making it great for mincing things like herbs. The ones I use most are my 8″ Misen and my OOU.
Santoku Knife – Santokus are basically Japanese Chef’s knives. They’re lighter and thinner and the flat blades don’t rock. For me, they’re unmatched for my methods of chopping and dicing. Many times you’ll find these knives with grooves on the sides of the blade, making food release from it more easily. I have four, and my 7″ OOU gets the most mileage.
Serrated Knife – These are long, straight, and have “teeth” of varying sizes. You’ll find them often called Serrated Bread Knives and they’re great for that, but they’re also perfect for carving turkeys and getting paper-thin slices out of even the ripest, juiciest tomatoes. I have a Wusthof 8″ Bread Knife.
Paring Knife – Pairing knives are supposed to be essential in the kitchen but they aren’t in mine. I use them most often to trim and clean meat, or to open new packages of things. This Misen one comes off my magnetic knife rack most often.
Other Sharp Edges
Kitchen Shears – I mainly use my kitchen shears for spatchcocking poultry, but they actually have a myriad of uses. You can use them in place of a knife and cutting board to cut meat, vegetables, and herbs. If you use peeled tomatoes you can use shears to snip them into pieces before you even pour them from the can. They’re also great for cutting slices of deep-dish pizza.
Box Grater, Vegetable Peeler, and Zester – I hate shredding cheese and almost always do it in my food processor, but sometimes when I need a small amount, out comes the box grater. Most of them come with multiple sides that you can use for peeling or slicing as well as zesting, but having a separate peeler and zester is nice, too.
Mandoline – Three words: Homemade Potato Chips.
Can Opener – I’m sure the canned section of my Pantry Essentials post is enough to explain why a good can opener is necessary for my house.
Cutting Boards
Having a large selection of cutting boards isn’t necessary, but if you cook as much as I do it’s extremely helpful. I have probably too many, but I’ll allow it! I am never at risk of cross-contaminating food because I have a cutting board for each ingredient if I want.
Flexible Cutting Mats – Flexible cutting mats are easy to store and clean. You can find dual-sided mats or ones that have a non-slip side for safer usage. My favorite thing about these is that they bend, roll and fold, so you can easily funnel chopped ingredients into the pot without spillage. I don’t use them as much as I used to, but my favorites are these from Target.
Bamboo Cutting Boards – Bamboo is harder on your knives and doesn’t last as long as wood – but if you’re looking for the best environmentally friendly option, bamboo is where it’s at. A large bamboo cutting board with grooves for catching stray juices is my favorite for carving poultry and roasts.
Color-Coded Cutting Boards – You’ve probably seen me use my Joseph Joseph Folio Cutting Boards more than any others over this past year. The reason for that is the folio storage case sits right on my countertop so they’re the most easily accessible. It’s commonly thought that plastic cutting boards are more sanitary than surfaces like wood or bamboo, but this isn’t true. Make sure you scrub the hell out of these and sanitize them too.
Wooden Chopping Block – Wood is easiest on your knives and won’t show damage as other types of boards. A chopping block isn’t really a necessity, but it’s beautiful and functional. Not only can you prep your meal on it, but you can serve it, too. Boards from John Boos are trusted in kitchens and restaurants across the country and will last you for many, many years.
Utensils
Wooden – Wooden utensils are safe for all types of cookware as well as durable and versatile. You can get away with just a quality wooden spoon, but I’ve found a use for spoons, turners, scrapers and more in my culinary adventures. Wooden utensils are also super easy to care for. Make sure to toss them if they start to crack or splinter.
Spatulas – Another item I probably have too many of. Some are narrow and long, best for scraping the sides of bowls and jars. Others are short and fat, great for folding whipped ingredients into batters. Everyone that watches me cook has seen my Virgo spatula from Williams Sonoma, as well as my skinny blue silicone babies. Silicone is my material of choice because it’s safe at high heat. I have a bad habit of sitting my utensils on hot burners.
Whisks – I use whisks almost as often as spoons – for gravies, sauces, eggs, and more. My silicone ball whisks are my favorites; they allow me to whisk my grits and bechamel sauces in the pot vigorously without guilt. I’ve replaced all of my cookware with metal utensil safe pieces, but it’s a hard habit to shake without asecond thought. For gravies, my roux whisks and sauce whisks are essential, allowing me to work all the corners of a skillet easily.
Tongs – I got by with forks, mainly, for picking stuff up and flipping things over before I started using tongs. Now, I don’t know what I’d do without them. I prefer the ones with silicone tips to protect any fragile surfaces, and the ones that lock into place so I can tell if they’re closed or not (I’m not sure why but I struggle to tell if there’s no locking mechanism). Also in this category are kitchen tweezers, which are useful for plating and garnish purposes.
Slotted Spoon, Ladle, and Pasta Server – If you purchase a utensil set like this one I have from Joseph Joseph, these items are almost guaranteed to be a part of it. You’ll be able to find your way around without them, but they’re useful to have nonetheless. I use my ladle most often for plating grits, my slotted spoons for drizzling sauces and gravies, and pasta servers for straining pasta from the water – not really for serving. I prefer a carving fork for that.
Bowls
Stainless Steel Mixing Bowlswith Lids – Stainless Steel is my favorite material for mixing bowls. They’re heat safe and can be used in a pinch as double boilers. Try to find some with rubber bottoms and lids. They can be used for storing leftovers, rising dough, mixing batters, the list goes on and on. If they nest together, even better! I have two sets, but this set of three with lids and rubber bottoms are my most used.
Ceramic or Melamine Mixing Bowls – If you’re looking for something decorative, ceramic and melamine bowls usually have patterns or other embellishments. You also don’t have to worry about them reacting to acidic foods like metal. I’m often asked where I got the speckled set I use on IGTV sometimes, and it was Walmart, but they’ve been out of stock for quite a while.
Prep Bowls – You’ve heard of Mise en Place, right? It’s the French term for having all your ingredients prepared before you start cooking. I believe it translates to “everything in its place.” Prep bowls facilitate this, helping keep things organized before and during cooking – which makes the whole process go more smoothly. These cheap plastic bowls from Target have been well worth the $0.79 each.
Pinch Bowls – Another extravagant extra, pinch bowls are usually made of silicone and are very tiny. They’re perfect for adding pre-measured amounts of herbs and seasonings to the pot. These 2 ounce ramekins are also great for this.
Thermometers
For some reason, many laypeople believe thermometers signals being an unsure or inexperienced cook. In truth, cooks and chefs of all levels can find a use for them. Thermometers are integral to some processes while making others foolproof.
Instant Read Thermometer – These are ideal for things like testing the internal temperature of a piece of meat that’s searing on the stovetop or making sure heated milk isn’t so warm it’ll kill the yeast. You can find probe and surface instant-read thermometers.
Oven Probe Thermometer – These make cooking roasts and reverse searing steaks simple and easy. Stick the probe into the thickest part, and into the oven it goes. Set it to chime when it reaches your desired temperature and walk away. The display can sit on the counter or – now that most of them are magnetic – stick right to your oven door.
Candy Thermometer – They’re usually called candy thermometers but they’re good for oil as well. Maintaining the oil temperature is an important part of deep frying on the stove, and it can be harder to master than it appears. Living up to their name, boiling sugars and syrups for candy needs precision and these are best for that. Go for stainless steel and one that clips onto the pot.
Tools
Versatile Lids – These babies are a lifesaver if you have a small amount of room to store your cookware, or you’ve lost or broken a lot of lids over the years.
Basting Brush – Silicone and boar bristles are my favorite bristle materials. Boar is very gentle so best for delicate baked goods like rolls and pastries. I like silicone for basting meat when searing on the stovetop or finishing in a super hot oven.
Meat Tenderizer – I don’t use these very often, but for pounding chicken to an even thickness, or loosening up some round steak before pan-frying, there’s no substitute.
Measuring Cups – I like having a good selection of both dry measuring cups and liquid measuring cups. The way they hold their ingredients is different so the distinction is different. It matters, especially when baking.
Measuring Spoons – The magnetic measuring spoons are my favorite, but I own a bunch. Having multiple allows me to measure many things without washing them or mixing any ingredients. I recommend having at least one of each size: 1/8 teaspoon, 1/4 teaspoon, 1/2 teaspoon, 1 teaspoon, 1/2 tablespoon, and 1 tablespoon.
Kitchen Scale – If you meal prep for specific reasons or bake a decent amount a kitchen scale is essential. I’ve been using this small digital scale for years now, and there are a whole host of options to choose from.
Cookie Scoops and Food Disher – Cookie scoops with wipers are everything! The scoop ensures that they’re evenly sized and the wiper gives you a clean release every time. I like having small, medium, and large for making cookies. Food dishers are like really big cookie scoops or ice cream scoops. I use a food disher for ice cream, and for things like drop biscuits.
Colander and Mesh Strainers – Draining pasta or canned veggies, sifting dry ingredients together for baked goods, and showering powdered sugar or chocolate for decoration: sifters and colanders are required for all of this. I use metal mesh strainers for small jobs and big plastic colanders for large ones.
Pepper Mill – Spices, seasonings, and dried herbs don’t necessarily go bad, but they do lose their potency. Freshly cracked black pepper is always best, so a pepper mill is vital. You can find manual and electronic ones, and most of them have different settings for how fine you want the pepper. Salt Mills are nice too.
Salt Cellar – They do exactly what they sound like they do: they house the salt in a cool, dry atmosphere. Pinching salt between your fingers is easier than measuring – once you learn how – and more reliable than using a shaker of some sort.
Bench Scraper – If you bake, you’ll want a bench scraper. There’s no better tool for clearing off your work surface of flour and scraps, and it helps keeps your hands free when transferring or kneading a sticky dough. I like stainless steel, but you can find flexible plastic ones as well – those are great for lifting down from mixing bowls.
Stainless Steel Spider and Pig Tail Flipper – If you like to fry, these might be your new best friend. I use the strainer for frying delicate foods like beignets and small foods like nuggets, as well as boiling short kinds of pasta and small or chopped vegetables. The flipper makes turning light fried foods easy and is great for lifting big pieces of meat, too.
Trivets – I don’t like things on my hands, which is why it’s incredibly rare to see me anywhere near a glove. Trivets – specifically silicone ones – are great multi-purpose tools. They protect your counters from hot cookware and work great as oven mitts. The hard ones are good for spoon rests, too. I don’t know why but I refuse to buy spoon rests!
Silicone Baking Mats – A nice way to protect your pans and make sure all your food releases easily. They’re an investment initially but you’ll save a lot on parchment paper or foil or whatever you usually use. I’m still getting used to pulling them out, myself.
Rolling Pin – Rolling out pie dough. Smoothing puff pastry. Beating the crap out of cookies and candy. This tool does all of this and more! I like wood, but you can find metal and marble, too.
Cookware
After many years of buying cookware from any and everywhere, I’ve replaced virtually all of mine with two kinds: Scanpan – their TechNIQ line, specifically – and Hexclad. These brands are pretty expensive, so it was an investment, but largely worthwhile so far. I expect to get many years out of each piece.
Materials
There are other types of cookware other than the ones I’ve listed below. Stainless Steel, Copper, Stoneware and more. Do your research and play with different materials: you won’t know what you like unless you try them!
Cast-Iron – Cast-Iron has always been my favorite type of cookware, although I’ve been using it less often. The weight is just a lot for me – yes, that pesky hand break again. I tend to be pretty rough on everything, and nothing can take a beating better than Cast-Iron! Not only that, but it just cooks well.
Cast-iron retains and distributes heat evenly, sears like nobody’s business, and once seasoned well the non-stick surface is damn near incomparable. It comes enameled, which looks nice and doesn’t need to be seasoned.
Nonstick – If you’re just starting out, sometimes it can feel like Nonstick frying pans are the only things you can even make grilled cheese in. If you’re experienced but you initially learned to cook using Nonstick cookware it’s possible you need some practice cooking at appropriate temperatures too. This is something stainless steel and other surfaces demand you gain mastery of, while Nonstick is more forgiving.
Like cast-iron, you can usually find Nonstick pans anywhere. Unlike Cast-Iron, you’ll need to be a bit more selective because it’s not all built the same. The easiest cookware to find is usually coated in Teflon, or is Ceramic. Becoming more popular is Carbon Steel, which needs to be seasoned like cast iron before its nonstick.
Cookware with Teflon surfaces is the least expensive but generally doesn’t last as long. You want to avoid preheating these pans and stay away from metal utensils and harsh cleaning tools so the surface lasts as long as possible. When the cooking surface starts to chip and flake it’s time to replace it. If you’re like me you’ll still hang on to them for a VERY long time, but this isn’t recommended.
Ceramic surfaces will also wear away with time, so you need to be gentle, but they tend to hold up better than Teflon. Carbon Steel can last forever and ever.
I like Scanpan’s TechNIQ line because it’s durable as hell. I’ve mentioned that I’m rough on everything. Having nonstick cookware that can be preheated, put in the oven, and is metal utensil safe is a dream. It’s a bit heavy, but no heavier than any other pieces of similar quality and still lighter than cast iron.
Hexclad Short Review
[amazon table=”10138″]
I’ve had my 7-piece Hexclad Hybrid Cookware with Lids and Wok for almost a year now (it’s January 2021 and I purchased them in April 2020) and they’re good as new. Not a scratch or scuff, and I treat them like I treat all my other cookware – even my heirloom cast iron. It cleans beautifully and is very light – very important again after breaking my hand – and is truly nonstick.
It’s reminded me to be even more patient and deliberate with the temperature when cooking, as the “revolutionary nonstick surface” will quickly seem like a scam if you go cranking up the heat under your omelet. I’ve put it in the dishwasher and it held up fine, but the hexagonal design can hold onto anything stuck in its surface so handwashing is recommended.
Since my initial purchase of the 7 piece set, I’ve acquired the 12″ griddle pan and 6 piece pot set. I love it all, and will probably keep adding to my collection as long as they keep releasing new items! I expect it to last just as long as the lifetime warranty promises.
Skillets
Often referred to as frying pans, I think skillets are needed in any and all kitchens. They work for sunny side up eggs, seared chops, stir-fried vegetables, crispy-edged pancakes, – the list really goes on and on.
8″ – This small skillet is perfect for scrambling eggs and reheating small amounts of leftovers. It’s also good for toasting spices and chiles, and other small-batch stuff. Single grilled cheeses!
10″ – 10″ is a nice, versatile size if you’re limiting yourself to just one. It’ll allow you to fry, sear, or sautee enough food to feed 2-4 people, usually.
12″ – This is a big one, usually heavier and harder to fit on small stoves, but if you want to cook large amounts at once, it’s great. I use mine the most for breakfast to make a bunch of pancakes at once, or home fries.
Saucepans
As important as skillets are saucepans. Anything that’s mostly liquid – soups, stews, sauces, gravies, porridges, etc. – will come together best in a saucepan of some size. They have high sides so stirring and whisking vigorously is safe, and can be found in the same finishes as skillets (just like all cookware). All of my saucepans are by Scanpan.
2 qt. is generally the smallest (I’ve seen 1 qt), good for sauces. 3 qt. is a nice standard size, good for making about 4-6 servings or so, depending on this dish. I recommend having multiples so you can easily prepare multiple sides. 4 qt. is good for multiple servings of soup or pasta.
Windsor Pan – The Holy Grail for grits. This saucepan is medium-sized has sides that taper out slightly at the rim, allowing for even evaporation and cooking. It makes amazing rice, and oatmeal as well. They can be hard to find, especially by name. Sauciers are good substitutes.
Specialty Pieces
Sauté Pan – These are often confused for skillets. You can tell which is which by the sides. Saute pans have straight vertical sides while frying pans have rims that are slanted outward. They can be used for the same purposes, but I think saute pans are much better for dishes that have to be stirred quite a bit. Like stir-frys!
Stockpot – Every kitchen needs at least one really big pot! Great for boiling pasta, steaming seafood, and making huge amounts of soups or sides.
Dutch Oven – Braising is my favorite way to cook (this is why I don’t have a pressure cooker), so Dutch Ovens are a favorite type of cookware. They are heavy, usually enameled, and have tightly fitting lids that help keep things moist during the long, slow process. They are great on the stovetop and in the oven. In my kitchen, they’re interchangeable with ‘Cocettes’ but I’m sure there’s some distinction I’m not aware of.
Braiser – Braisers are basically shallow Dutch Ovens. I especially love them for one-pot dishes that I start on the stove and end in the oven.
Grill Pan – Who doesn’t like grill marks? These allow you to get them on the stovetop and in the oven. I recommend cast iron or another high-heat and oven safe material so you can preheat it before adding anything.
Double-sided Griddle – Pancakes. Tacos. Smashburgers. Steaks. Chicken. Whatever! Double-sided griddles usually have one smooth side and one with grill lines. I like the cast-iron ones that fit over multiple burners, but you can find single burner joints, too.
Wok – Woks can cook pretty much anything. They distribute heat well thanks to the tall, high sides and those same sides lend well to safely deep-frying and vigorous stirring. I don’t use mine often because they work best over flames, not the radiant rings on my stove.
Bakeware
Sheet Pans – If you don’t purchase anything else for your oven, purchase these. Not just for baking cookies, sheet pans are true workhorses. Put them under casseroles and pies before baking to protect your oven. Place one in a 200°F oven and stack pancakes on it as you cook them to keep them warm. Bake an entire dinner – thinly sliced onions, peppers, and chicken for fajitas!
Cooling Racks – If you’re familiar with any of my recipes for fried foods, you’ll know I’m adamant about draining it on wire racks rather than paper towels. Not only does a rack allow the food to stay raised above any puddling oil, but it can be placed into a warm or hot oven.
Baking Pans – You’ll want baking pans of various sizes and materials. Glass, ceramic, and cast-iron are all great choices. I like 8″ and 9″ square pans for brownies and crumbles. For macaroni and cheese, casseroles, and lasagnas I like 9×13″ bakers. For the nicest oven-to-table ones search for “rectangular bakers.”
Round Cake Pans, Cupcake Pans, Loaf Pan and Bundt Pan – 9″ nonstick rounds for layer cakes. Cupcakes pans for cupcakes, muffins, and single serve items. Loaf pans are good for quick bread and pound cake. Bundt pans, for bundt cakes.
Springform Pan – Unparalleled for cheesecakes, quiches, and anything else you need to pop out smoothly after baking.
Pie Pansand Ramekins – I like pie very much. I have fancy ruffle-edged pie dishes and basic boring pie pans in all sizes and in deep-dish and regular depth. Ramekins are great for single-crust individual pies and other random purposes like serving parfaits.
Roasting Pans (and at least one Rack) – If you plan on roasting whole birds and bone-in roasts, you’ll need a roasting pan. You can also find smaller ones for things like potatoes and cornish hens. A rack helps keep it above any fat and drippings during the cooking process, making sure the skin stays nice and crisp all over.
Small Appliances
Food Processor – My Ultimate Tool! With the addition of the shredding and slicing blade, it does everything I need it to. Mostly I shred cheese in it, but it’s also good for shortcutting your way to pie dough, making salsa, and crushing graham crackers and cookies for crusts.
Immersion Blender – Also called a stick blender, I use this when I need to blend something still in the pot like refried beans or a creamy pie filling. Mine has a whisk attachment so it’s nice for making small amounts of whipped cream, too.
Blender – To be completely honest my blender is used mostly for one thing: smoothies. When cooking I prefer my immersion blender, but sometimes – especially when using dried chiles in Mexican and Tex-Mex food – it’s needed for cooking, too.
Stand Mixer – I’m gonna be honest: I wouldn’t bake bread at all if I didn’t have this mixer. You *might* be able to squeeze a cake or cookies out of me if I was really pressed, but breads would not happen.
Hand Mixer – That cake and those cookies I mentioned above? If I didn’t have a stand mixer OR a hand mixer you couldn’t even get those either. There’s very little a hand mixer can’t do that a stand mixer can, but the difference in how hands-on you have to be alone is enough to justify me having both.
Slow Cooker – My slow-cooker is a multi-cooker. I don’t use any of the other functions except “browning” but apparently it bakes, too! Maybe I’ll use that one day. Searing in the crockpot makes making beef stew and roasts much easier. Less cleanup is always good.
Water Filter System – We think a lot about our ingredients when cooking, but water seems an afterthought for most. Tap water is fine, but filtered water is better. I live in an apartment complex within city limits, so it’s important to me.