Description
Sorry for the delay, but they’re worth the wait!
Ingredients
Scale
- 2 C (240 grams) all-purpose flour, plus more for shaping
- 1 C buttermilk, cold
- 6 tbsp salted butter, diced and frozen
- 2 tbsp salted butter, melted
- 1 tbsp granulated sugar
- 2 tsp aluminum-free baking powder
- 1/2 tsp baking soda
- 1/4 tsp fine sea salt, optional
Instructions
- Grab a large mixing bowl and place your flour sifter into it. To the chamber of your flour sifter add all of your dry ingredients – the flour, the baking soda, the baking powder, and fine sea salt, if using. Sift the dry ingredients together – discard anything in the sifter that’s too large to get through the mesh – and set the sifter aside.
- Tap the bottom of the bowl on the counter to help level out the flour mixture. Sprinkle the pats of butter all over the surface of the flour, keeping them as separate as you can for as long as you can. After all the butter is in the bowl use your fingers to lightly toss them together, just so that the butter pieces are all coated in flour.
- Now, use a pastry cutter – or your fingers, or a back of a fork – to work the frozen butter into the flour. Keep working until there are no pieces of butter any larger than a pea. The mixture should resemble cornmeal.
- Using a wooden spoon or silicone spatula make a well in the center of the bowl and pour the buttermilk into this well. Use the utensil to push the flour from the edges over the top of the buttermilk, almost as if you’re tucking it in or trying to hide it. Try not to disturb the buttermilk while you do this.
- Once the buttermilk is mostly covered, go ahead and being folding the wet and dry together into a dough. Scrape your utensil along the sides of the bowl, then bring that flour into the center and pull the utensil out of the bowl. Turn the bowl clockwise about a quarter of the way, then do that again. After you’ve scraped the sides of the bowl down, scrape the bottom of the bowl and turn that over onto itself. It shouldn’t take you more than 10 stirs or so to make a very shaggy dough. It doesn’t need to look cohesive, just as long as there are no large spots of buttermilk or large spots of dry flour.
- Grab your biscuit cutter and put that in the bowl. Stick the entire mixing bowl into the fridge to chill while you prepare to make the biscuits. Keeping them cold the entire time before they reach the oven is important! Line a baking sheet with a silicone mat or parchment paper and set it aside. Put a little bit of flour in a small bowl – you’ll use this to flour your biscuit cutter between cuts – and sprinkle a fairly generous amount, about a teaspoon or so, onto your work surface.
- At this point go ahead and turn on the oven and preheat it to 450°F. Turn the dough out onto the floured work surface and use your fingertips to pat the mound down and out. Don’t use extra pressure, just let the natural weight of your hands do the work for you. Once you’ve patted the dough out so that it’s about a 1/2 inch high all the way across it’s time to cut out the biscuits.
- Stick the biscuit cutter into the small bowl of flour, and dust off the excess. Press the biscuit cutter straight down without twisting or turning it and use your weight to ensure the biscuit cutter gets all the way through the dough, to the surface underneath. Without turning the biscuit cutter or taking the pressure off of the counter, begin moving the biscuit cutter in small tight circles. This will help the biscuit release from the cutter and the counter, and stay in a round shape. Repeat this process until you’ve cut as many biscuits out of the dough as you can. Use your bench scraper to help lift the biscuits up and transfer them to the prepared baking sheet, making sure they’re all touching just a bit.
- Take the remaining dough and push it together. I like to use the bench scraper to do this and keep my hands clean. You just want to push the dough together, you don’t need to lift it or anything. Just push it together so it’s stuck. Pat it back down until it’s 1/2″ high again, then cut out as many more biscuits as you can. Repeat if needed.
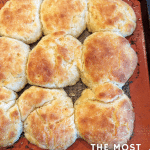
- Baste the biscuits lightly with the melted butter, then bake the biscuits in the top half of the oven for 12-15 minutes, until deeply golden browned and cooked through. Baste them with the remaining melted butter as soon as they come out of the oven. Dassit!
Notes
- If you’d like to use unsalted butter go right ahead! Add a teaspoon of fine sea salt to the dry mix and you’ll be set don’t forget! No salt = bland biscuits and no one wants that.
- Prep Time: 15 minutes
- Cook Time: 15 minutes
