Cajun Chicken Pasta has been my youngest baby’s favorite since she was old enough to chew. It was the first thing she learned to cook herself – the first of many! I made it again this past week for her birthday (as requested) and figured this was a good time to add the recipe to my website.
This recipe was originally published to my YouTube channel, as my first tutorial. The full recipe was listed in the description box, and I don’t know why I never posted it here.
I’ve tweaked the recipe a bit – y’all know I rarely make the same thing the same exact way – but the previous version is great, too! You can still find it on YouTube if you’re interested. Just open the description box and scroll down. First tho, the cajun seasoning recipe included:
Cajun Seasoning Recipe (makes about a cup):
4 tablespoons seasoned salt (I like Lawry’s)
1 tablespoon ground black pepper
2 tablespoons garlic powder
1 1/2 tablespoons onion powder
4 1/2 tablespoons smoked paprika
2 tablespoon cayenne pepper (cut down if you need less spice)
1 tablespoon The Brass Experience by Brass Cuisine
1/2 tablespoon cracked peppercorns
1 tablespoon ground thyme
Tid-Bits:
If you’d like to see a quick demo of the updated version check out my IGTV. I’ll make a new version of the YouTube tutorial eventually.
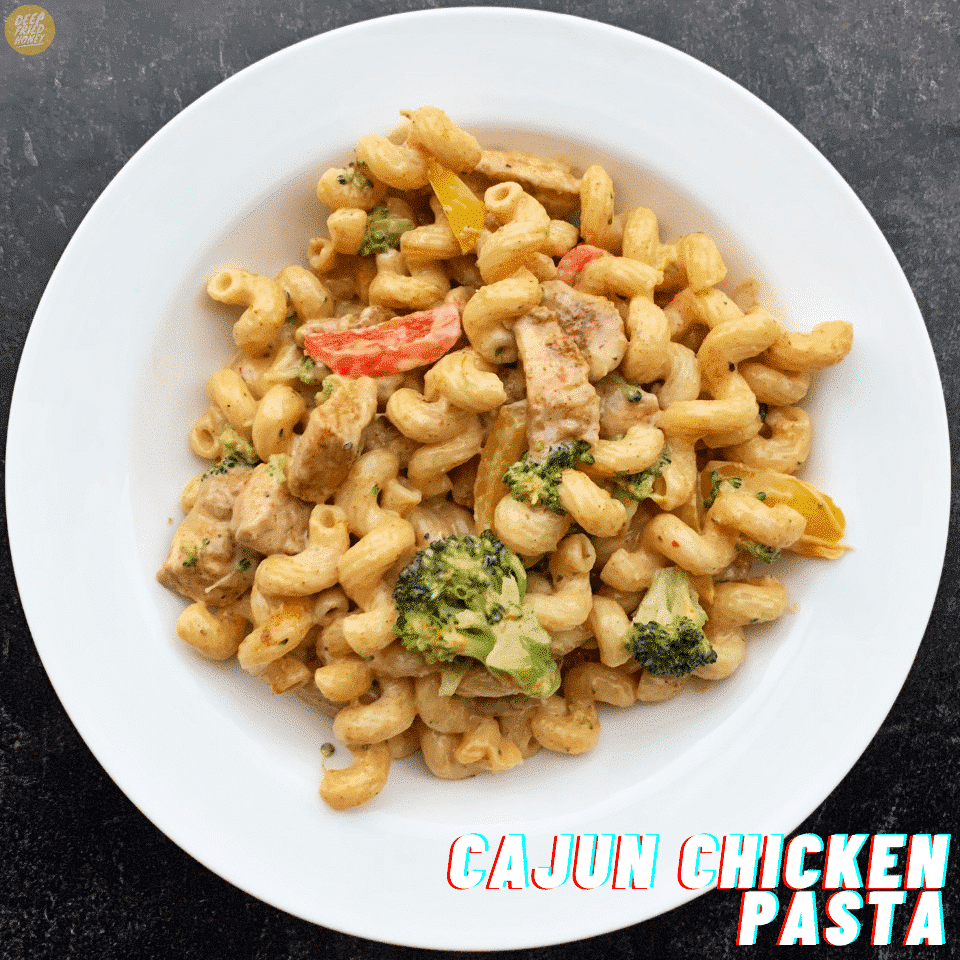
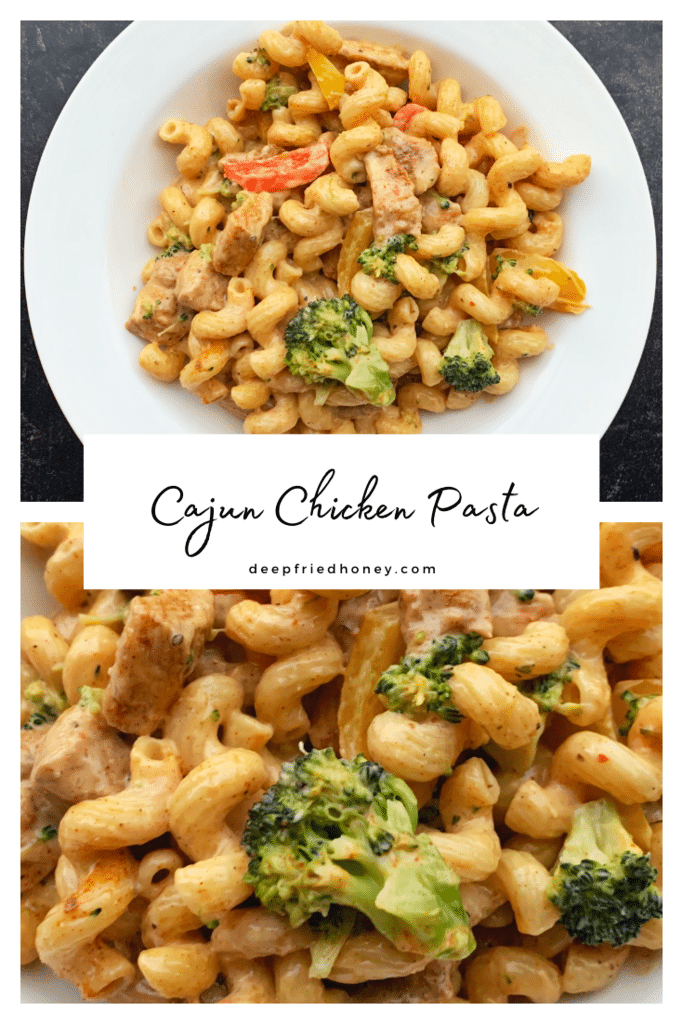
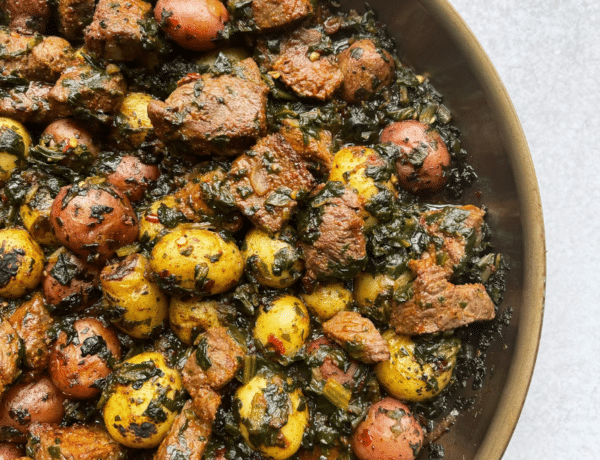
I like to cut the chicken into chunks, then season and cook it that way, so I can get as much char and cajun spice happening on the surface area as possible. You can’t tell in the photo because it’s coated in the sauce. The flavors are the same in the end no matter what you do.
We like broccoli and bell peppers but there are all sorts of possible delicious additions and substitutions available: spinach, mushrooms, shrimp, it goes on and on!
Pecorino Romano is a fantastic replacement for Parmesan. I’d even venture to say I prefer it! Try them both and see what you think. Mozzarella is good too, if you’d rather have a milder cheese.
Our Vegan Version: Use unsweetened oat milk and vegan parmesan for the sauce (flour + olive oil for a roux to thicken). Replace the butter with vegan butter or olive oil. Omit the chicken, or swap it for fake chicken or crispy baked tofu chunks.
it’s probably the same as everyone else’s recipe. I mean, how different can it be?
Ingredients
UnitsScale
1lb boneless skinless chicken breast, sliced in half, lengthwise
16oz dry pasta noodles
1 red bell pepper, sliced
1 yellow bell pepper, sliced
2 C broccoli florets, chopped into bite sized pieces
2 C heavy cream
1 C aged parmesan, freshly grated
3 cloves garlic, minced
3 tbsp olive oil, divided
1 tbsp salted butter
4 tbsp of Cajun seasoning, divided
1/4 tsp kosher salt, to taste
Instructions
Combine 3 tbsp of Cajun seasoning and 1 tbsp of olive oil. Mix into a marinade and work into chicken. Allow the chicken to marinate for half an hour, or up to overnight, in the fridge.
Drizzle a bit more oil into a large skillet over medium-high heat, just enough to coat the bottom of the pan. When the oil is shimmering add the chicken breasts and cook on each side for 5-7 minutes. Remove when cooked through.
Start on your pasta – cook it in boiling, salted water according to package directions. When the pasta is a 2-3 minutes away from being al dente, add the broccoli to the pasta water. Drain everything together, when ready.
Add your bell peppers along with a pinch of salt to the skillet. Sauté over medium-high until the peppers begin to soften and the skin chars or blisters. Remove the peppers and add them to the pot with the drained pasta and broccoli, along with the salted butter. Stir together gently, cover with a lid and set aside.
Pour the heavy cream into the skillet and whisk in the remaining seasonings. Bring to a simmer, then reduce the heat to medium. Stir in the grated cheese. Allow the sauce to simmer for 7 minutes, or until thickened and slightly reduced.
Slice your chicken into strips, then add it to the sauce, along with any accumulated juices. Let the sauce cook for another 2-3 minutes, then taste and adjust seasonings as needed.
Pick one of the pots you’ve been using and combine the chicken and sauce with the pasta and vegetables. Fold everything together until well combined.
Allow to cook uncovered for another 5 minutes, or until sauce has thickened. Dassit. Enjoy.
Notes
ICYMI: I put the recipe notes above my recipes, so don’t skip the post. There is very little filler or fluff here on DFH.
This post may contain affiliate links, which means I get a little off the top to help me keep this website running. It doesn't cost you extra or affect my opinion.
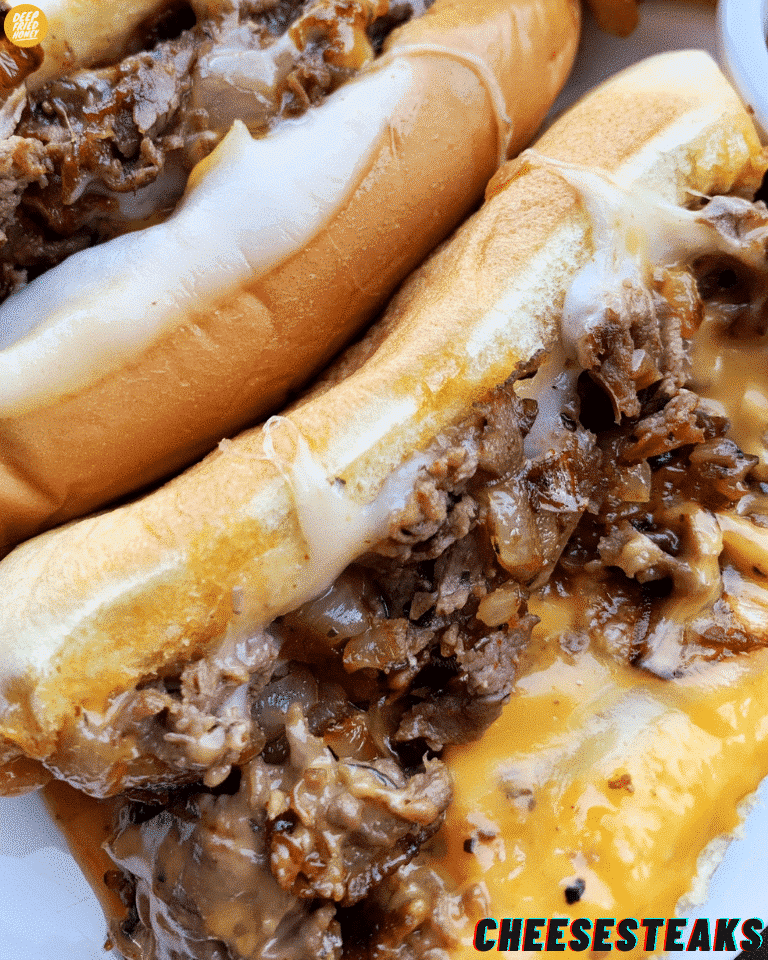
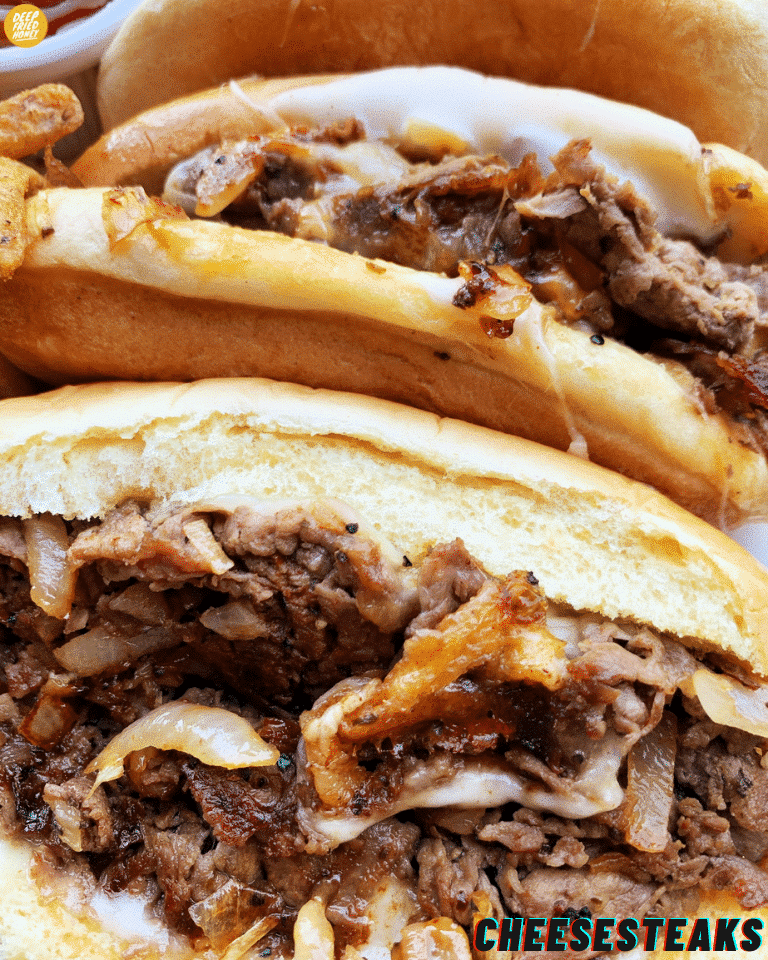
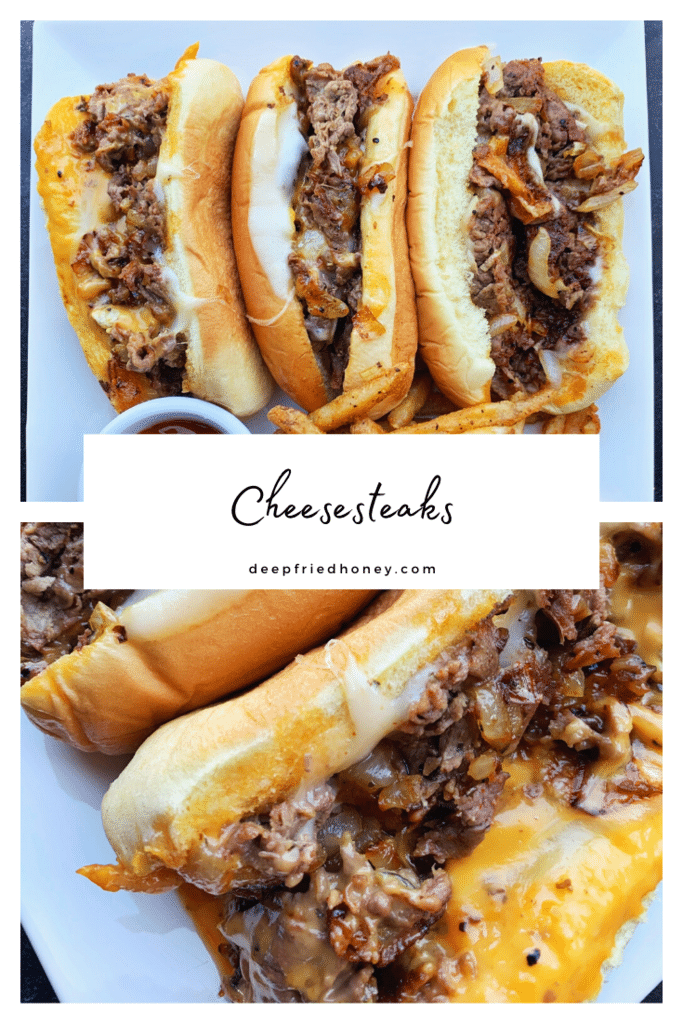
Cheesesteaks are my favorite. I think I probably call everything I enjoy eating my favorite because I like so few things… but I LOVE cheesesteaks. I used to think you could only get a decent version of at a restaurant – and those can be hit or miss – until I learned grocery store butches will cut and shave meat into pretty much anything you ask for, at no extra charge.
Many stores – and butchers! – sell already packaged shaved steak, and I’ll pick that up if I see it, but if I don’t I’ll ask Miguel – the meat manager at the store I live next to – to shave a ribeye for me.
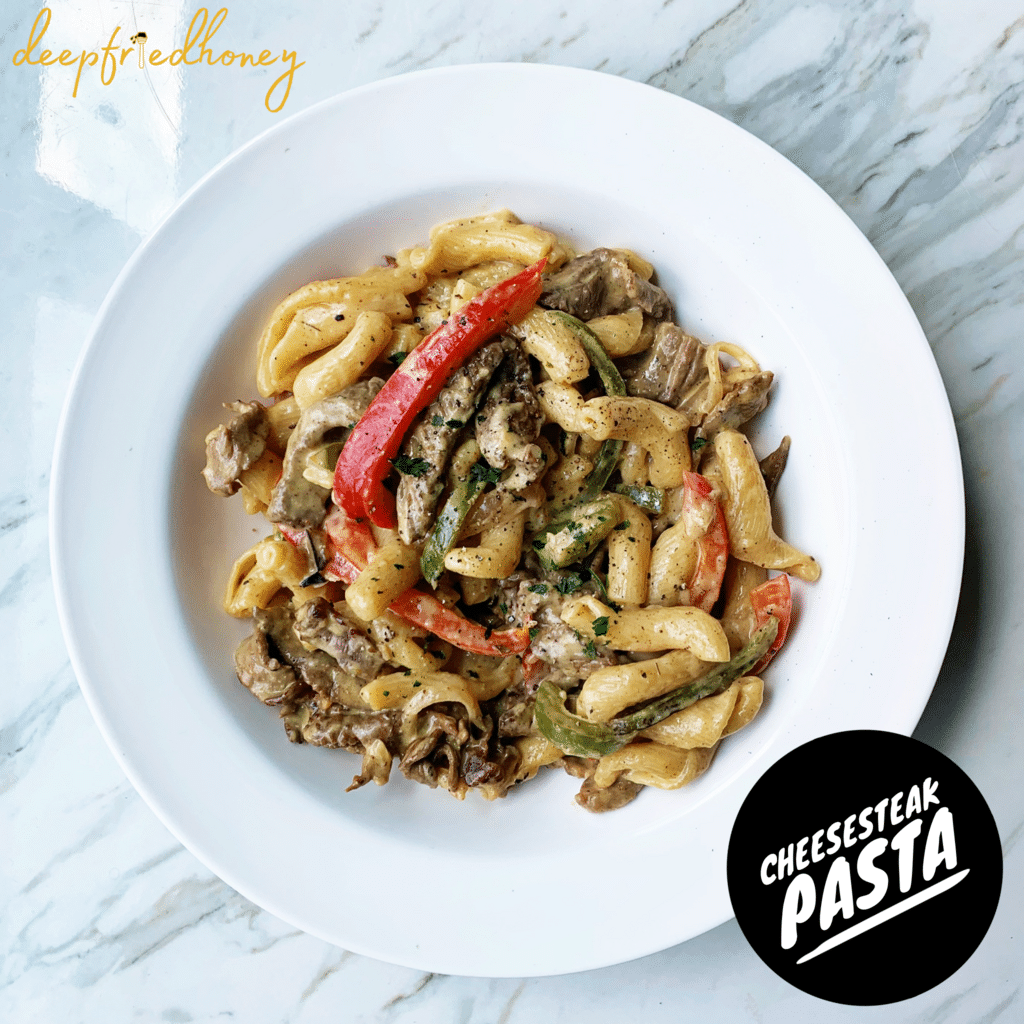
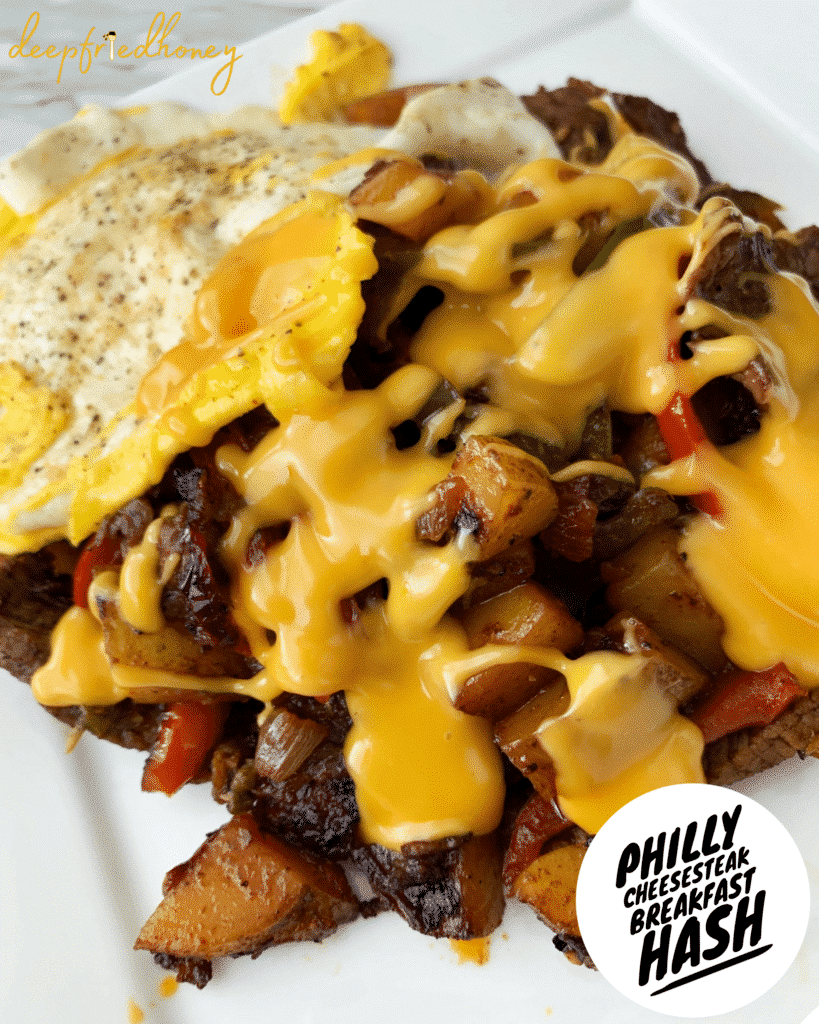
In my house, it’s just a delicious steak sandwich if the steak isn’t shaved, but in a pinch or as preference you could thinly slice steaks by hand. I recommend partially freezing the steaks to make it easier to do. This is the method called for in my Philly Cheesesteak Breakfast Hash and Cheesesteak Pasta recipes.
Cheesesteak Pasta.
Cheesesteak Breakfast Hash
Call-Outs:
You’re pan-frying the onions, not caramelizing them. There should be a mix of crispy-edged pieces and soft golden brown ones when you combine them with the meat; keep in mind they’ll continue to cook until the sandwiches are out of the pan.
Adapt this recipe. Please! Swap out the cheeses for your favorites, use your favorite hoagie rolls, add peppers – whatever. I guess technically you could even say ‘no onions’ (clutches chest) if you wanted.
American cheese will melt into a similar texture as Cheez-Wiz, with a similar, if more familiar flavor, and it makes a great substitute. Get it from the deli if you can, but singles work too.
Adjust it to your family’s tastes. I like to add green bell peppers to my Cheesesteaks. One of my kids wants no cheese at all – so not actually a cheesesteak I guess – and my husband wants ALL THE CHEESES.
You’ll need a BIG skillet. I use my Hexclad 12“ Nonstick Skillet with lid which fit 4 long potato rolls at a time or two larger sub rolls. A large griddle pan would work well, too, but you’ll want to warm the buns in the oven since you won’t cover with a lid to steam them (if you have a melting dome use that, of course).
Heat a large nonstick skillet over medium heat and add a drizzle of oil. Once the oil is shimmering add your diced onions and butter.
Stir together to melt the butter and get the onions coated. Add a pinch of salt, then spread into one layer and let cook undisturbed for 4-5 minutes.
Turn the onions when they begin to brown, so that they cook evenly. Once they are nice and golden and starting to darken around the edges, push them to one side of the pan.
Add your shaved steak – it may help to separate it with your hands while adding it – and season with the granulated garlic, remaining salt and black pepper.
Use a wooden spatula or another firm tool to break up the meat into smaller pieces. Once no more pink remains, combine the onions and meat together. Taste it. Do you need more salt? Be careful – the cheese you have yet to add is salty.
After the meat and onions are mixed well, reduce the heat to low and make a decision: are you mixing the Cheez-Wiz into the steak or not? If you are, do it now. Dollop as much as desired on top of the meat and use the spatula to combine it. After you’re done – or if you’re not doing it – separate the meat into oval-shaped mounds, a little smaller than the rolls you’re using. Depending on the size of your pan you may need to do this in batches.
If you decided not to stir in the Cheez-Wiz go ahead and dollop it on top of the mounds that need it and leave it in place. This will form a thick, gooey blanket of cheese between the meat and bread.
Place a slice of Provolone atop of each mound. Once you notice the provolone begin to soften (melt), cover the pan with a lid. Let the steam warm the buns and melt the cheese.
After 3 minutes remove the lid. Place one hand flat – gently – against the back of an open bun, then slide a spatula between the meat and the pan to separate them. Press the spatula up, holding the meat tightly against the bun. Flip the bun over quickly, and now you have a cheesesteak in your palm! Separate all the cheese strings and plate it.
Repeat the required steps with the remaining sandwiches until they’re all made. Dassit!
You could stir the Provolone into the meat as well. In my family we all like our cheesesteaks differently, but if I had my way I’d mix the Cheez-Wiz and the provolone into the meat before making the mounds, then top each steak with a tiny drizzle more of Cheez-Wiz.
This post may contain affiliate links, which means I get a little off the top to help me keep this website running. It doesn't cost you extra or affect my opinion.
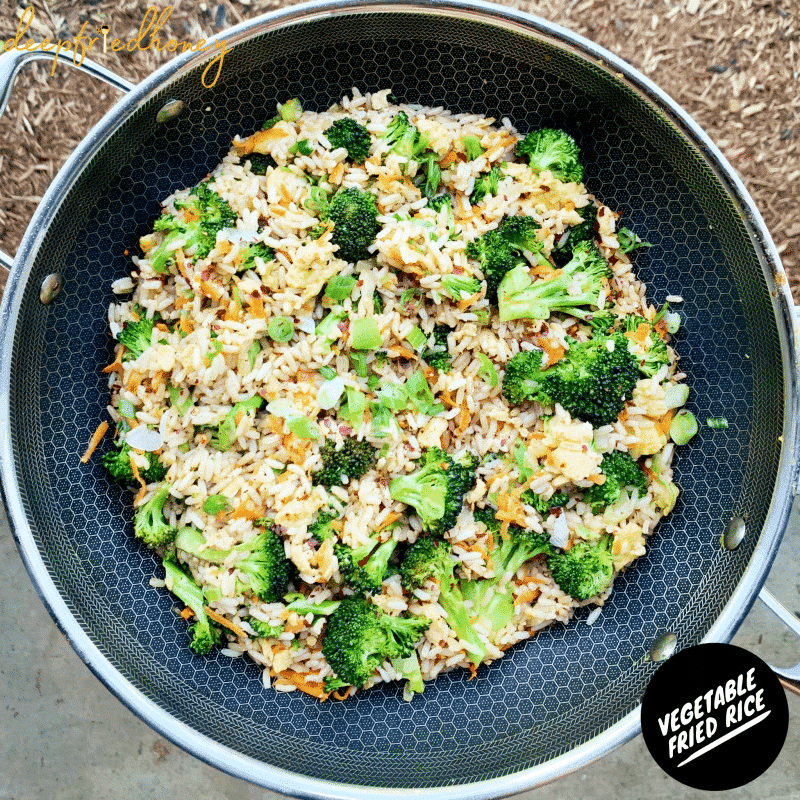
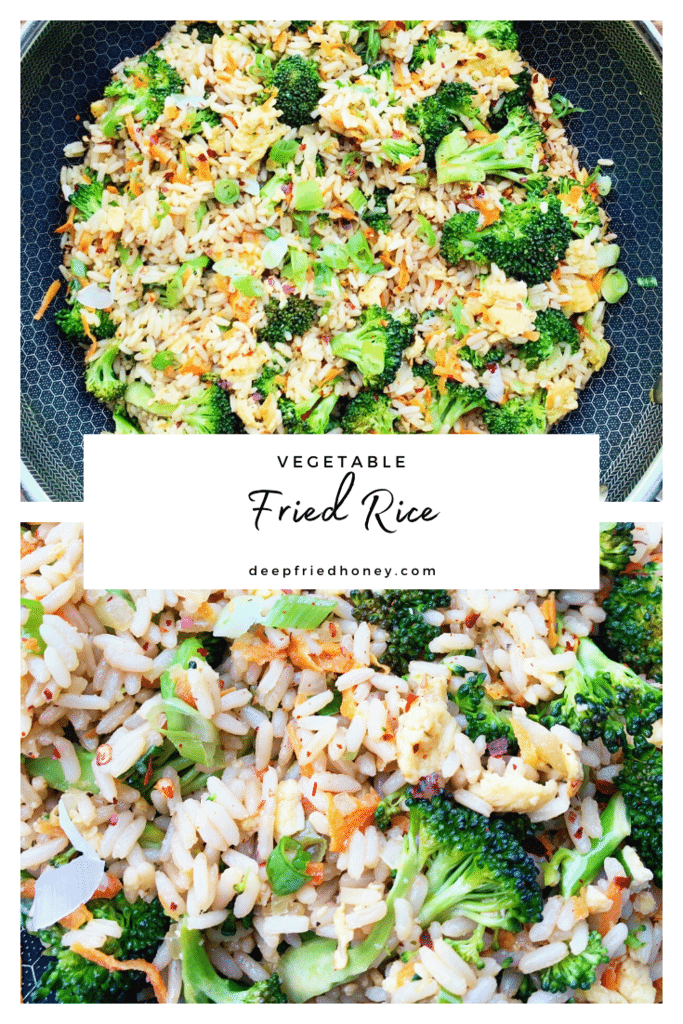
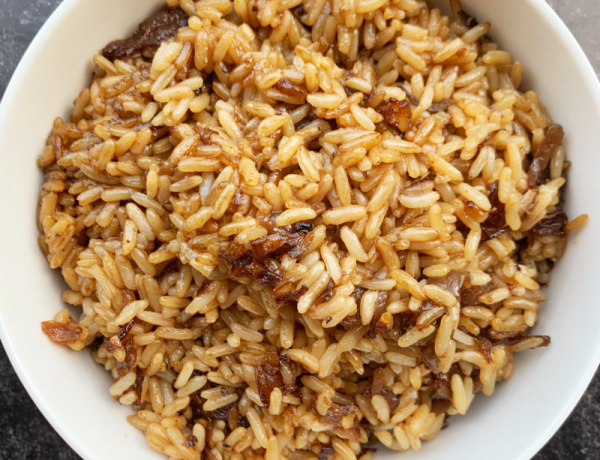
Vegetable Fried Rice is a quick and easy side dish I make about once per week for meal prep. Fried rice is one of those things that’s easily ordered, and almost as easily made. As long as you start with cold rice, the rest is a breeze.
Before we get into the recipe, tho, I need to share a little not-exactly food related information.
All Black Lives Matter has been in the footer of this website since it’s inception back in 2018. My heart’s gladdened to see it now spread far and wide across food blogs and publications all over the world. Although I know much of it is performative, silence is compliance so it is the very least they can do. I hope it’s followed by real action and affects real change.
You might have noticed recently that I’ve started running advertisements on deepfriedhoney.com. I made this decision because I needed to do something to help offset the costs of providing you with all of this content (I really don’t plan on ever monetizing my Instagram, as puzzling as that is to some folks).
If the ads bother you just consider that these recipes are free for you to consume, but not free at all for me to provide.
My ad management company is Mediavine and they’ve provided an option to their publishers to donate all unsold ad space to their We Stand With You initiative, and I signed up. Clicking on any of the ads will take you to a page where they’ve collected resources for educating yourself about and taking action against anti-Black racism.
My participation doesn’t mean I endorse all of the resources gathered on Mediavine’s website. For example, I do not support the ‘8 Can’t Wait’ police reform initiative listed there. I’m an abolitionist:
That aside, there is much to be gained from reviewing the content and I hope all of my white and non-Black POC readers will take part.
No Justice, No Peace!
Alright, now back to the food (if any of the above bothered you pls GTFO off my website, thanks)! This Vegetable Fried Rice is full of fluffy scrambled eggs, grated carrots, sliced broccoli, minced onions, and chopped scallions.
Switch it Up:
You can swap out or add any other vegetables you want. Corn and bell peppers are two of my favorites.
You can substitute liquid aminos for the soy sauce.
I rarely have fresh ginger on hand, but if you do use that instead of dry ginger powder.
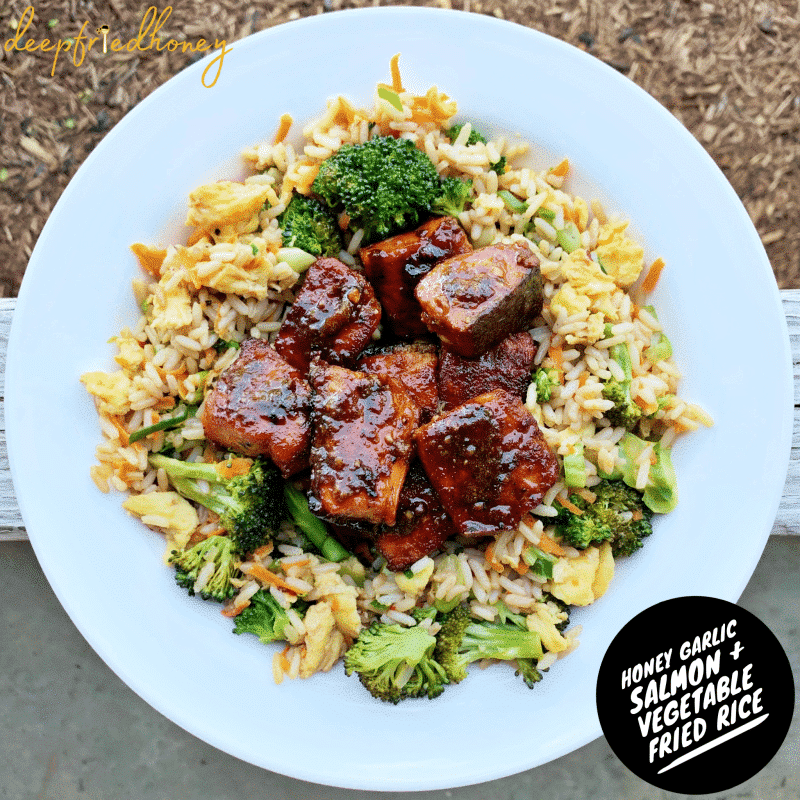
Use regular salted butter in place of garlic butter if you don’t have any but don’t skip the butter unless you have to, it adds great flavor and color. If you’re looking for a Garlic Butter recipe, there’s one in my newest ebook “Who Made the Potato Salad?” and so are the Honey Garlic Salmon Bites pictured on top of the fried rice below.
If you make this recipe come back and rate it, and let me know what you thought! Looking for another easy rice dish? My One-Pot Dirty Rice is pretty great.
Cook your rice the night before for best results. It needs to be completely chilled for best results.
Steam your broccoli for 4 minutes, in the microwave or on the stove. It should be that bright green color.
In a small mixing bowl, scramble 4 eggs with a pinch of salt until no streaks remain. Set aside.
Heat a wok or large frying pan over medium-high heat. Drizzle in some vegetable oil and let it heat up.
Add your carrots and the minced yellow onion. Add a pinch of salt, then the ground ginger. Stir, allowing the carrots to soften and the onion to begin to brown.
Toss in the broccoli.
Remove the vegetables to a large bowl and set aside.
Reduce the heat to medium. Add more oil to the pan, then pour in your eggs. Scramble the eggs with a silicone spatula.
When the eggs are done push them to the side and add half of the garlic butter. When it melts add the green onion stalks and toss everything together.
Add the cooked rice and stir it together. Pour in your soy sauce, sesame oil, and stir well. Make sure the liquids are evenly distributed throughout the rice.
Add your cooked veggies, the remaining garlic butter, the red pepper flakes, and the sesame seeds. Toss one more time.
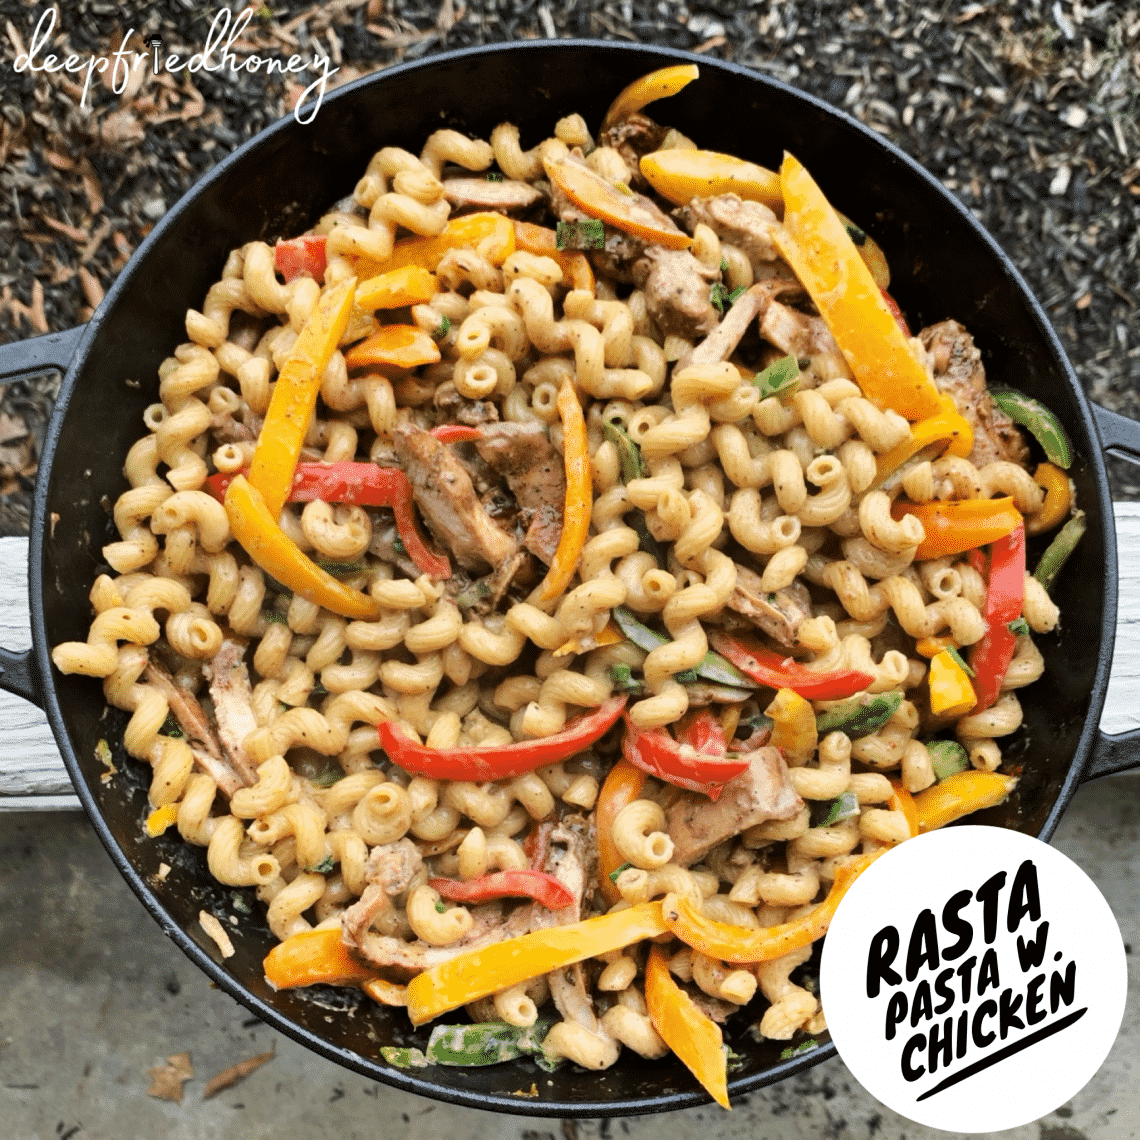
Last week I hosted a poll via my Instagram story, asking for your vote on which recipe request I should fulfill next and Chicken Rasta Pasta won by leaps and bounds.
I’ll be polling y’all a few Wednesdays every month so make sure you keep an eye out for it if you’d like a say on new content! Check out the current list of requests and if you don’t see something you’d like, feel free to suggest it.
I’m a big fan of breakfast potatoes. Home fries? Hashbrowns? Potatoes O’Brien?
It seems like every diner I’ve been to has a different name for that dish you get when you dice potatoes and fry them in a skillet with peppers and onions.
Whatever they’re called, sign me up, always. This Philly Cheesesteak Breakfast Hash adds thinly sliced steak, onions and bell peppers to the mix, then we drizzle over a bit of Cheez-Wiz to take it over the top.
This post may contain affiliate links, which means I get a little off the top to help me keep this website running. It doesn't cost you extra or affect my opinion.
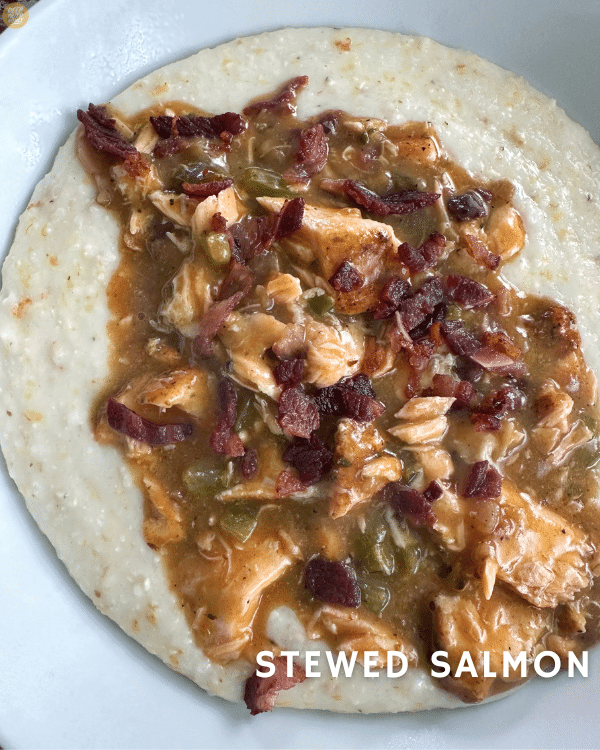
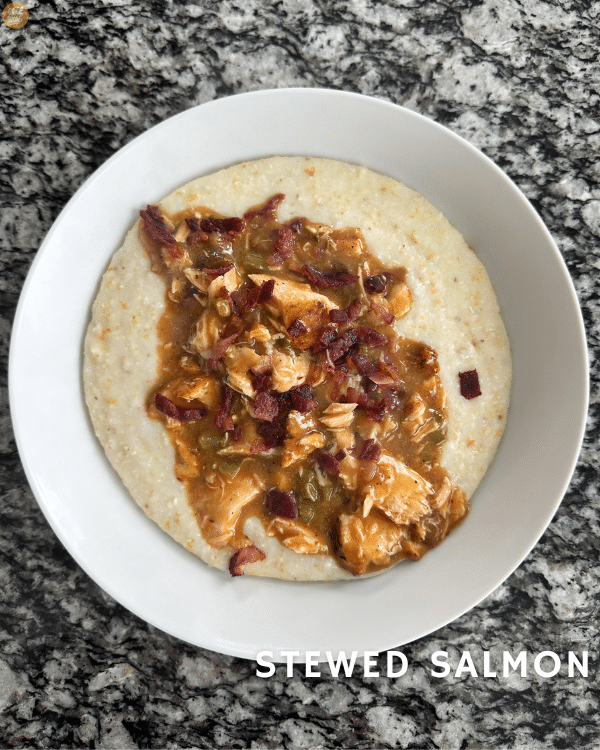
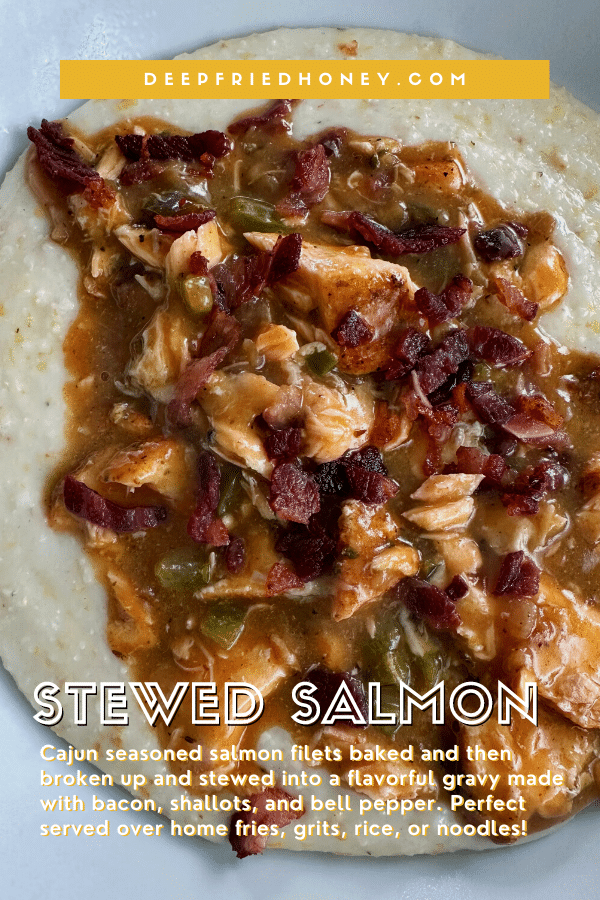
This Stewed Salmon is so damn good. I know seafood recipes are few and far between here on deepfriedhoney.com, with most of them being salmon focused, but here’s another one! My inspiration was this post from Gina Willis of What’s Gina Cooking on Instagram. Before seeing her post I don’t think I’ve ever seen or ever would have considered preparing and making salmon like this, but I’m very glad I replicated it!
It’s an extremely simple and straightforward recipe; the hardest part is building the gravy. You will need both the stovetop and the oven to follow the recipe exactly, which I found to be easiest, but alternatively, you can cook the salmon on the stovetop and then set it aside as you build the gravy in the same pan, then allow the salmon to reheat in the gravy itself. Either way, I think you’ll love it!
Stewed Salmon Ingredients
Feel free to jump to the full recipe, but here are useful notes about the ingredients you will need to make this Stewed Salmon recipe:
Fresh salmon, bacon: I used an Atlantic salmon filet, but I think canned salmon would work all right in this recipe, too. You might want to reduce the amount of seasoned salt if you try that. And make sure to come and tell me how your Stewed Salmon turned out if you try it. I used beef bacon, but you can use whatever kind you want.
Green bell pepper, shallot: Our aromatics. If you prefer another color bell pepper, cool. If you want to do onion and garlic instead of shallot, that’s cool too. This Stewed Salmon is incredibly versatile.
All-purpose flour, water: For building our gravy. Rice flour is a great gluten-free substitute.
Unsalted butter, vegetable oil: For adhering the seasoning to the salmon, sauteing the aromatics, and building the gravy. I used avocado oil, but any oil you want to use is fine.
Cajun seasoning, seasoned salt, cracked black pepper: Our seasonings! You can swap out Kosher salt for seasoned salt, and Creole seasoning for the Cajun seasoning. I added a little Carolina reaper dust too, for heat.
How to Make Stewed Salmon
Full instructions are included in the recipe below, but here is a basic overview of what you’ll need to do, along with some important tidbits to help you make the most of this recipe:
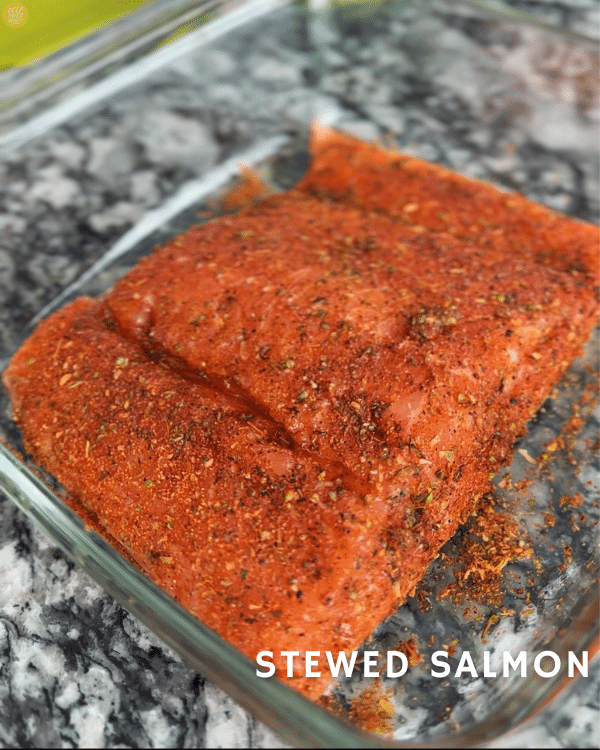
Prepare for Stewed Salmon. Preheat your oven to 375°F and place your salmon filet, skin side down, in a glass baking dish. Drizzle about a teaspoon of oil over your salmon filet and use your hands or a basting brush to make sure the entire filet is coated in a light layer of oil. Sprinkle the cajun seasoning all over the salmon, making sure to season the sides and edges of the salmon, too. There’s no need to season the skin, as we’re not eating it. I mean you can if you want; I’m only here to guide you, not boss you around.
Bake the Salmon. When the oven has preheated go ahead and pop in the salmon and let bake for 10-13 minutes, until opaque and the white protein is starting to seep from the sides. We’re not baking it all the way through; we want it to finish cooking in the gravy.
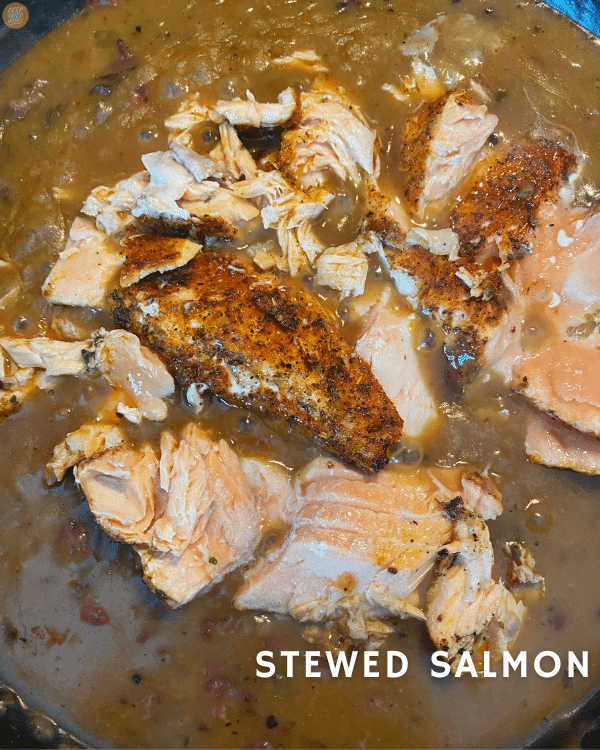
Saute some Aromatics. While the salmon bakes, start on the gravy. Place a large skillet or saute pan over medium-high heat and allow it to preheat for 2 minutes, then add your bacon. Cook until crispy, stirring occasionally, then use a slotted spoon to transfer the cooked bacon pieces onto a paper towel-lined plate, leaving the bacon grease in the pan. There should be enough bacon grease to coat the entire surface of the pan; if there isn’t add in one teaspoon of vegetable oil, then add your shallot and bell pepper. Sprinkle over a pinch of kosher salt, just enough to encourage them to sweat, and stir as they saute, just until softened slightly, about 5 minutes. Check on your salmon if you haven’t already.
Build the Stewed Salmon Gravy. Once the shallot and bell pepper has cooked down add the butter and remaining vegetable oil to the pan. Stir the fats into the aromatics until the butter has melted, then spread everything out into a single layer. Sprinkle the flour over it all, and use a spatula or roux whisk to stir the flour in. Stir and scrape until you have no more dry spots of flour, and all the peppers and shallot are coated in a thin, yellowish paste. Add more oil to the pan, a teaspoon at a time, if you’re struggling to soak up all the dry flour. Cook, stirring occasionally, for 3 minutes. I am pretty sure your salmon is ready to pull from the oven now if it wasn’t earlier. Next, pour the water into the skillet one-half cup at a time, making sure to stir until the liquid is completely incorporated before you add the next half cup. Repeat until you’ve used the full 2 1/2 cups of water. If you’d like a looser gravy, you can add another half a cup.
Finish the Stewed Salmon. Add your seasoned salt and cracked black pepper to the gravy. Stir in and allow to cook for 3 minutes, then stir in half of the cooked bacon bits. Use a wooden spoon to break the cooked salmon down into chunks. Not too small, like you would for salmon cakes or anything, as it will break down further as we stir it into the gravy. Transfer the cooked salmon to the pan of gravy, leaving the skin behind. Gently work the salmon into the gravy – use a folding motion rather than just stirring. Give it a taste, and add more salt if you think it needs it. Dassit!
Preheat your oven to 375°F and place your salmon filet, skin side down, in a glass baking dish. Drizzle about a teaspoon of oil over your salmon filet and use your hands or a basting brush to make sure the entire filet is coated in a light layer of oil.
Sprinkle the cajun seasoning all over the salmon, making sure to season the sides and edges of the salmon, too. There’s no need to season the skin, as we’re not eating it. I mean you can if you want; I’m only here to guide you, not boss you around.
When the oven has preheated go ahead and pop in the salmon and let bake for 10-13 minutes, until opaque and the white protein is starting to seep from the sides. We’re not baking it all the way through; we want it to finish cooking in the gravy.
While the salmon bakes, start on the gravy. Place a large skillet or saute pan over medium-high heat and allow it to preheat for 2 minutes, then add your bacon. Cook until crispy, stirring occasionally, then use a slotted spoon to transfer the cooked bacon pieces onto a paper towel-lined plate, leaving the bacon grease in the pan.
There should be enough bacon grease to coat the entire surface of the pan; if there isn’t add in one teaspoon of vegetable oil, then add your shallot and bell pepper. Sprinkle over a pinch of kosher salt, just enough to encourage them to sweat, and stir as they saute, just until softened slightly, about 5 minutes. Check on your salmon if you haven’t already.
Once the shallot and bell pepper has cooked down add the butter and remaining vegetable oil to the pan. Stir the fats into the aromatics until the butter has melted, then spread everything out into a single layer.
Sprinkle the flour over it all, and use a spatula or roux whisk to stir the flour in. Stir and scrape until you have no more dry spots of flour, and all the peppers and shallot are coated in a thin, yellowish paste. Add more oil to the pan, a teaspoon at a time, if you’re struggling to soak up all the dry flour. Cook, stirring occasionally, for 3 minutes. I am pretty sure your salmon is ready to pull from the oven now if it wasn’t earlier.
Next, pour the water into the skillet one-half cup at a time, making sure to stir until the liquid is completely incorporated before you add the next half cup. Repeat until you’ve used the full 2 1/2 cups of water. If you’d like a looser gravy, you can add another half a cup.
Add your seasoned salt and cracked black pepper to the gravy. Stir in and allow to cook for 3 minutes, then stir in half of the cooked bacon bits.
Use a wooden spoon to break the cooked salmon down into chunks. Not too small, like you would for salmon cakes or anything, as it will break down further as we stir it into the gravy.
Transfer the cooked salmon to the pan of gravy, leaving the skin behind. Gently work the salmon into the gravy – use a folding motion rather than just stirring. Give it a taste, and add more salt if you think it needs it. Dassit!
Notes
I call for a whole filet, in one big piece. It’s OK if it’s just under or over a pound and a half. If you’re using cut portions of salmon filet I recommend roasting those on a baking sheet at 425°F for 10-12 minutes instead following the recipe instructions. Just a suggestion, as written will work.
This post may contain affiliate links, which means I get a little off the top to help me keep this website running. It doesn't cost you extra or affect my opinion.
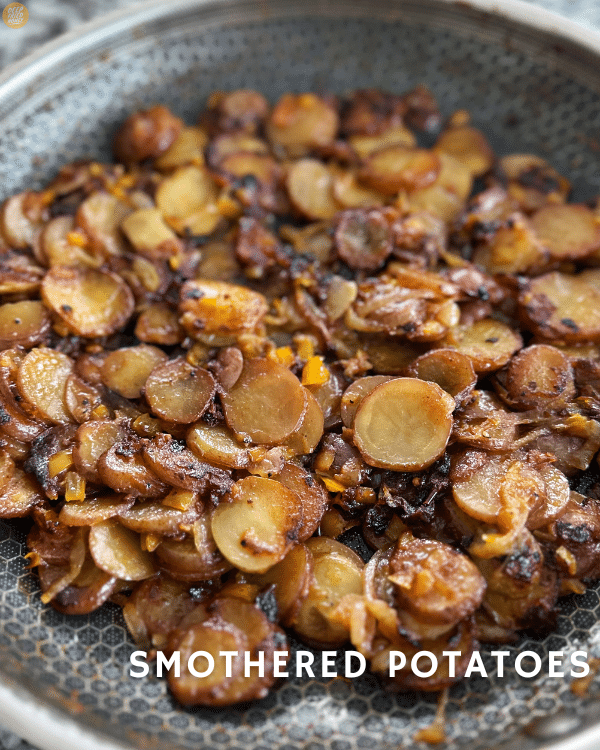
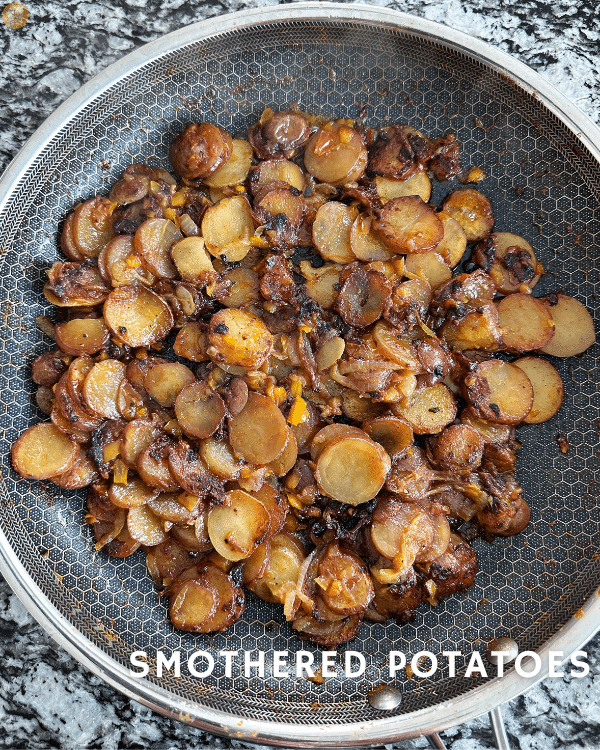
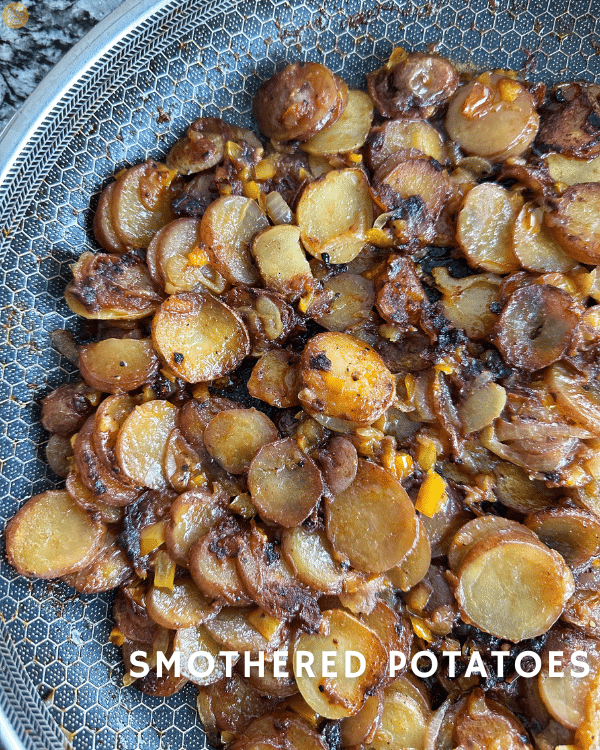
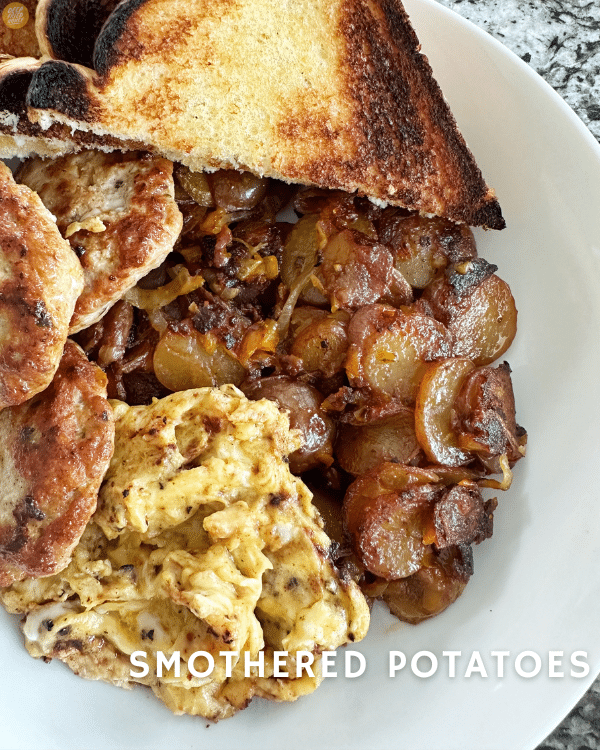
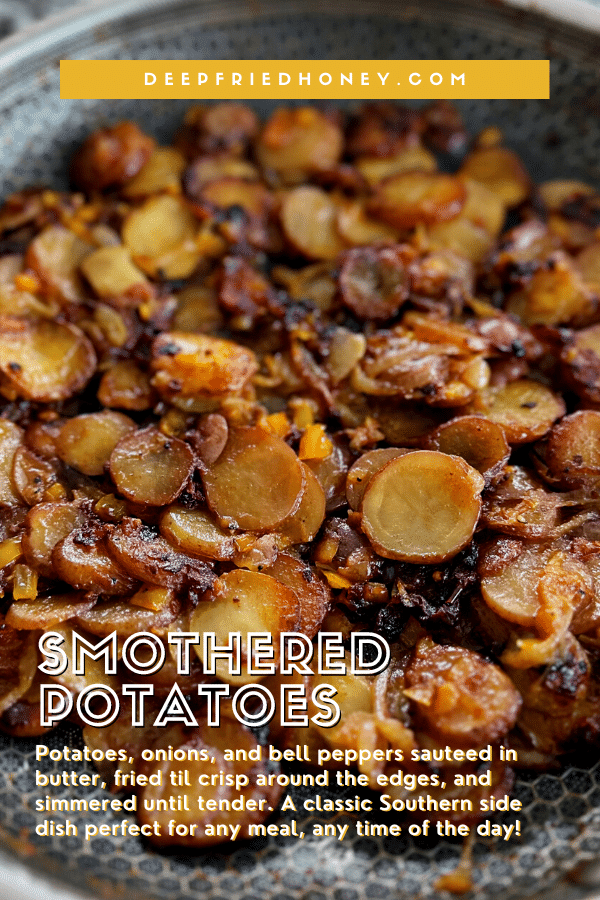
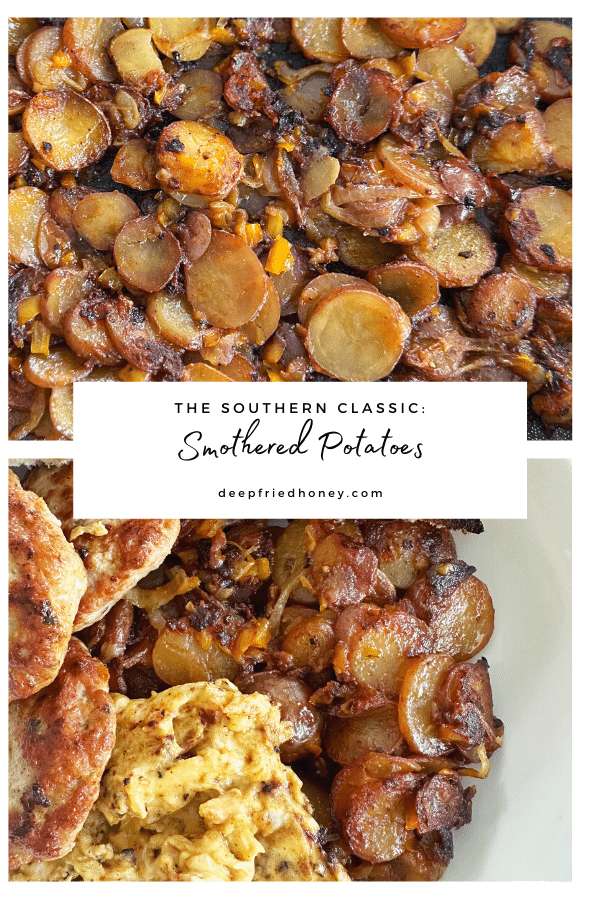
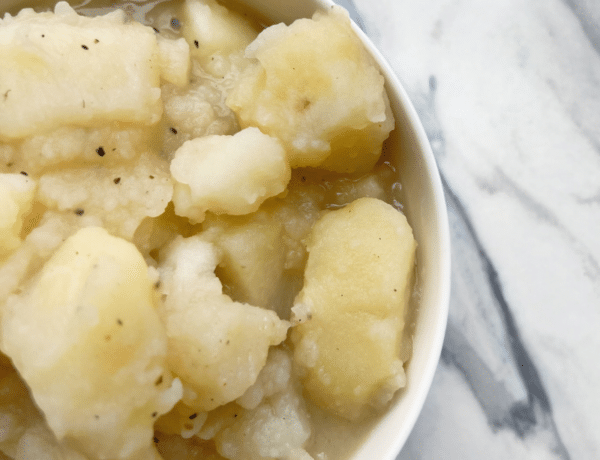
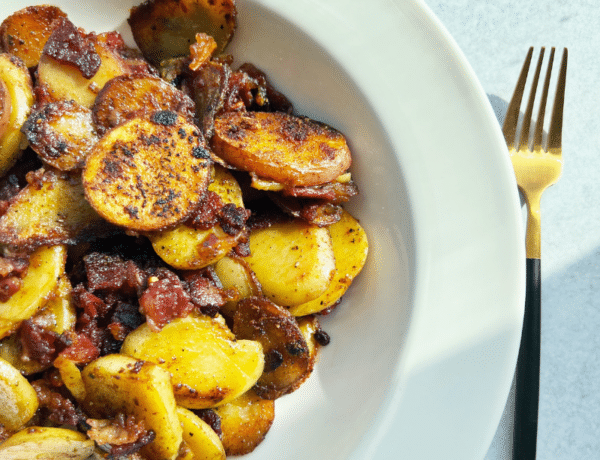
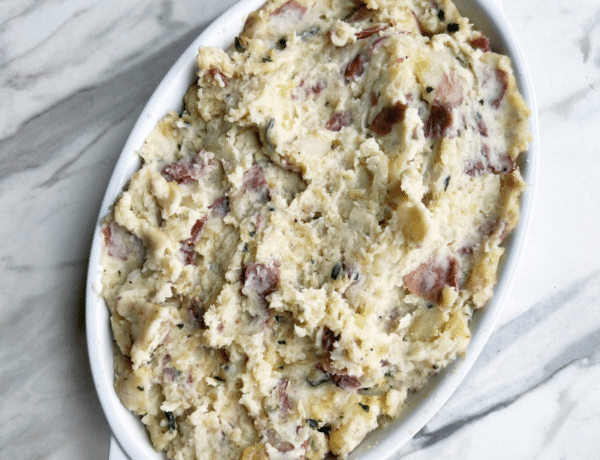
Why are Smothered Potatoes called Smothered Potatoes? I have no idea. I guess because you cook them with a bit of liquid and covered with a lid, which is kind of like smothering them? We’ll go with that. They’re quite yummy! And new to me, since they differ from home fries aka hasbrowns aka breakfast potatoes.
We’ve enjoyed these for breakfast, lunch, and dinner over the last few weeks as I fine tuned the recipe. I found them to be amazing my Salmon Cakes and Simple Salmon Cakes – the difference being the latter is made with canned salmon and the former made with fresh salmon – and my Turkey Sausage.
Smothered Potatoes Ingredients
Feel free to jump to the full recipe, but here are useful notes about the ingredients you will need to make this Smothered Potatoes recipe:
Baby potatoes: I use a mix of red and gold baby potatoes. You can use just red or just gold potatoes if you like, it doesn’t really matter as long as you’re using one of the two. Russet potatoes are starchier and will break apart more easily – in other words, they’ll work for Smothered Potatoes but the final dish will look a bit messier. I like slicing the potatoes thinly with a knife (a mandoline will work, too) but cutting them into evenly sliced small chunks works fine.
Yellow onion, bell pepper: A sweet or white onion will work, and any color bell pepper will do. You can omit these if you like. I do sometimes when I’m feeling lazy, or just want simple and plain Smothered Potatoes. Make sure you add onion powder to the seasonings if you omit the onion.
All-purpose flour, water: Flour for thickening and color, and a bit of texture. Water so they easily steam while covered. You can use chicken broth if you prefer.
Salted butter, vegetable oil: Butter for color and flavor, and oil to ensure the seasonings stick to the potatoes and nothing burns (butter has a much lower smoke point).
Seasoned salt, paprika, garlic powder, cracked black pepper: Our Smothered Potatoes flavorings. Swap and switch them out as you see fit. Kosher salt will work instead of seasoned salt if that’s what you’d prefer to use.
How to Make Smothered Potatoes
Full instructions are included in the recipe below, but here is a basic overview of what you’ll need to do, along with some important tidbits to help you make the most of this Smothered Potatoes recipe:
Prepare for Smothered Potatoes. In a large mixing bowl, toss the sliced potatoes with the seasoned salt, garlic powder, paprika, black pepper, and flour. Once all the potatoes are nicely coated, add the vegetable oil. Give everything a good stir again, making sure the oil is distributed. Place a large saute pan with a lid over medium-high heat (but without the lid, we don’t need that yet). Allow it to preheat for 2 minutes, then add in the butter.
Saute the Peppers and Onions. Once the butter has melted add the onion and bell pepper. Toss the coat in the butter, then spread them out into a single layer and allow to cook undisturbed for 5 minutes.
Add the Potatoes. After 5 minutes pour in the potatoes. Fold everything together, ensuring the peppers and onions are evenly distributed throughout the potatoes. Spread them out in a single layer and let fry for 3 minutes, then flip them over, spread them out, and let fry for another 3 minutes. Pour in the water and cover with the lid. Reduce the heat to low and let cook until the water has evaporated/absorbed and the potatoes are tender, which should take about 10 minutes.
Finish theSmothered Potatoes. Remove the lid and increase the heat to medium-high. Gently give the potatoes another flip, and spread them back into a single layer. Let them cook until deeply browned and crisped around the edges, turning every 3-4 minutes until you’re happy with them. Serve immediately. Dassit!
In a large mixing bowl, toss the sliced potatoes with the seasoned salt, garlic powder, paprika, black pepper, and flour. Once all the potatoes are nicely coated, add the vegetable oil. Give everything a good stir again, making sure the oil is distributed.
Place a large saute pan with a lid over medium-high heat (but without the lid, we don’t need that yet). Allow it to preheat for 2 minutes, then add in the butter.
Once the butter has melted add the onion and bell pepper. Toss the coat in the butter, then spread out into a single layer and allow to cook undisturbed for 5 minutes.
After 5 minutes pour in the potatoes. Fold everything together, ensuring the peppers and onions are evenly distributed throughout the potatoes. Spread them out in a single layer and let fry for 3 minutes, then flip them over, spread them out, and let fry for another 3 minutes.
Pour in the water and cover with the lid. Reduce the heat to low and let cook until the water has evaporated/absorbed and the potatoes are tender, which should take about 10 minutes.
Remove the lid and increase the heat to medium-high. Gently give the potatoes another flip, and spread them back into a single layer. Let them cook until deeply browned and crisped around the edges, turning every 3-4 minutes until you’re happy with them.
Serve immediately. Dassit!
Notes
This recipe can be adjusted in a ton of different ways! Check out the post above the recipe!
This post may contain affiliate links, which means I get a little off the top to help me keep this website running. It doesn't cost you extra or affect my opinion.
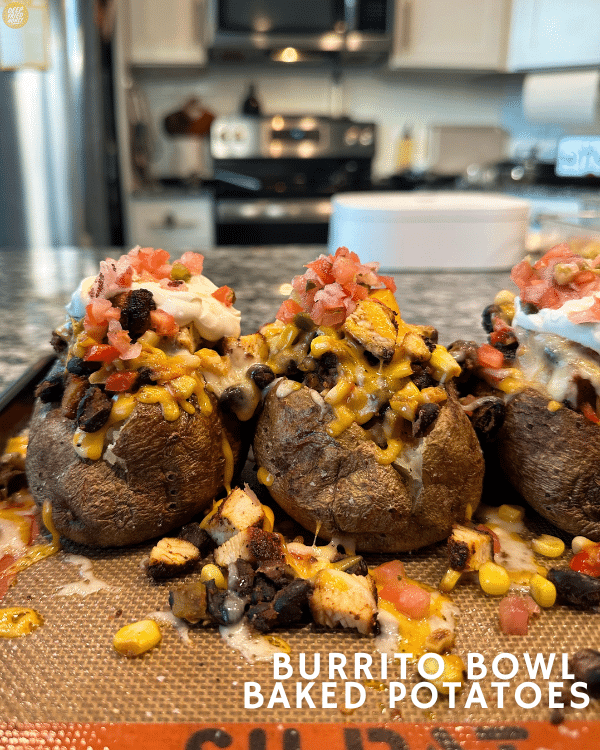
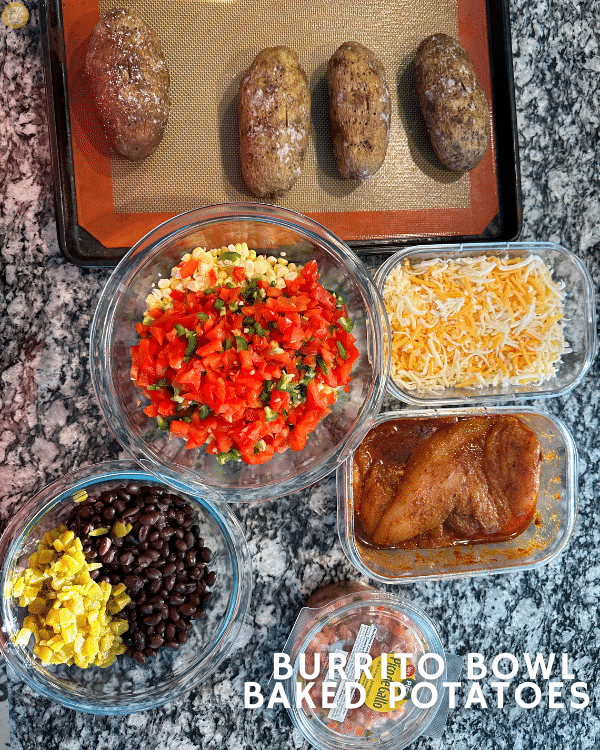
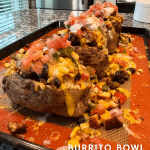
I enjoy a good baked potato so much more than it might seem if you peruse this site or my socials – this recipe for Burrito Bowl Baked Potatoes is only the second baked potato recipe I’ve added here. A travesty! If you enjoy Burrito Bowls, baked potatoes, tex-mex food, etc then I think you’ll really enjoy this recipe.
Burrito Bowl Baked Potatoes Ingredients
Feel free to jump to the full recipe, but here are useful notes about the ingredients you will need to make this Burrito Bowl Baked Potatoes recipe:
Boneless skinless chicken breasts: As always, thighs would work if that’s your preference. You’ll just need to cook them a tad longer than you would breasts. Remember 165°F is safe internally for poultry.
Lime juice, vegetable oil: For marinating our chicken. The vegetable oil is used to saute the beans and corn, too. The chicken will taste super similar to my Jalapeno Lime Chicken if you’re familiar with that one.
Kosher salt, ground cumin, cayenne pepper, sazon, cracked black pepper: The seasonings for your Burrito Bowl Baked Potatoes. Most of them are for the chicken, with just Kosher salt adding flavor to the beans and corn.
Corn, jalapeno, red bell pepper: I shaved the kernels off four cobs of corn, but you can use frozen or canned corn. If you use canned, you can just pick up a can of southwestern or fiesta corn, which will already have peppers diced up in it. Easy peasy.
Black beans, green chiles: New Mexico Hatch green chiles are my preference. You want a small can – 4oz. Pinto beans would be a good alternative.
Colby jack cheese: The type of cheese you use doesn’t matter much, I would stick with something familiar in Tex-Mex food that will meld with the flavors of these Burrito Bowl Baked Potatoes and any of the jack cheeses would be perfect here.
Pico de gallo, sour cream, hot sauce: Plus whatever other toppings you’d normally put on your Burrito Bowls.
How to Make Burrito Bowl Baked Potatoes
Full instructions are included in the recipe below, but here is a basic overview of what you’ll need to do, along with some important tidbits to help you make the most of this Burrito Bowl Baked Potatoes recipe:
Prepare for Burrito Bowl Baked Potatoes. Heat oven to 400°F and place a wire rack over a baking sheet. Poke your potatoes all over with a fork or small knife, making sure it’s well-vented on all sides. Place on the prepared baking sheet. In a medium bowl, mix together all of the ingredients under the ‘Chicken’ heading: vegetable oil, lime juice, sazon, kosher salt, cumin, and cayenne to make a marinade. Add the chicken and turn to coat, ensuring the marinade covers all of the chicken. Set aside.
Get to Bakin’. Once the oven is preheated, go ahead and pop the potatoes in. Allow them to bake undisturbed for 30 minutes, then remove from the oven and baste lightly with vegetable oil. Sprinkle a few pinches of kosher salt all over the potatoes, then continue baking for another 30 minutes until the skin is wrinkled and a knife slips through easily.
Let’s multitask! While the potatoes are baking, prepare the other components. Place three nonstick skillets on the stove – you can do this one at a time if you’re hesitant to multitask – over medium heat. Let the pans preheat for 2 minutes, then add a small drizzle of vegetable oil to each, just enough to coat the surface of the pan. To the first pan, add the chicken in a single layer – do not crowd the pan; cook in batches if needed – and increase the heat to medium-high. To the second pan, add the black beans and green chiles, and to the last pan, add the corn, jalapeno, and bell pepper. Add a few hefty pinches of salt to the corn and the black beans. Give the beans and the corn a stir to combine everything. Once the corn and beans are heated through, and simmering, reduce the heat to low and cover them with lids. By this time, the chicken should be well-seared. Flip it over and continue cooking until well browned on that side and cooked through inside. Remove the chicken from heat to a cutting board to rest while you prepare the baked potatoes.
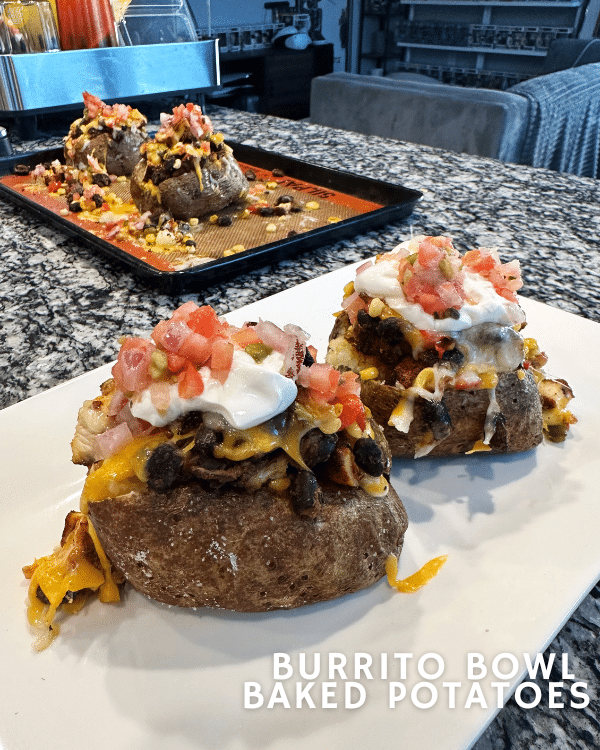
Assemble the potatoes. Set the fully baked potatoes on the countertop and allow them to cool for a few minutes, then use a pairing knife to open them up. Switch the oven to broil on high. Slice from end to end on one side, then grab the edges of the potato and push them inward. This will make the potato crack and burst up out of the opening you made. Add a pat of butter and your desired amount of salt and pepper to the inside of the potatoes, then use a small fork or butter knife to fluff the potato and work the seasonings into it.
Finish the Burrito Bowl Baked Potatoes. Use a chef’s knife to dice the chicken into bite-sized pieces, and grab your sauteed black beans, southwestern corn mixture, and whatever toppings you’re using. Pull the opening of each potato apart just enough to be able to spoon in the fillings. Add shredded cheese, then pop them in the broiler just until it has melted. Top with chicken, then beans, then corn, then more cheese. It’s OK if it’s a bit overstuffed; just press them down into the potato and keep going until it’s packed. Place the potatoes back under the broiler and this time, allow them to broil until the cheese is completely melted and bubbling. Finish the potatoes with cold toppings and enjoy. Dassit!
Heat oven to 400°F and place a wire rack over a baking sheet. Poke your potatoes all over with a fork or small knife, making sure it’s well-vented on all sides. Place on the prepared baking sheet.
In a medium bowl, mix together all of the ingredients under the ‘Chicken’ heading: vegetable oil, lime juice, sazon, kosher salt, cumin, and cayenne to make a marinade. Add the chicken and turn to coat, ensuring the marinade covers all of the chicken. Set aside.
Once the oven is preheated, go ahead and pop the potatoes in. Allow them to bake undisturbed for 30 minutes, then remove from the oven and baste lightly with vegetable oil. Sprinkle a few pinches of kosher salt all over the potatoes, then continue baking for another 30 minutes until the skin is wrinkled and a knife slips through easily.
While the potatoes are baking, prepare the other components. Place three nonstick skillets on the stove – you can do this one at a time if you’re hesitant to multitask – over medium heat. Let the pans preheat for 2 minutes, then add a small drizzle of vegetable oil to each, just enough to coat the surface of the pan.
To the first pan, add the chicken in a single layer – do not crowd the pan; cook in batches if needed – and increase the heat to medium high. To the second an, add the black beans and green chiles, and to the last pan, add the corn, jalapeno, and bell pepper. Add a few hefty pinches of salt to the corn and the black beans. Give the beans and the corn a stir to combine everything.
Once the corn and beans are heated through, and simmering, reduce the heat to low and cover them with lids. By this time the chicken should be well seared. Flip it over and continue cooking until well browned on that side and cooked through inside. Remove the chicken from heat to a cutting board to rest while you prepare the baked potatoes.
Set the fully baked potatoes on the countertop and allow them to cool for a few minutes, then use a pairing knife to open them up. Switch the oven to broil on high. Slice from end to end on one side, then grab the edges of the potato and push them inward. This will make the potato crack and burst up out of the opening you made.
Add a pat of butter along with your desired amount of salt and pepper to the inside of the potatoes, then use a small fork or butter knife to fluff the potato and work the seasonings into it.
Use a chef’s knife to dice the chicken into bite-sized pieces and grab your sauteed black beans, southwestern corn mixture, and whatever toppings you’re using.
Pull the opening of each potato apart just enough to be able to spoon in the fillings. Add shredded cheese, then pop them in the broiler just until it has melted. Top with chicken, then beans, then corn, then more cheese. It’s OK if it’s a bit overstuffed; just press them down into the potato and keep going until it’s packed. Place the potatoes back under the broiler and this time, allow them to broil until the cheese is completely melted and bubbling.
Finish the potatoes with cold toppings and enjoy. Dassit!
This post may contain affiliate links, which means I get a little off the top to help me keep this website running. It doesn't cost you extra or affect my opinion.
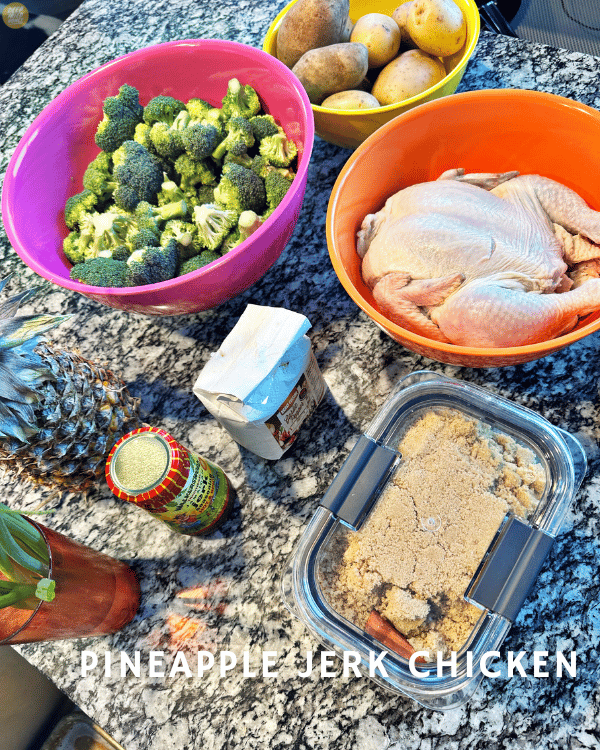
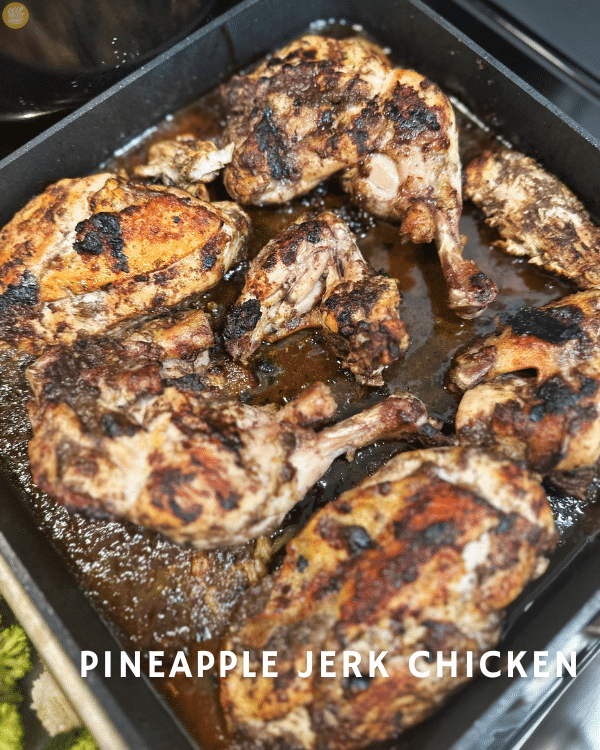
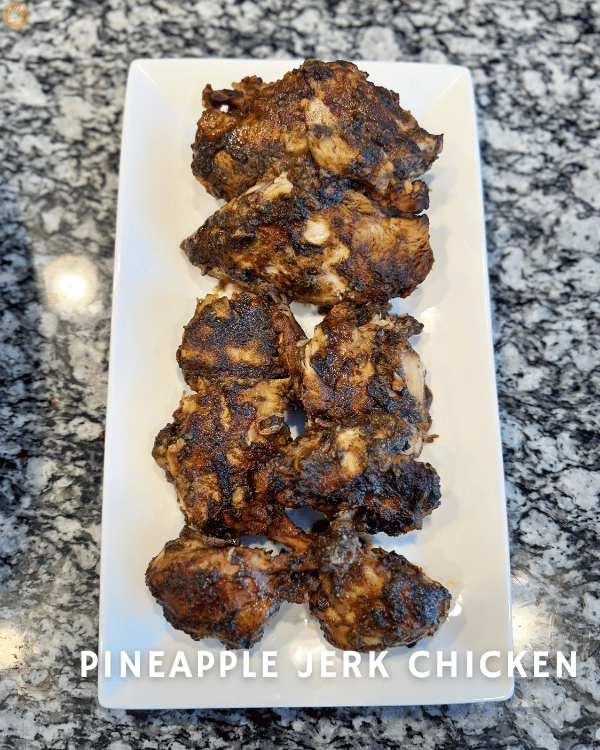
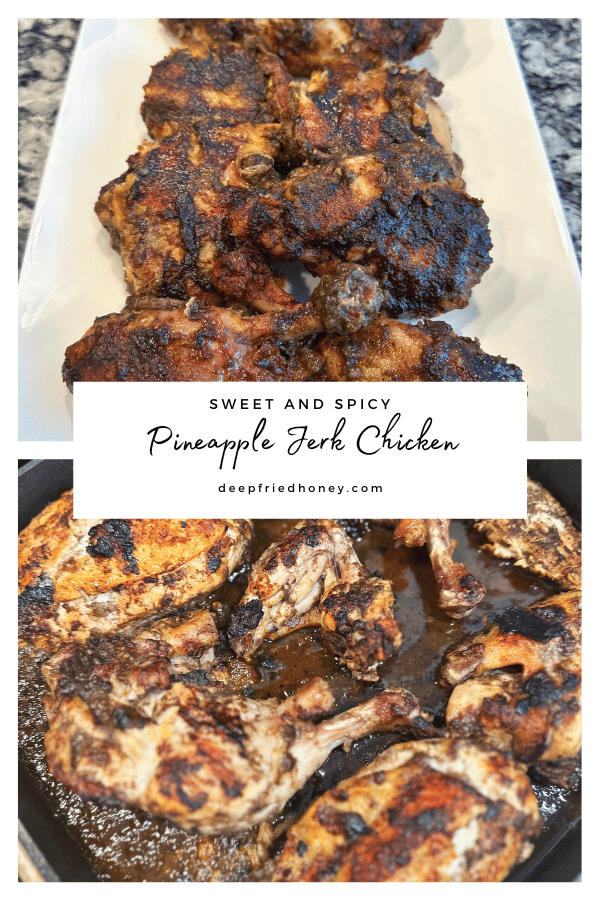
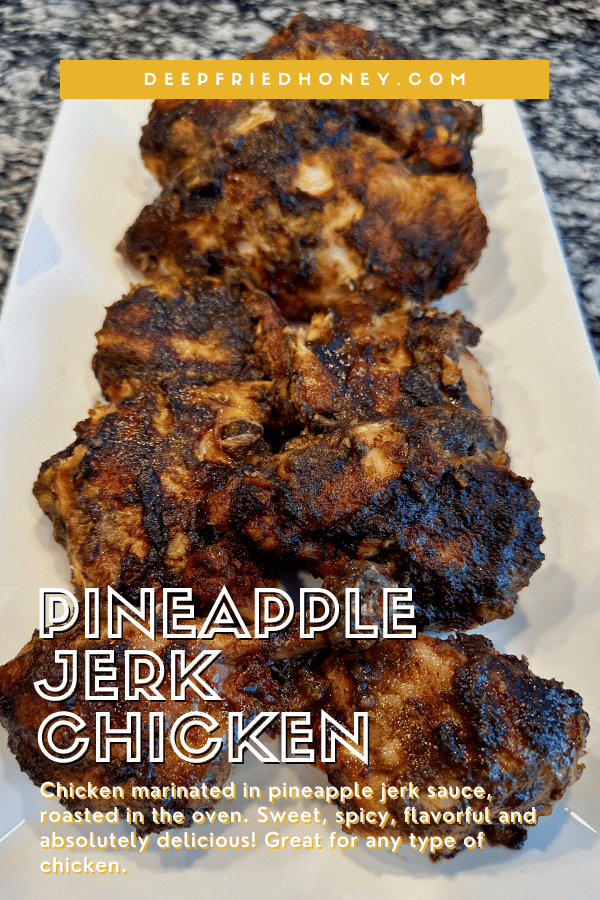
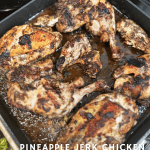
Bruh I meant to have this Roasted Pineapple Jerk Chicken recipe up two months ago! Apologies for the delay, it required me to make it a few more times than I’d planned to get decent photos, and also perfect the recipe. If you watch the videos of me preparing this on any of my social like Instagram or TikTok you’ll notice that each time I’ve made it differently. What you’ll find below is the final form.
This Roasted Pineapple Jerk Chicken is just what it sounds like: chicken marinated overnight in a sauce made of fresh pineapple and jerk seasoning, then roasted at a high temp until done inside, with an optional broiler finish to crisp up the skin. While this recipe will work with any cut of chicken – boneless skinless chicken breasts, a whole bird, cornish hens, bone-in thighs, etc – I developed it for an entire chicken cut into 8 pieces, with the skin on. If you swap out the type of chicken, you’ll need to adjust the recipe accordingly.
Pineapple Jerk Chicken Ingredients
Feel free to jump to the full recipe, but here are helpful notes about the ingredients you will need to make this Pineapple Jerk Chicken recipe:
Jerk marinade: I like Walkerswood’s Hot and Spicy. Use your favorite, make your own, whatever.
Pineapple, brown sugar: Use fresh pineapple. If you don’t feel like bussing down a whole one you should be able to find what you need in the produce section by the other cut produce. Canned pineapple stored in water with no added sugar will be a fine substitute as long as you drain it very well. Brown sugar is optional. Only add it if you’re pineapple is a little lacking in sweetness, or if you want to increase the sweetness overall.
Chicken: A whole bird, cut into eight pieces. Or, about 3-4 pounds of whatever other kind of chicken you want to use or have on hand.
Green seasoning: You might call it sofrito. It’s basically an herbaceous, flavorful paste you can add to almost any dish to up the ante. You can sometimes find it in the grocery store or in Caribbean markets. I make my own by blending the following together: one red bell pepper, one green bell pepper, five fat garlic cloves, one medium white onion, one bunch of flat-leaf parsley, two bunches of cilantro (one bunch of cilantro, and another of culantro if I can find it), a handful of fresh basil, a handful of green onions and a touch of kosher salt. If I can find scotch bonnet peppers I will add a couple of those as well. There are plenty of recipes all over the internet if you need an exact one.
Paprika,browning: For color. It’ll look a lil’ pale if you omit either or both of these, but the flavor will still be amazing.
Kosher salt: Flavorrrr.
How to Make Pineapple Jerk Chicken
Full instructions are included in the recipe below, but here is a basic overview of what you’ll need to do, along with some important tidbits to help you make the most of this Pineapple Jerk Chicken recipe:
Prepare the chicken. Add your chicken pieces to a large bowl. Add the oil to the bowl, then sprinkle in the salt and paprika. Use your hands to work the seasonings and oil into the chicken, especially into the skin. Drizzle the browning into the bowl and work that into the chicken, making sure the sauce has been well distributed and all pieces are coated. Repeat this process again with the green seasoning, then set the chicken aside.
Make the Pineapple Jerk marinade. Cut your pineapple into chunks and add them to the bowl of your blender – or a high-capacity food processor, along with all of the jerk marinade and brown sugar (if using). Pulse until the pineapple and jerk sauce are combined, then blend on high until it forms a sauce.
Marinate it. Pour the pineapple jerk marinade into the bowl of the chicken, and again use your hands to work the marinade into the meat. Make sure to get under the skin, and leave no spot behind! Cover the bowl with clingwrap or a lid and refrigerate overnight, or for at least 12 hours. I wouldn’t tell you to wait if you didn’t need to, just trust me! About 30-45 minutes prior to cooking pull the chicken out of the fridge and let it set on the counter.
Roast the Pineapple Jerk Chicken. Preheat your oven to 425°F and center one of the oven racks. Choose your favorite heavy roasting pan or dish – make sure it’s large enough to hold everything. Add your chicken in a single layer, skin side down. Roast the chicken in the oven until a meat thermometer in the center of the largest piece reads 165°F, which should take around 30-40 minutes. It’ll vary based on just how fat your pieces of chicken are.
Broil the Pineapple Jerk Chicken. Once the chicken is done, pull the roasting pan from the oven and turn the broiler on high. Use tongs to flip the chicken over so that the skin side is up, then use a small spoon to spoon the roasted jerk sauce from the bottom of the pan back onto the chicken pieces. Put the chicken back in the oven under the broiler until the skin is crisp and the color of the chicken has deepened – about 5-7 minutes, then pull. Serve hot and enjoy. Dassit!
What To Serve With Pineapple Jerk Chicken
You can make endless variations with this Pineapple Jerk Chicken (or my Honey Jerk Chicken!) recipe, so please feel free to customize yours to taste! For example, you could…
Add your chicken pieces to a large bowl. Add the oil to the bowl, then sprinkle in the salt and paprika. Use your hands to work the seasonings and oil into the chicken, especially into the skin.
Drizzle the browning into the bowl and work that into the chicken, making sure the sauce has been well distributed and all pieces are coated. Repeat this process again with the green seasoning, then set the chicken aside.
Cut your pineapple into chunks and add them to the bowl of your blender – or a high-capacity food processor, along with all of the jerk marinade and brown sugar (if using). Pulse until the pineapple and jerk sauce are combined, then blend on high until it forms a sauce.
Pour the pineapple jerk marinade into the bowl of the chicken, and again use your hands to work the marinade into the meat. Make sure to get under the skin, and leave no spot behind! Cover the bowl with clingwrap or a lid and refrigerate overnight, or for at least 12 hours. I wouldn’t tell you to wait if you didn’t need to, just trust me!
About 30-45 minutes prior to cooking pull the chicken out of the fridge and let it set on the counter. Preheat your oven to 425°F and center one of the oven racks. Choose your favorite heavy roasting pan or dish – make sure it’s large enough to hold everything. Add your chicken in a single layer, skin side down.
Roast the chicken in the oven until a meat thermometer in the center of the largest piece reads 165°F, which should take around 30-40 minutes. It’ll vary based on just how fat your pieces of chicken are.
Once the chicken is done, pull the roasting pan from the oven and turn the broiler on high. Use tongs to flip the chicken over so that the skin side is up, then use a small spoon to spoon the roasted jerk sauce from the bottom of the pan back onto the chicken pieces.
Put the chicken back in the oven under the broiler until the skin is crisp and the color of the chicken has deepened – about 5-7 minutes, then pull. Serve hot and enjoy. Dassit!
Notes
*For more information and substitution advice, refer to the post above the recipe.
This post may contain affiliate links, which means I get a little off the top to help me keep this website running. It doesn't cost you extra or affect my opinion.
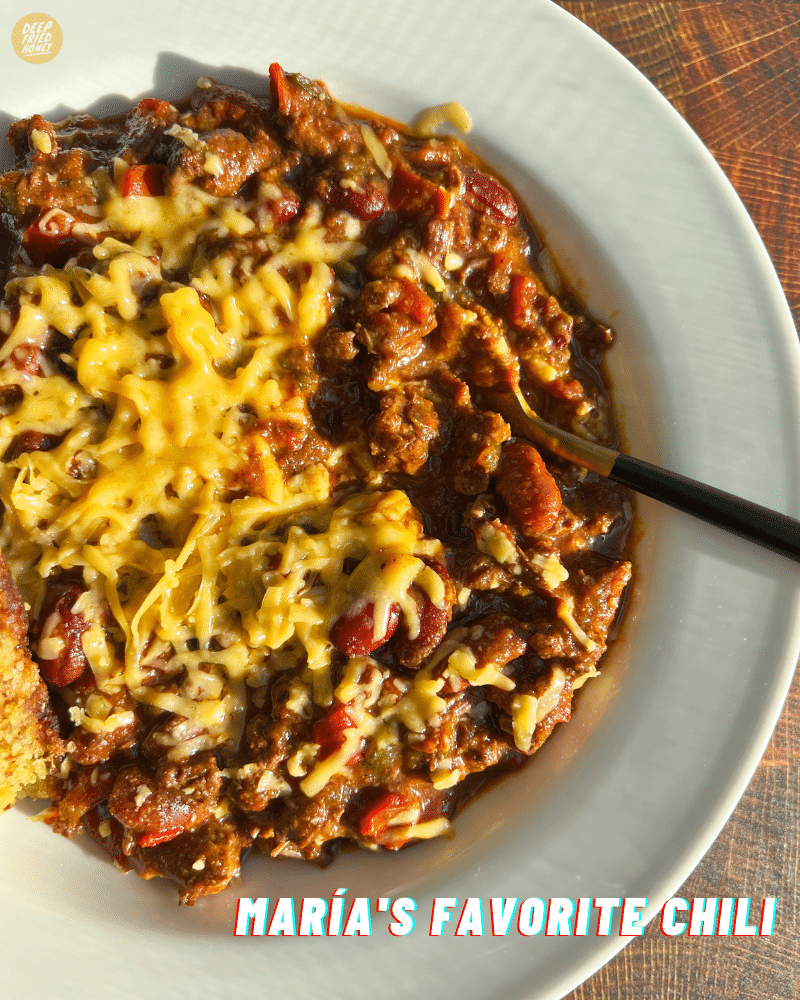
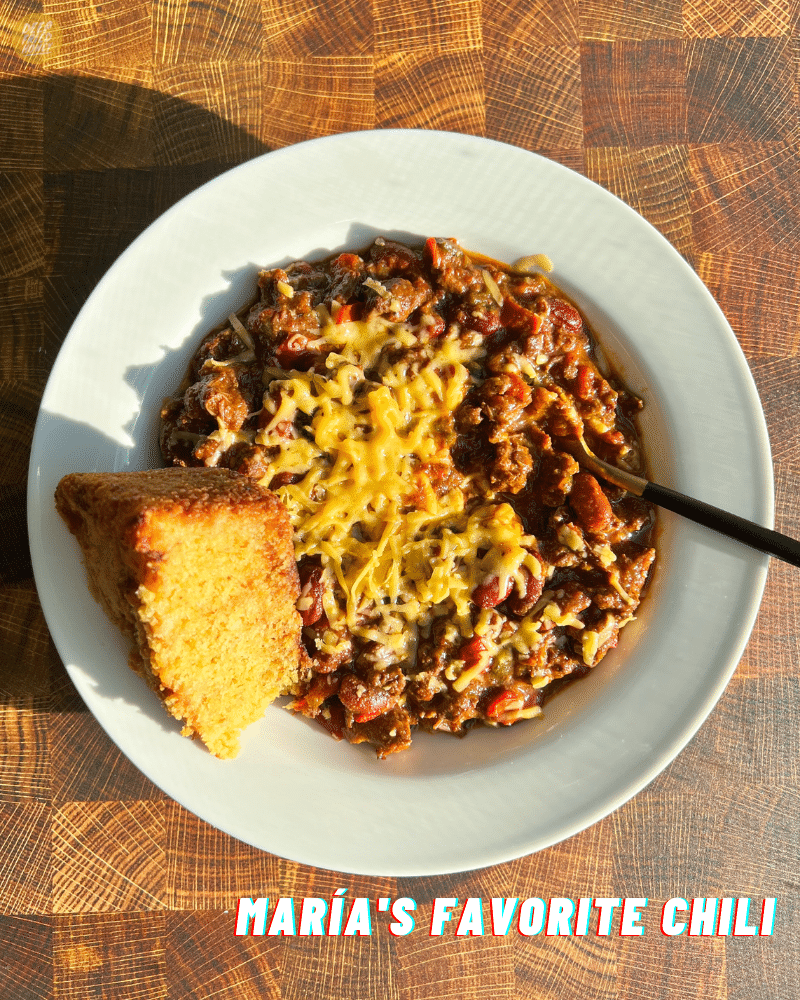
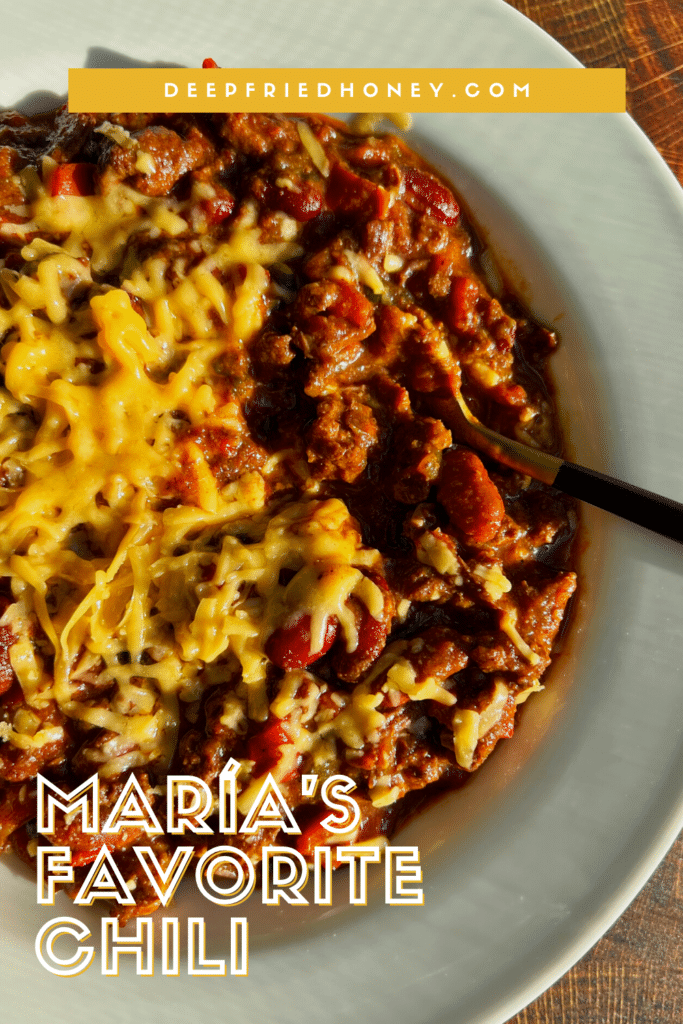
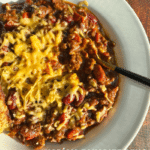
I LOVE chili. I loved braised beef, period, as we’ve discussed before – namely in the post above my Carne Guisada recipe – and chili is something I’m always happy to eat. I’m biased, admittedly and obviously, but the recipe I’m sharing with you today, María’s Favorite Chili, is some of the best chili I have ever had in my life – and I’ve had a LOT of chili.
This recipe was originally in my ebook ‘As Seen on IG‘ and titled Slow-Cooker Chili. I wanted to make sure to include regular instructions for those that don’t have slow cookers, so you’ll find both stovetop and slow-cooker recipes included in the recipe card. And because how good chili is definitely subjective, I titled it María’s Favorite Chili instead of BEST CHILI IN THE WHOLE WORLD because you might disagree.
What You’ll Need to Make María’s Favorite Chili
Feel free to jump to the full recipe, but here are useful notes about the ingredients you will need to make María’s Favorite Chili recipe:
Ground sirloin, chuck roast: You can use regular ground beef, just make it lean. Like 90/10 or leaner. Make sure to trim the excess fat from your chuck roast as you cut it into pieces. Too much fat will make for greasy chili, and that’s no good. You can also opt for the ‘stew meat’ you find in grocery stores or a different type of roast like sirloin tip.
Light kidney beans, dark kidney beans: I like beans in my chili, but I worked on this recipe repeatedly until I knew it would work well either way.
Tomato sauce, diced tomatoes with habaneros, fire-roasted diced tomatoes: It’s not chili without tomatoes idc!
Bell pepper, jalapeno pepper, poblano pepper, yellow onion: We want a hearty, chunky chili, but these for the most part will break all the way down and add very little discernible texture.
Beef broth: The recipe calls for 8-10 cups because it varies based on cook time, ingredient amounts, and also personal preference. I like chili that doesn’t leave any broth/gravy behind. If you like a looser chili, such as Wendy’s chili, add up to the whole 10 cups.
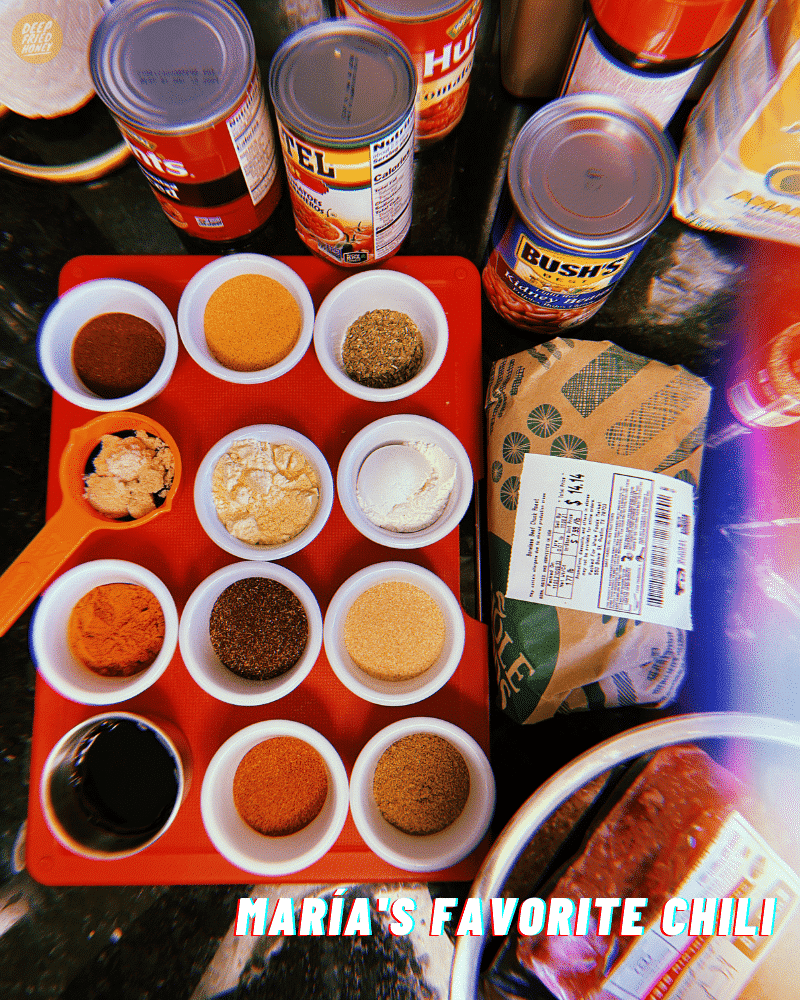
All-purpose flour, masa harina: We use this to coat the pieces of chuck roast. The combination adds a great flavor to the chili, so we use the leftover flour mixture to thicken things, too. Unless you’re making this in the slow cooker: we thicken it a little differently.
Chili powders: I usually use Ancho, Chipotle, and New Mexico chili powders. If you can only find the stuff labeled as ‘chili powder’ in the seasoning aisle, that’ll work fine, but try to find some variations. I know that McCormick offers chili powder, hot Mexican chili powder, dark red chili powder, and chipotle chili powder at my local grocery stores. Different kinds will make your chili sing! Variety is the spice of life, after all.
Garlic powder, ground cumin, dried oregano, seasoned salt: We use seasoned salt to flavor the chili. Kosher salt is to season our meats, as we sear them. I like to use more seasoned salt to adjust the flavors, but you can use kosher salt there instead. I like Lawry’s. Use what you want. Or substitute Kosher salt, if you like.
Molasses, dark brown sugar, liquid smoke, fish sauce: Remember how long and hard I said I worked on this recipe? Figuring this part out – these extra flavorings – was most of the work. Together they round out the chili experience: cutting thru any acidity, deepening the umami, and elevating certain aspects. Oyster sauce can be used to substitute fish sauce and light brown sugar or honey can be used in place of molasses. Use regular molasses, not Blackstrap: that’s too bitter.
How to Make María’s Favorite Chili
Full instructions are included in the recipe below, but here is a basic overview of what you’ll need to do, along with some important tidbits to help you make the most of María’s Favorite Chili recipe:
Season and sear the roast. Add the roast chunks to a large mixing bowl and season them liberally with kosher salt. Sprinkle the flour and masa harina over the meat and toss, making sure each piece is coated. Place a large dutch oven over medium-high heat and drizzle in a couple of teaspoons of vegetable oil. Add the pieces of roast in a single layer, making sure not to crowd the pan so all the meat will sear well – leave about a 1/2″ of space between them. Let cook undisturbed for 3 minutes, then flip and sear the other sides. Continue in batches, until all the pieces have been seared, and set them aside to rest.
Season and sear the ground beef. Add it to the dutch oven and sprinkle in the ancho chile powder along with a 1/2 tbsp each of seasoned salt, and garlic powder. Brown completely and drain any excess fat. Stir the diced onions and peppers into the ground beef and cook for 5-7 minutes, until the onions begin to brown around the edges.
Build the chili. Now, pour in the cans of diced tomatoes, tomato sauce, molasses, fish sauce, liquid smoke, brown sugar, and all remaining seasonings. Stir it all together, then stir in the beef broth. Taste and if needed, adjust the flavor with more seasoned salt if bland or brown sugar if tart/acidic/bitter. Bring the chili to a rolling boil, then reduce the heat to medium-low and cover with a lid. Let cook for 2 hours, stirring once every 45 minutes or so.
Skim, stir, simmer. After two hours, remove the lid and use a spoon to skim off the grease that’s pooling on the surface. After you’ve removed as much as you can, go ahead stir everything a few times, making sure to scrape the bottom of the pot as you go. Taste it again, and adjust for salt or sugar, if needed. Cover and continue cooking for another hour, undisturbed.
Bring it on home. After another hour has passed, remove the lid and once again skim off any grease pooled on top. Grab a piece of chuck roast and see if you can smash it apart with a spoon: if you can, go ahead and add the kidney beans. Let the chili come to a simmer, then reduce the heat to low and cover again. Continue cooking for another couple of hours, until the chili has darkened in color and the mixture has thickened. Dassit!
What To Serve With María’s Favorite Chili
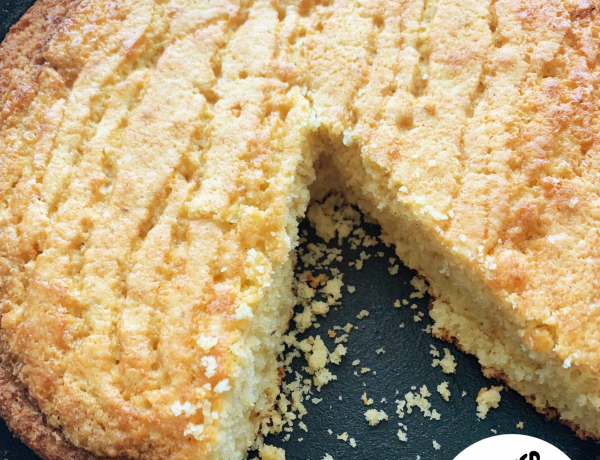
Well if you’re not gonna make Frito Pies – a must every single time I whip up a batch – how about some cornbread? Pictured above is my Browned Butter Honey Cornbread, but any of my cornbread recipes will work!
Add the roast chunks to a large mixing bowl and season them liberally with kosher salt. Sprinkle the flour and masa harina over the meat and toss, making sure each piece is coated. Shake the excess flour mixture off of the pieces, and reserve it.
Place a large dutch oven over medium-high heat and drizzle in a couple of teaspoons of vegetable oil. Add the pieces of roast in a single layer, making sure not to crowd the pan so all the meat will sear well – leave about a 1/2″ of space between them. Let cook undisturbed for 3 minutes, then flip and sear the other sides.
Continue in batches, until all the pieces have been seared, and set them aside to rest while you cook the ground sirloin. Add it to the dutch oven and sprinkle in the ancho chile powder along with a 1/2 tbsp each of seasoned salt, and garlic powder. Brown completely and drain any excess fat.
Stir the diced onions and peppers into the ground beef and cook for 5-7 minutes, until the onions begin to brown around the edges. When they do, sprinkle the leftover flour mixture – the stuff you used to coat the chuck roast pieces before searing – over the top, and stir that in. Stir until you don’t see any streaks of flour.
Now, pour in the cans of diced tomatoes, tomato sauce, molasses, fish sauce, liquid smoke, brown sugar, and all remaining seasonings. Stir it all together, then stir in 8 cups of the beef broth. Taste and if needed, adjust the flavor with more seasoned salt if bland or brown sugar if tart/acidic/bitter. Bring the chili to a rolling boil, then reduce the heat to medium-low and cover with a lid. Let cook for 2 hours, undisturbed.
After two hours, remove the lid and use a spoon to skim off the grease that’s pooling on the surface. After you’ve removed as much as you can, go ahead stir everything a few times, making sure to scrape the bottom of the pot as you go. Taste it again, and adjust for salt or sugar, if needed. Cover and continue cooking for another hour, undisturbed.
After another hour has passed, remove the lid and once again skim off any grease pooled on top. If you like a looser chili, go ahead and add extra beef broth, up to the entire two cups. Next, grab a piece of chuck roast and see if you can smash it apart with a spoon: if you can, go ahead and add the kidney beans if you’re using them. Let the chili come to a simmer, then reduce the heat to low and cover again. Continue cooking for another couple of hours, until the chili has darkened in color and the mixture has thickened. Dassit!
Slow-Cooker Instructions:
Add the roast chunks to a large mixing bowl and season them liberally with kosher salt. Sprinkle the flour and masa harina over the meat and toss, making sure each piece is coated.
Place a large dutch oven over medium-high heat – or if your slow cooker has a saute setting, use that – and drizzle in a couple of teaspoons of vegetable oil. Let it heat until the oil is shimmering.
Add the pieces of roast in a single layer, making sure not to crowd the pan so all the meat will sear well – leave about a 1/2″ of space between them. Let cook undisturbed for 3 minutes, then flip and sear the other sides.
Continue in batches, until all the pieces have been seared, and set them aside to rest while you cook the ground sirloin. Add it to the dutch oven and sprinkle in the ancho chile powder along with a 1/2 tbsp each of seasoned salt, and garlic powder. Brown completely and drain any excess fat.
Stir the diced onions and peppers into the ground beef and cook for 5-7 minutes, until the onions begin to brown around the edges.
Heat a few teaspoons of olive oil in a large, heavy-bottomed skillet and add the beef in batches, searing on all sides.
When all the chunks and done add the ground beef. Season with 1/2 tbsp each of chili powder, seasoned salt, and garlic powder. Brown completely and drain the fat.
Add your diced onions and piers and cook until the onions begin to brown.
Add the veggies and meat to your crockpot, along with the diced tomatoes, tomato sauce, molasses, fish sauce, liquid smoke, and all remaining seasonings. Then, pour in 9 cups of beef broth, reserving the rest in case you want to loosen the chili later.
Stir together and taste and adjust with more salt or brown sugar if needed. Cook on low for 4 hours.
After 4 hours if you’re going to use the kidney beans and/or the extra broth, go ahead and stir them in. Cover and continue cooking for another 4 hours.
When the meat is tender and the mixture has thickened back up a bit, it’s ready. If you added too much broth, or just want it a tad thicker, add a cornstarch slurry (1 tsp cornstarch mixed with 1 tsp cold water) and let cook for 10 minutes more.
Notes
This recipe is super versatile! Check out the post above for tips and suggestions on adjusting and substituting.
This post may contain affiliate links, which means I get a little off the top to help me keep this website running. It doesn't cost you extra or affect my opinion.
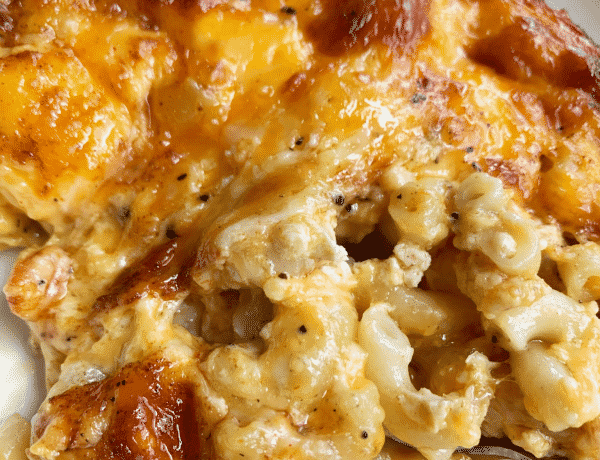
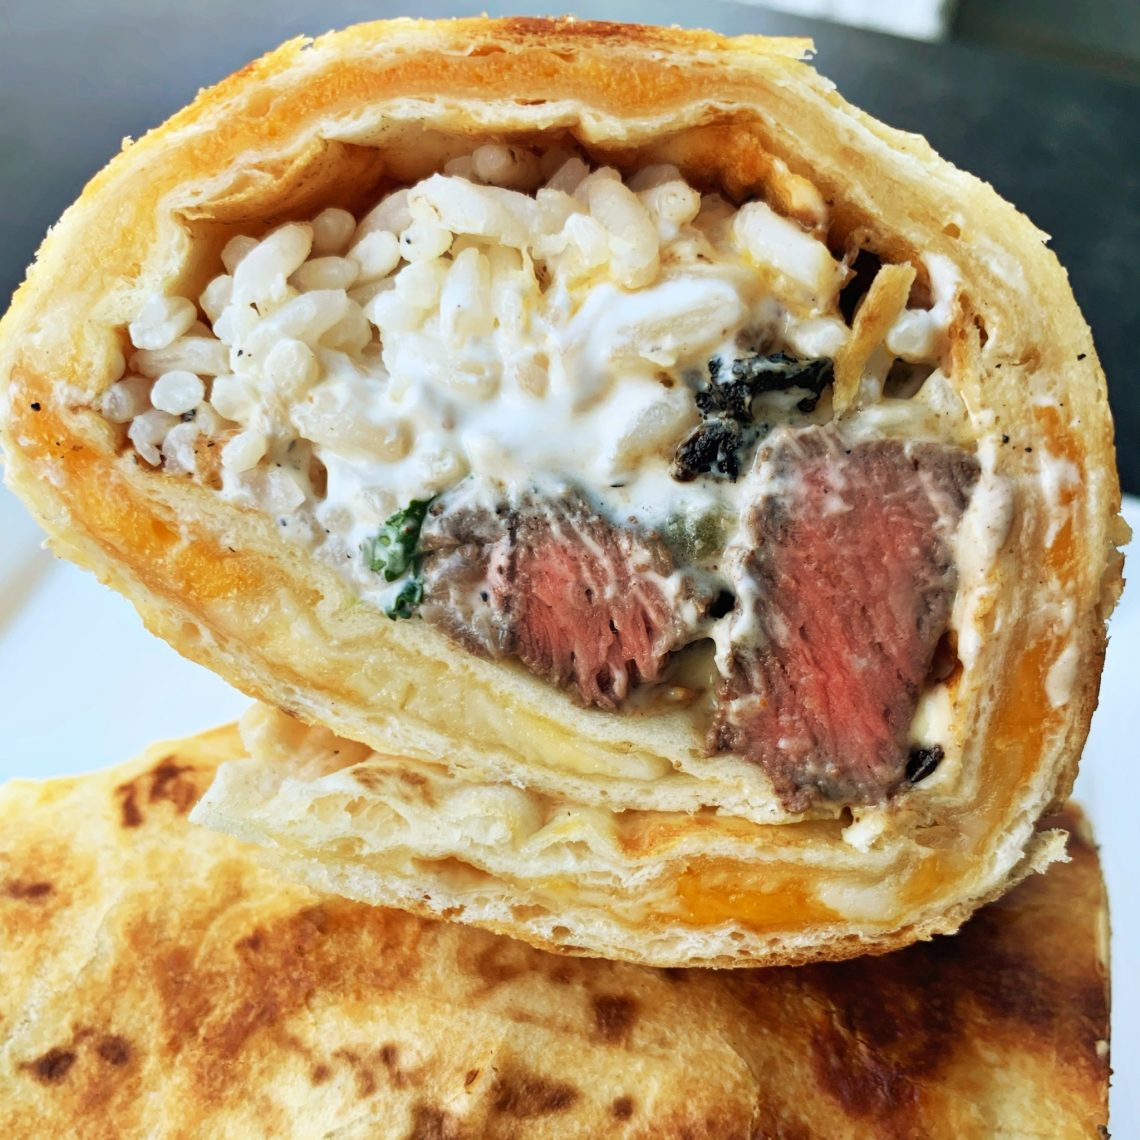
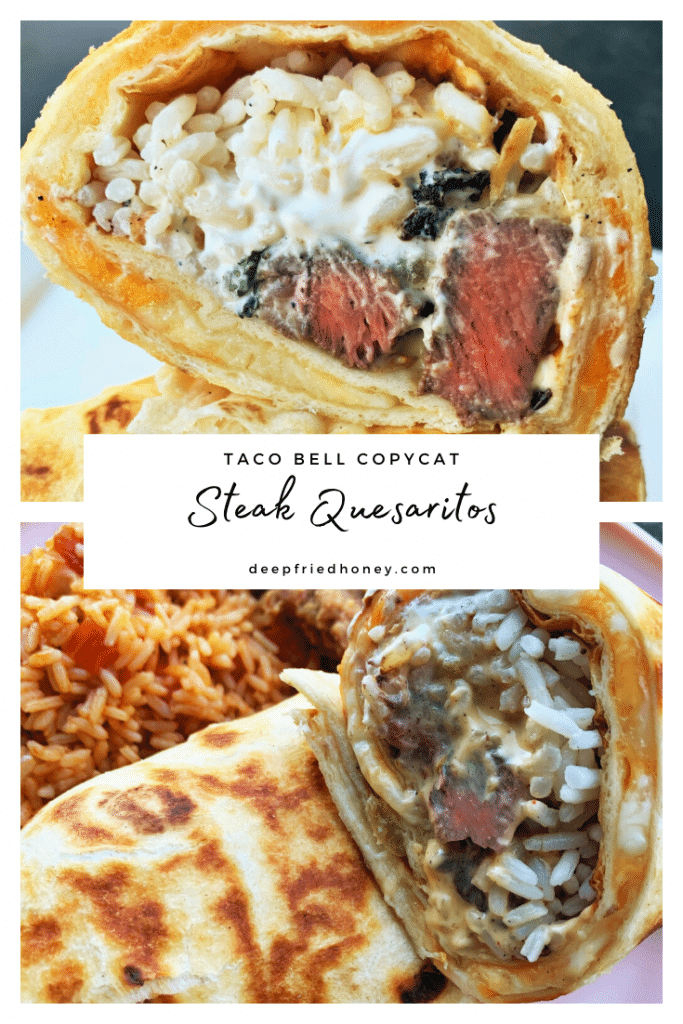
This Steak Quesarito recipe is long overdue. Well, the first time I used ground beef so they were just your standard Quesarito, but y’all asked for the recipe and I promised to get it you way back then! Here it is. If anyone is still waiting for it, thank you.
The first time my kid asked me to make her a Quesarito I had to google them to see what they were. I felt silly when I realized they’re exactly what they sound like: a burrito with a quesadilla wrapped around the filling instead of just plain flour tortilla.
Steak Quesarito Ingredients
Feel free to jump to the full recipe, but here are useful notes about the ingredients you will need to make this Steak Quesarito recipe:
Steak: The cut of steak you use is your choice! The marinade is pretty acidic, so it’s perfect for tougher cuts like flank or skirt. It’s also super flavorful, so it works its way into thicker cuts like filet and ribeye well. I used a combination of filets and ribeyes the last time I made this because I happened to have a surplus of those in my freezer.
Cooked Rice: Plain white rice is the bed the rest of our burrito toppings will be nestled on. If you have the time and inclination, cilantro-lime rice goes great in these.
Extra Sharp White Cheddar, Medium Cheddar: I like to use these cheeses – grated – for the quesadilla filling. The combination pairs nicely with the other flavors in this dish and doesn’t get lost in the same bite as the queso.
Chile Queso: Taco Bell puts their nacho cheese inside; we’re using my spicy queso recipe. If you want it to be smooth, toss the chiles and jalapenos in a blender before adding them to the pot.
Flour Tortillas: You can’t have quesadillas without tortillas! We’re using the largest ones in the grocery store. They’ll usually say ‘large burrito.’
Orange juice, lime juice, soy sauce: These add a bright citrusy flavor and help to tenderize the meat as well.
Onion powder, cracked black pepper, granulated garlic: for ~flavor~
Oil, butter: Only needed for searing the steak and frying the quesadilla.
Sour cream, cilantro, hot sauce: If you follow the recipe as written, you’ll put this inside of the Steak Quesaritos. Feel free to serve them alongside.
How to Make Steak Quesaritos
Full instructions are included in the recipe below, but here is a basic overview of what you’ll need to do, along with some important tidbits to help you make the most of this Steak Quesaritos recipe:
Marinate the steak. Season the steak lightly all over with kosher salt. Place the steak, sliced onions, and serrano peppers in a large dish or bag. Whisk together all of the marinade ingredients and pour it all over the steak. Move everything around to make sure the steak is fully coated. Place in the fridge for up to 6 hours – no longer or it’ll get mushy. Remove from the fridge
Cook the steak and prepare the rice and queso. If you’ve already cooked your rice and queso, you’ll want to have it all reheated by the time the quesadillas are ready. I usually cook everything fresh. I start with the rice, then the queso, then the steak, and finally the quesadillas.
Make the quesadillas. Add some oil and/or butter to a large nonstick skillet and lay one tortilla flat. Press it down to make sure the whole surface gets greased. Cover with a light layer of cheese, then press the other tortilla on top. You don’t want to use as much cheese as you would normally, as we’re rolling these. Let cook for a few minutes, then flip. I like to use a plate to make it easy. Continue cooking on the opposite side. You don’t want either to be too crisp, because we have to roll them into Steak Quesaritos! Not floppy tho. There’s a balance.
Assemble the quesaritos. Spoon a row of rice, then a row of steak just left of center in the tortilla (putting it dead center will make it harder to roll). Don’t use too much rice and steak, or the quesarito might burst. I say around 1/4 cup of each or so, followed by queso and any other desired toppings.
Roll the quesaritos. If you crisped the tortillas too much when you were frying the quesadillas then they’re probably going to crack and tear while you roll them, so hopefully, you didn’t do that. Roll them up like you would a burrito! Begin to roll – without moving the quesadilla from its position – while bringing up the outside edges. Be firm, but gentle. Tuck the ends inside and under as you bring the edge of the tortilla over on top of the filling. Roll until it’s sealed. Place it seam side down and wrap it in foil or wax paper to ensure it doesn’t pop open if not plating right away. Use a serrated knife to slice it in half, and enjoy!
Switch it Up:
There are endless variations that you can make with this Steak Quesaritos recipe, so please feel free to customize yours to taste! Off the top of my head, how about:
Use your own marinade. Or don’t use a marinade at all! Just season it simply with salt and pepper. I’m of the opinion that a good steak speaks for itself.
Change up the filling. The standard Quesarito option uses ground beef. I recommend trying Crispy Tacos taco filling in my ebook ‘Got an Hour?‘ or make your own! Chicken Tinga would be awesome, too.
Smothered and Covered. OK, it isn’t Waffle House, so just smothered. Ladle the queso on top of the assembled Quesarito instead of putting it inside. You’ll need to eat it with a knife and fork but it’s worth it.
Plant-based. Swap out the cheeses for dairy-free alternatives and use my Easy Refried Beans recipe for the central protein. This is what my vegetarian child enjoyed while the rest of us ate the recipe as written.
Here’s the obligatory pin for your Pinterest board:
Whisk together all of the steak marinade ingredients except the onions and Serrano peppers, and pour into a glass baking dish. Add the sliced onions and Serrano peppers. Add the streak, turning over to coat in the sauce. The onions and peppers should start to stick to the meat. Cover and refrigerate for 4 hours. Bring the steak out to rest at room temperature 1/2 an hour before ready to cook.
Preheat a cast-iron grill pan over medium-high heat for about 5 minutes. If you prepared your queso and rice earlier, now is a good time to start the reheating to process. I recommend reheating the queso slowly over medium-low heat in a saucepan.
Pat the steak dry lightly and drizzle a bit of oil over the grill pan’s surface. Add the steak to the grill pan – do not crowd! – and let sear undisturbed for 2 minutes. Preheat your broiler while it cooks. If there’s too much steak to cook at once in the grill pan, place a wire rack over a large baking sheet.
Flip the steak and allow it to sear on the other side for another minute. Transfer the grill pan (or the baking sheet) to the oven. Broil the steak for 4-5 minutes, then flip and broil for another 5-7 minutes or so, then remove to rest.
Place a large skillet over medium-high heat and drizzle in just enough oil to coat the bottom. Add 1/2 tsp of butter, then one tortilla, pressing it down to make sure the surface gets coated with oil and butter.
Sprinkle on a coating of cheese from edge to edge. Don’t use as much as you would for a regular quesadilla, as we’ll be folding this one, but it should still be a decent amount.
Place a second tortilla on top of the cheese and press it down. Baste it with vegetable oil. Check and make sure the cooking side of the tortilla is browned. If it is, flip and cook until the other side matches. Remove to a plate to rest while you prepare the remaining quesadillas.
To assemble the quesaritos, lay one quesadilla on a large work surface. Spoon a row of rice, then a row of steak beside it. You’ll be using about 1/3 of a cup of each, or less. Spoon the desired amount of queso over the top of everything. Add the desired toppings, then lift the side of the quesadilla closest to you and roll into a burrito shape, tucking in the ends as you go. Refer to the post above the recipe for helpful tips.
Dassit. Enjoy!
Notes
Read the post above the recipe for tips and suggestions!
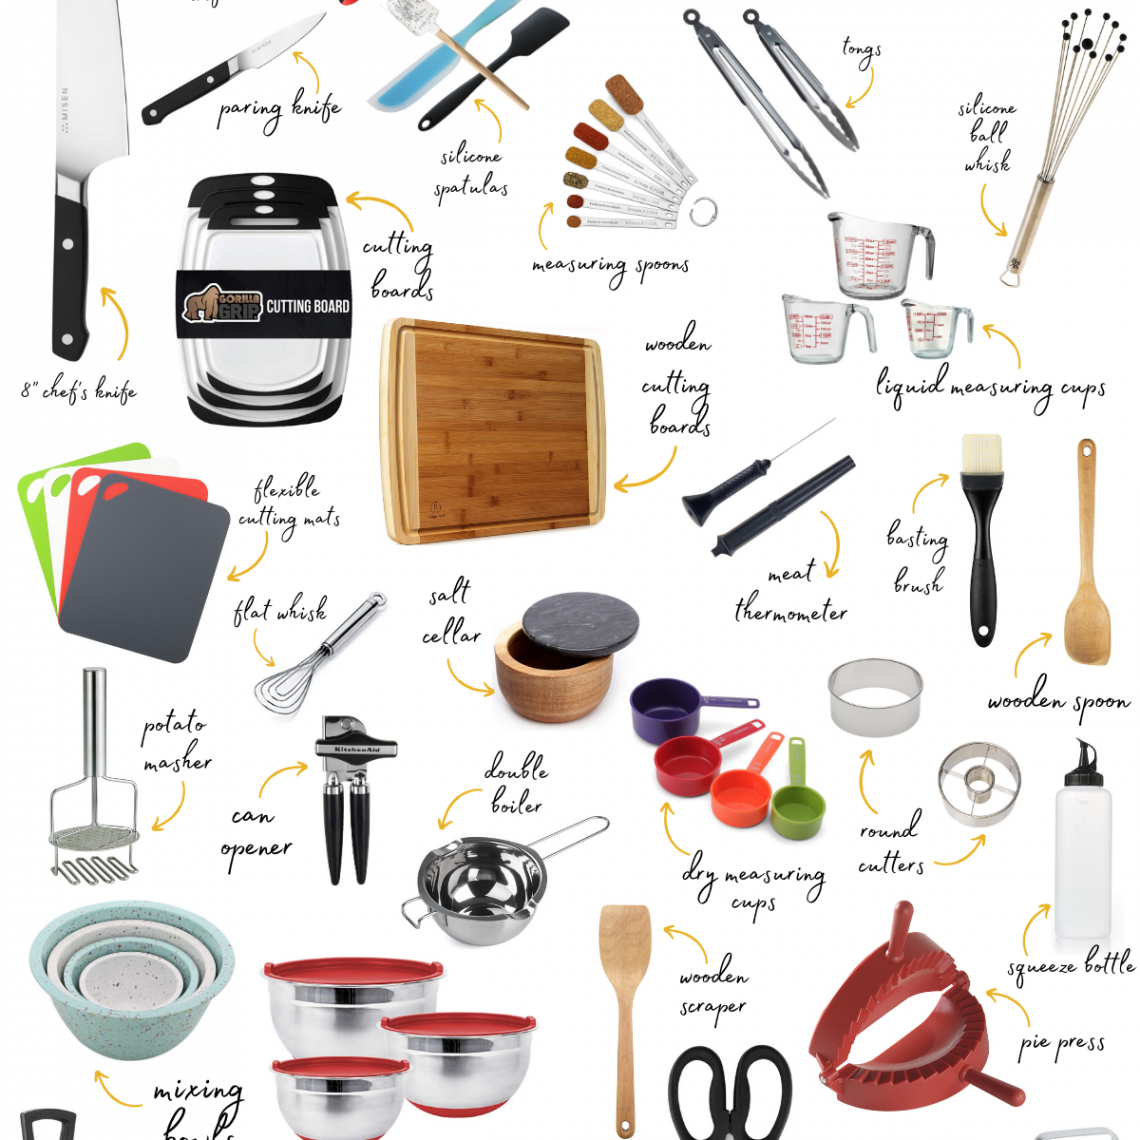
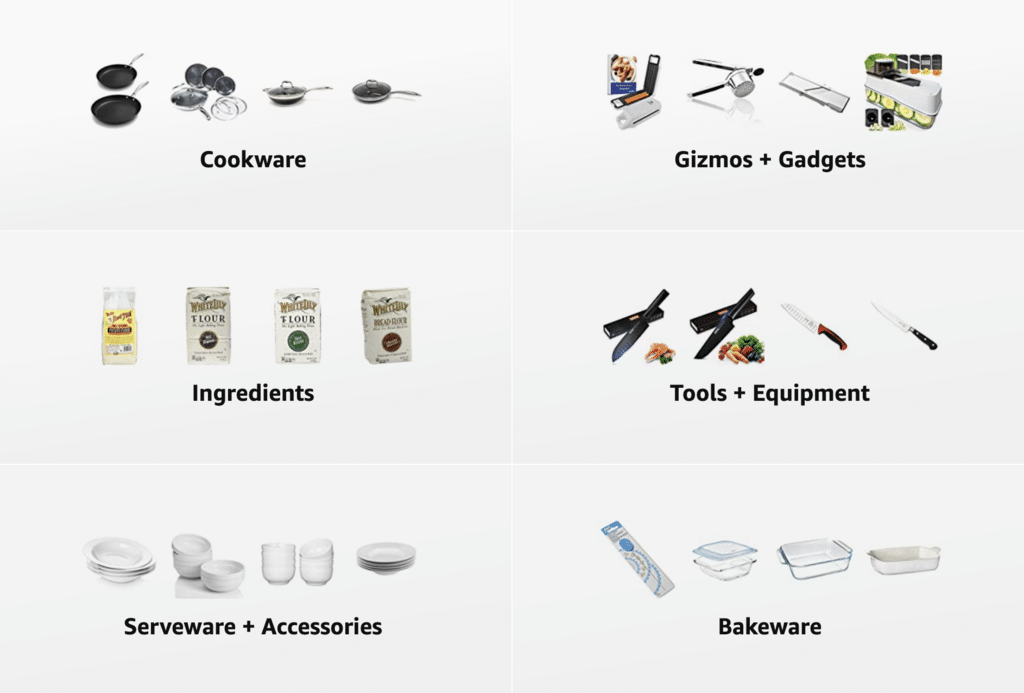
This is a (new and improved!) comprehensive list of all the culinary equipment I have squeezed into my tiny kitchen, alongside a curated collection of alternative options. Where I wasn’t able to link to what I own exactly, I located a comparable alternative at a similar price point.
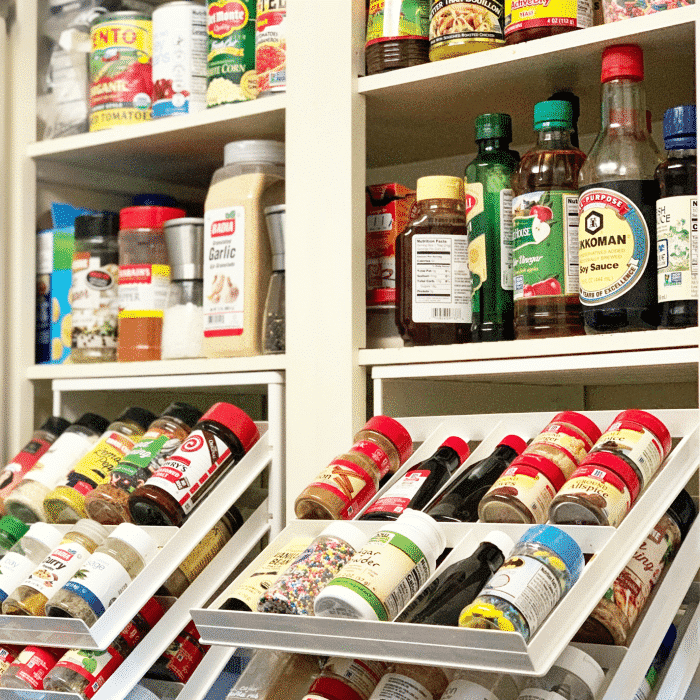
Check out my Pantry Essentials post for a list of what I keep stocked in my cabinets.
My Amazon Storefront – shown above – has always been available as an easy and convenient way for everyone to shop my kitchen, and it will continue to be. Thing is, I’m not able to tag everything I own because some items aren’t available via Amazon or any of its affiliates. That’s where this post comes in. Enjoy!
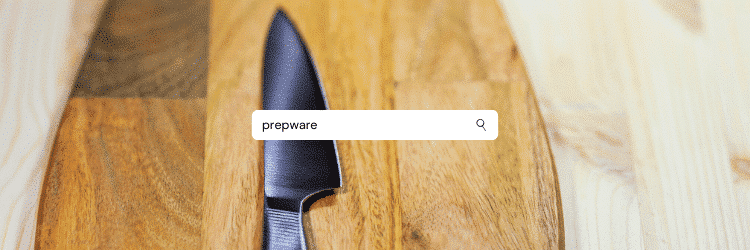
Prepware
Knives
A good knife is everything. It’s basically your hand when you’re prepping in the kitchen, so you want to make sure you take the time to find the right one for you. After some trial and error, I’ve settled on the 7″ Santoku as my official favorite.
Prior to breaking my right (dominant) hand a few years ago, it was the classic 8″ Chef’s knife, but the heft and weight are a little much for me now. There are many other styles besides the ones I have listed below, so research and test.
Chef’s Knife – These knives come in various lengths, the average size being 8″. It’s an all-around knife, capable of taking care of any task. The blade is broad and usually can rock on the cutting board, making it great for mincing things like herbs. The ones I use most are my 8″ Misen and my OOU.
Santoku Knife – Santokus are basically Japanese Chef’s knives. They’re lighter and thinner and the flat blades don’t rock. For me, they’re unmatched for my methods of chopping and dicing. Many times you’ll find these knives with grooves on the sides of the blade, making food release from it more easily. I have four, and my 7″ OOU gets the most mileage.
Serrated Knife – These are long, straight, and have “teeth” of varying sizes. You’ll find them often called Serrated Bread Knives and they’re great for that, but they’re also perfect for carving turkeys and getting paper-thin slices out of even the ripest, juiciest tomatoes. I have a Wusthof 8″ Bread Knife.
Paring Knife – Pairing knives are supposed to be essential in the kitchen but they aren’t in mine. I use them most often to trim and clean meat, or to open new packages of things. This Misen one comes off my magnetic knife rack most often.
Other Sharp Edges
Kitchen Shears – I mainly use my kitchen shears for spatchcocking poultry, but they actually have a myriad of uses. You can use them in place of a knife and cutting board to cut meat, vegetables, and herbs. If you use peeled tomatoes you can use shears to snip them into pieces before you even pour them from the can. They’re also great for cutting slices of deep-dish pizza.
Box Grater, Vegetable Peeler, and Zester – I hate shredding cheese and almost always do it in my food processor, but sometimes when I need a small amount, out comes the box grater. Most of them come with multiple sides that you can use for peeling or slicing as well as zesting, but having a separate peeler and zester is nice, too.
Mandoline – Three words: Homemade Potato Chips.
Can Opener – I’m sure the canned section of my Pantry Essentials post is enough to explain why a good can opener is necessary for my house.
Cutting Boards
Having a large selection of cutting boards isn’t necessary, but if you cook as much as I do it’s extremely helpful. I have probably too many, but I’ll allow it! I am never at risk of cross-contaminating food because I have a cutting board for each ingredient if I want.
Flexible Cutting Mats – Flexible cutting mats are easy to store and clean. You can find dual-sided mats or ones that have a non-slip side for safer usage. My favorite thing about these is that they bend, roll and fold, so you can easily funnel chopped ingredients into the pot without spillage. I don’t use them as much as I used to, but my favorites are these from Target.
Bamboo Cutting Boards – Bamboo is harder on your knives and doesn’t last as long as wood – but if you’re looking for the best environmentally friendly option, bamboo is where it’s at. A large bamboo cutting board with grooves for catching stray juices is my favorite for carving poultry and roasts.
Color-Coded Cutting Boards – You’ve probably seen me use my Joseph Joseph Folio Cutting Boards more than any others over this past year. The reason for that is the folio storage case sits right on my countertop so they’re the most easily accessible. It’s commonly thought that plastic cutting boards are more sanitary than surfaces like wood or bamboo, but this isn’t true. Make sure you scrub the hell out of these and sanitize them too.
Wooden Chopping Block – Wood is easiest on your knives and won’t show damage as other types of boards. A chopping block isn’t really a necessity, but it’s beautiful and functional. Not only can you prep your meal on it, but you can serve it, too. Boards from John Boos are trusted in kitchens and restaurants across the country and will last you for many, many years.
Utensils
Wooden – Wooden utensils are safe for all types of cookware as well as durable and versatile. You can get away with just a quality wooden spoon, but I’ve found a use for spoons, turners, scrapers and more in my culinary adventures. Wooden utensils are also super easy to care for. Make sure to toss them if they start to crack or splinter.
Spatulas – Another item I probably have too many of. Some are narrow and long, best for scraping the sides of bowls and jars. Others are short and fat, great for folding whipped ingredients into batters. Everyone that watches me cook has seen my Virgo spatula from Williams Sonoma, as well as my skinny blue silicone babies. Silicone is my material of choice because it’s safe at high heat. I have a bad habit of sitting my utensils on hot burners.
Whisks – I use whisks almost as often as spoons – for gravies, sauces, eggs, and more. My silicone ball whisks are my favorites; they allow me to whisk my grits and bechamel sauces in the pot vigorously without guilt. I’ve replaced all of my cookware with metal utensil safe pieces, but it’s a hard habit to shake without asecond thought. For gravies, my roux whisks and sauce whisks are essential, allowing me to work all the corners of a skillet easily.
Tongs – I got by with forks, mainly, for picking stuff up and flipping things over before I started using tongs. Now, I don’t know what I’d do without them. I prefer the ones with silicone tips to protect any fragile surfaces, and the ones that lock into place so I can tell if they’re closed or not (I’m not sure why but I struggle to tell if there’s no locking mechanism). Also in this category are kitchen tweezers, which are useful for plating and garnish purposes.
Slotted Spoon, Ladle, and Pasta Server – If you purchase a utensil set like this one I have from Joseph Joseph, these items are almost guaranteed to be a part of it. You’ll be able to find your way around without them, but they’re useful to have nonetheless. I use my ladle most often for plating grits, my slotted spoons for drizzling sauces and gravies, and pasta servers for straining pasta from the water – not really for serving. I prefer a carving fork for that.
Bowls
Stainless Steel Mixing Bowlswith Lids – Stainless Steel is my favorite material for mixing bowls. They’re heat safe and can be used in a pinch as double boilers. Try to find some with rubber bottoms and lids. They can be used for storing leftovers, rising dough, mixing batters, the list goes on and on. If they nest together, even better! I have two sets, but this set of three with lids and rubber bottoms are my most used.
Ceramic or Melamine Mixing Bowls – If you’re looking for something decorative, ceramic and melamine bowls usually have patterns or other embellishments. You also don’t have to worry about them reacting to acidic foods like metal. I’m often asked where I got the speckled set I use on IGTV sometimes, and it was Walmart, but they’ve been out of stock for quite a while.
Prep Bowls – You’ve heard of Mise en Place, right? It’s the French term for having all your ingredients prepared before you start cooking. I believe it translates to “everything in its place.” Prep bowls facilitate this, helping keep things organized before and during cooking – which makes the whole process go more smoothly. These cheap plastic bowls from Target have been well worth the $0.79 each.
Pinch Bowls – Another extravagant extra, pinch bowls are usually made of silicone and are very tiny. They’re perfect for adding pre-measured amounts of herbs and seasonings to the pot. These 2 ounce ramekins are also great for this.
Thermometers
For some reason, many laypeople believe thermometers signals being an unsure or inexperienced cook. In truth, cooks and chefs of all levels can find a use for them. Thermometers are integral to some processes while making others foolproof.
Instant Read Thermometer – These are ideal for things like testing the internal temperature of a piece of meat that’s searing on the stovetop or making sure heated milk isn’t so warm it’ll kill the yeast. You can find probe and surface instant-read thermometers.
Oven Probe Thermometer – These make cooking roasts and reverse searing steaks simple and easy. Stick the probe into the thickest part, and into the oven it goes. Set it to chime when it reaches your desired temperature and walk away. The display can sit on the counter or – now that most of them are magnetic – stick right to your oven door.
Candy Thermometer – They’re usually called candy thermometers but they’re good for oil as well. Maintaining the oil temperature is an important part of deep frying on the stove, and it can be harder to master than it appears. Living up to their name, boiling sugars and syrups for candy needs precision and these are best for that. Go for stainless steel and one that clips onto the pot.
Tools
Versatile Lids – These babies are a lifesaver if you have a small amount of room to store your cookware, or you’ve lost or broken a lot of lids over the years.
Basting Brush – Silicone and boar bristles are my favorite bristle materials. Boar is very gentle so best for delicate baked goods like rolls and pastries. I like silicone for basting meat when searing on the stovetop or finishing in a super hot oven.
Meat Tenderizer – I don’t use these very often, but for pounding chicken to an even thickness, or loosening up some round steak before pan-frying, there’s no substitute.
Measuring Cups – I like having a good selection of both dry measuring cups and liquid measuring cups. The way they hold their ingredients is different so the distinction is different. It matters, especially when baking.
Measuring Spoons – The magnetic measuring spoons are my favorite, but I own a bunch. Having multiple allows me to measure many things without washing them or mixing any ingredients. I recommend having at least one of each size: 1/8 teaspoon, 1/4 teaspoon, 1/2 teaspoon, 1 teaspoon, 1/2 tablespoon, and 1 tablespoon.
Kitchen Scale – If you meal prep for specific reasons or bake a decent amount a kitchen scale is essential. I’ve been using this small digital scale for years now, and there are a whole host of options to choose from.
Cookie Scoops and Food Disher – Cookie scoops with wipers are everything! The scoop ensures that they’re evenly sized and the wiper gives you a clean release every time. I like having small, medium, and large for making cookies. Food dishers are like really big cookie scoops or ice cream scoops. I use a food disher for ice cream, and for things like drop biscuits.
Colander and Mesh Strainers – Draining pasta or canned veggies, sifting dry ingredients together for baked goods, and showering powdered sugar or chocolate for decoration: sifters and colanders are required for all of this. I use metal mesh strainers for small jobs and big plastic colanders for large ones.
Pepper Mill – Spices, seasonings, and dried herbs don’t necessarily go bad, but they do lose their potency. Freshly cracked black pepper is always best, so a pepper mill is vital. You can find manual and electronic ones, and most of them have different settings for how fine you want the pepper. Salt Mills are nice too.
Salt Cellar – They do exactly what they sound like they do: they house the salt in a cool, dry atmosphere. Pinching salt between your fingers is easier than measuring – once you learn how – and more reliable than using a shaker of some sort.
Bench Scraper – If you bake, you’ll want a bench scraper. There’s no better tool for clearing off your work surface of flour and scraps, and it helps keeps your hands free when transferring or kneading a sticky dough. I like stainless steel, but you can find flexible plastic ones as well – those are great for lifting down from mixing bowls.
Stainless Steel Spider and Pig Tail Flipper – If you like to fry, these might be your new best friend. I use the strainer for frying delicate foods like beignets and small foods like nuggets, as well as boiling short kinds of pasta and small or chopped vegetables. The flipper makes turning light fried foods easy and is great for lifting big pieces of meat, too.
Trivets – I don’t like things on my hands, which is why it’s incredibly rare to see me anywhere near a glove. Trivets – specifically silicone ones – are great multi-purpose tools. They protect your counters from hot cookware and work great as oven mitts. The hard ones are good for spoon rests, too. I don’t know why but I refuse to buy spoon rests!
Silicone Baking Mats – A nice way to protect your pans and make sure all your food releases easily. They’re an investment initially but you’ll save a lot on parchment paper or foil or whatever you usually use. I’m still getting used to pulling them out, myself.
Rolling Pin – Rolling out pie dough. Smoothing puff pastry. Beating the crap out of cookies and candy. This tool does all of this and more! I like wood, but you can find metal and marble, too.
Cookware
After many years of buying cookware from any and everywhere, I’ve replaced virtually all of mine with two kinds: Scanpan – their TechNIQ line, specifically – and Hexclad. These brands are pretty expensive, so it was an investment, but largely worthwhile so far. I expect to get many years out of each piece.
Materials
There are other types of cookware other than the ones I’ve listed below. Stainless Steel, Copper, Stoneware and more. Do your research and play with different materials: you won’t know what you like unless you try them!
Cast-Iron – Cast-Iron has always been my favorite type of cookware, although I’ve been using it less often. The weight is just a lot for me – yes, that pesky hand break again. I tend to be pretty rough on everything, and nothing can take a beating better than Cast-Iron! Not only that, but it just cooks well.
Cast-iron retains and distributes heat evenly, sears like nobody’s business, and once seasoned well the non-stick surface is damn near incomparable. It comes enameled, which looks nice and doesn’t need to be seasoned.
Nonstick – If you’re just starting out, sometimes it can feel like Nonstick frying pans are the only things you can even make grilled cheese in. If you’re experienced but you initially learned to cook using Nonstick cookware it’s possible you need some practice cooking at appropriate temperatures too. This is something stainless steel and other surfaces demand you gain mastery of, while Nonstick is more forgiving.
Like cast-iron, you can usually find Nonstick pans anywhere. Unlike Cast-Iron, you’ll need to be a bit more selective because it’s not all built the same. The easiest cookware to find is usually coated in Teflon, or is Ceramic. Becoming more popular is Carbon Steel, which needs to be seasoned like cast iron before its nonstick.
Cookware with Teflon surfaces is the least expensive but generally doesn’t last as long. You want to avoid preheating these pans and stay away from metal utensils and harsh cleaning tools so the surface lasts as long as possible. When the cooking surface starts to chip and flake it’s time to replace it. If you’re like me you’ll still hang on to them for a VERY long time, but this isn’t recommended.
Ceramic surfaces will also wear away with time, so you need to be gentle, but they tend to hold up better than Teflon. Carbon Steel can last forever and ever.
I like Scanpan’s TechNIQ line because it’s durable as hell. I’ve mentioned that I’m rough on everything. Having nonstick cookware that can be preheated, put in the oven, and is metal utensil safe is a dream. It’s a bit heavy, but no heavier than any other pieces of similar quality and still lighter than cast iron.
Hexclad Short Review
[amazon table=”10138″]
I’ve had my 7-piece Hexclad Hybrid Cookware with Lids and Wok for almost a year now (it’s January 2021 and I purchased them in April 2020) and they’re good as new. Not a scratch or scuff, and I treat them like I treat all my other cookware – even my heirloom cast iron. It cleans beautifully and is very light – very important again after breaking my hand – and is truly nonstick.
It’s reminded me to be even more patient and deliberate with the temperature when cooking, as the “revolutionary nonstick surface” will quickly seem like a scam if you go cranking up the heat under your omelet. I’ve put it in the dishwasher and it held up fine, but the hexagonal design can hold onto anything stuck in its surface so handwashing is recommended.
Since my initial purchase of the 7 piece set, I’ve acquired the 12″ griddle pan and 6 piece pot set. I love it all, and will probably keep adding to my collection as long as they keep releasing new items! I expect it to last just as long as the lifetime warranty promises.
Skillets
Often referred to as frying pans, I think skillets are needed in any and all kitchens. They work for sunny side up eggs, seared chops, stir-fried vegetables, crispy-edged pancakes, – the list really goes on and on.
8″ – This small skillet is perfect for scrambling eggs and reheating small amounts of leftovers. It’s also good for toasting spices and chiles, and other small-batch stuff. Single grilled cheeses!
10″ – 10″ is a nice, versatile size if you’re limiting yourself to just one. It’ll allow you to fry, sear, or sautee enough food to feed 2-4 people, usually.
12″ – This is a big one, usually heavier and harder to fit on small stoves, but if you want to cook large amounts at once, it’s great. I use mine the most for breakfast to make a bunch of pancakes at once, or home fries.
Saucepans
As important as skillets are saucepans. Anything that’s mostly liquid – soups, stews, sauces, gravies, porridges, etc. – will come together best in a saucepan of some size. They have high sides so stirring and whisking vigorously is safe, and can be found in the same finishes as skillets (just like all cookware). All of my saucepans are by Scanpan.
2 qt. is generally the smallest (I’ve seen 1 qt), good for sauces. 3 qt. is a nice standard size, good for making about 4-6 servings or so, depending on this dish. I recommend having multiples so you can easily prepare multiple sides. 4 qt. is good for multiple servings of soup or pasta.
Windsor Pan – The Holy Grail for grits. This saucepan is medium-sized has sides that taper out slightly at the rim, allowing for even evaporation and cooking. It makes amazing rice, and oatmeal as well. They can be hard to find, especially by name. Sauciers are good substitutes.
Specialty Pieces
Sauté Pan – These are often confused for skillets. You can tell which is which by the sides. Saute pans have straight vertical sides while frying pans have rims that are slanted outward. They can be used for the same purposes, but I think saute pans are much better for dishes that have to be stirred quite a bit. Like stir-frys!
Stockpot – Every kitchen needs at least one really big pot! Great for boiling pasta, steaming seafood, and making huge amounts of soups or sides.
Dutch Oven – Braising is my favorite way to cook (this is why I don’t have a pressure cooker), so Dutch Ovens are a favorite type of cookware. They are heavy, usually enameled, and have tightly fitting lids that help keep things moist during the long, slow process. They are great on the stovetop and in the oven. In my kitchen, they’re interchangeable with ‘Cocettes’ but I’m sure there’s some distinction I’m not aware of.
Braiser – Braisers are basically shallow Dutch Ovens. I especially love them for one-pot dishes that I start on the stove and end in the oven.
Grill Pan – Who doesn’t like grill marks? These allow you to get them on the stovetop and in the oven. I recommend cast iron or another high-heat and oven safe material so you can preheat it before adding anything.
Double-sided Griddle – Pancakes. Tacos. Smashburgers. Steaks. Chicken. Whatever! Double-sided griddles usually have one smooth side and one with grill lines. I like the cast-iron ones that fit over multiple burners, but you can find single burner joints, too.
Wok – Woks can cook pretty much anything. They distribute heat well thanks to the tall, high sides and those same sides lend well to safely deep-frying and vigorous stirring. I don’t use mine often because they work best over flames, not the radiant rings on my stove.
Bakeware
Sheet Pans – If you don’t purchase anything else for your oven, purchase these. Not just for baking cookies, sheet pans are true workhorses. Put them under casseroles and pies before baking to protect your oven. Place one in a 200°F oven and stack pancakes on it as you cook them to keep them warm. Bake an entire dinner – thinly sliced onions, peppers, and chicken for fajitas!
Cooling Racks – If you’re familiar with any of my recipes for fried foods, you’ll know I’m adamant about draining it on wire racks rather than paper towels. Not only does a rack allow the food to stay raised above any puddling oil, but it can be placed into a warm or hot oven.
Baking Pans – You’ll want baking pans of various sizes and materials. Glass, ceramic, and cast-iron are all great choices. I like 8″ and 9″ square pans for brownies and crumbles. For macaroni and cheese, casseroles, and lasagnas I like 9×13″ bakers. For the nicest oven-to-table ones search for “rectangular bakers.”
Round Cake Pans, Cupcake Pans, Loaf Pan and Bundt Pan – 9″ nonstick rounds for layer cakes. Cupcakes pans for cupcakes, muffins, and single serve items. Loaf pans are good for quick bread and pound cake. Bundt pans, for bundt cakes.
Springform Pan – Unparalleled for cheesecakes, quiches, and anything else you need to pop out smoothly after baking.
Pie Pansand Ramekins – I like pie very much. I have fancy ruffle-edged pie dishes and basic boring pie pans in all sizes and in deep-dish and regular depth. Ramekins are great for single-crust individual pies and other random purposes like serving parfaits.
Roasting Pans (and at least one Rack) – If you plan on roasting whole birds and bone-in roasts, you’ll need a roasting pan. You can also find smaller ones for things like potatoes and cornish hens. A rack helps keep it above any fat and drippings during the cooking process, making sure the skin stays nice and crisp all over.
Small Appliances
Food Processor – My Ultimate Tool! With the addition of the shredding and slicing blade, it does everything I need it to. Mostly I shred cheese in it, but it’s also good for shortcutting your way to pie dough, making salsa, and crushing graham crackers and cookies for crusts.
Immersion Blender – Also called a stick blender, I use this when I need to blend something still in the pot like refried beans or a creamy pie filling. Mine has a whisk attachment so it’s nice for making small amounts of whipped cream, too.
Blender – To be completely honest my blender is used mostly for one thing: smoothies. When cooking I prefer my immersion blender, but sometimes – especially when using dried chiles in Mexican and Tex-Mex food – it’s needed for cooking, too.
Stand Mixer – I’m gonna be honest: I wouldn’t bake bread at all if I didn’t have this mixer. You *might* be able to squeeze a cake or cookies out of me if I was really pressed, but breads would not happen.
Hand Mixer – That cake and those cookies I mentioned above? If I didn’t have a stand mixer OR a hand mixer you couldn’t even get those either. There’s very little a hand mixer can’t do that a stand mixer can, but the difference in how hands-on you have to be alone is enough to justify me having both.
Slow Cooker – My slow-cooker is a multi-cooker. I don’t use any of the other functions except “browning” but apparently it bakes, too! Maybe I’ll use that one day. Searing in the crockpot makes making beef stew and roasts much easier. Less cleanup is always good.
Water Filter System – We think a lot about our ingredients when cooking, but water seems an afterthought for most. Tap water is fine, but filtered water is better. I live in an apartment complex within city limits, so it’s important to me.
Welcome to the first post in my new Kitchen Essentials series! Y’all ask about what I use in my own home pretty much daily so I’m going to break it down for you in great detail.
I figured the best place to start would be my Pantry Essentials because with everything going on right now I’ve been fielding a lot more questions about how my kitchen is stocked, and how I handle not being able to visit the grocery store as often as I usually do.